Get started with Django and Jupyter Notebooks on VSCode in minutes
Arohan Subramonia12 min read
This is a guide primarily for developers familiar with Django, looking to add a data analytics or data science element to their web development project.
Don’t have much time and comfortable with Jupyter? Click here to see the initializer file you should create + import into every python script you want to run: Final Code
Want to see an example data analytics script you can use for any Django project? See here: Example Script
Data Science for Web Apps
Django is a (very popular) Python-based framework that helps you build web apps frighteningly quickly. A quick Google/YouTube search for Django tutorials and you’ll have an avalanche of content coming your way.
Jupyter Notebook is a tool that lets you build python scripts fast. It’s especially popular for data science prototyping as it lets you break up your code and re-run parts of your script.
Why merge the two?
Today, data analytics is (and should be) the mantra behind every successful product owner’s launch plan - and as a developers, providing guidance and infrastructure to enable this is extremely valuable. However, combining these two in one stack can lead to some interesting errors and so, I’ve written this article to help you cross these hurdles quicker than I did.
Prerequisites
At this point, you should have a Django development server setup in a virtual environment (if not, there’s plenty of tutorials for that). This setup uses MacOS/OX (though OS shouldn’t matter) with VSCode.
If you don’t have Python already set up in VSCode with a good formatter and would like to, click here.
Configuring Django to run Python scripts without the server
Start by creating a folder inside your Django root directory named python_functions. All your python scripts can live in here.
At this point, if you try and import something from Django (and you don’t have your development server running), you’ll get an error that your settings are not configured. To see the error, type the following into hello.py and run your script:
from django.contrib.auth.models import User
You should see an error message that ends with:
django.core.exceptions.ImproperlyConfigured: Requested setting INSTALLED_APPS, but settings are not configured. You must either define the environment variable DJANGO_SETTINGS_MODULE or call settings.configure() before accessing settings.
This happens because without running manage.py, Django doesn’t configure and run your project - and so doesn’t know where to import modules from.
To fix this, we’ll need to firstly specify an environment variable to our settings file and then call the setup function. As we’ll have to do this for every python script we write, let’s do all the setup in a separate script, and import it into hello.py.
Creating an initialiser script
Create a new file in the python_functions directory called django_initializer.py. In this file, we first set an environment variable pointing to our settings.py file, then run the function to setup Django.
But we’re not done yet! As django_initializer.py isn’t in the project’s root directory, python won’t recognise "arcwebsite.settings" as a legitimate path. To fix this, we need to manually add the project root directory to the python path.
Altogether, here’s what we’ve got in django_initializer.py:
  # A script that's needed to setup django if it's not already running on a server.
  # Without this, you won't be able to import django modules
  import sys, os, django

  # Find the project base directory
  BASE_DIR = os.path.dirname(os.path.dirname(os.path.abspath(__file__)))

  # Add the project base directory to the sys.path
  # This means the script will look in the base directory for any module imports
  # Therefore you'll be able to import analysis.models etc
  sys.path.insert(0, BASE_DIR)

  # The DJANGO_SETTINGS_MODULE has to be set to allow us to access django imports
  os.environ.setdefault("DJANGO_SETTINGS_MODULE", "arcwebsite.settings")

  # This is for setting up django
  django.setup()
Remember, this is separate to the actual file we want to run, as seen below:
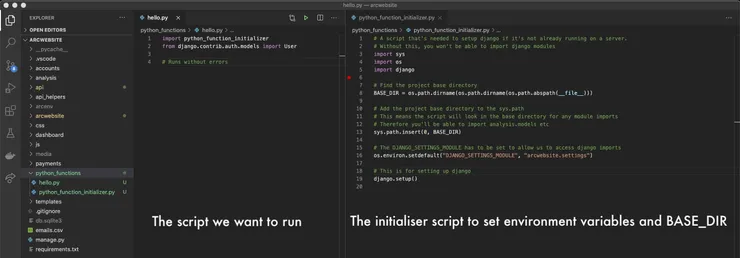 Make sure the initialiser script is in the same folder as your actual script
Run hello.py once more, and you should see it work with no problems!
Now, you’ve got a setup to run Python scripts to analyse your data, that can interact with your Django database even when your server isn’t running. This is especially useful when prototyping on a local machine before deploying any scripts to production.
The final step is to set up Jupyter Notebook in VSCode, to interact with your Django project.
Setting up Jupyter Notebook in VSCode for a Django Project
Why Jupyter Notebook?
Jupyter Notebook is a tool by Project Jupyter to make data science modelling and prototyping easy. One of the main benefits is the ability to split large procedural programming scripts into individual lines or blocks, written in ‘cells’, and run them one at a time.
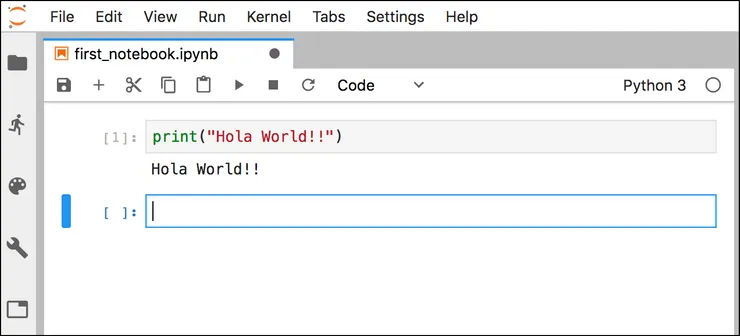 An example use of the cell-by-cell feature of a Jupyter Notebook
Running cells individually has a lot of benefits - for one, you can split your script into data collection, pre-processing, model training, and prediction steps, and run these segments individually. This can be especially useful when tweaking hyper-parameters on your models for example (or for any other instances you may want to re-run just one section of code from your script).
Jupyter Notebooks can of course be run in the browser, rather than in VSCode, using the following command:
(myenv) $ python manage.py shell_plus --notebook
With this however, you wouldn’t get the benefit of other VSCode extensions on your ipynb file, and easy access to your non-python files within the same code editor. Thus, setting up Jupyter inside VSCode makes our dev experience that little bit better.
Installing Jupyter Notebook in Django
So let’s get started. First we’ll need to install Jupyter and django-extensions. django-extensions is a collection of custom extensions for the Django Framework. It’s often needed to support many other custom packages such as this one.
Run this command in your terminal:
(myenv) $ pip install jupyter django-extensions
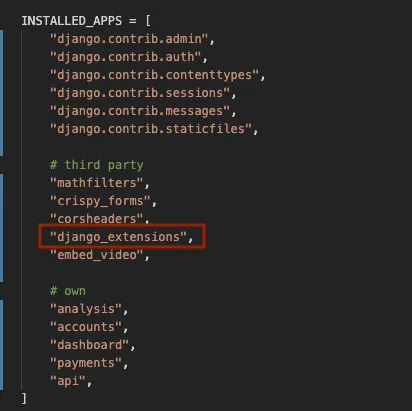
Next, add django_extensions to your INSTALLED_APPS in settings.py and restart the django server:
As we’re already using VSCode with the Python extension, we can create a new Notebook quite easily. Simply bring up the command bar (cmd+shift+P) and select in ‘Create New Blank Jupyter Notebook’.
![Screenshot of VSCode search bar [use cmd+shift+P] with 'Create new Blank Jupyter Notebook' typed in](/_astro/image10.BQXhYNTa_Z4qYO5.webp)
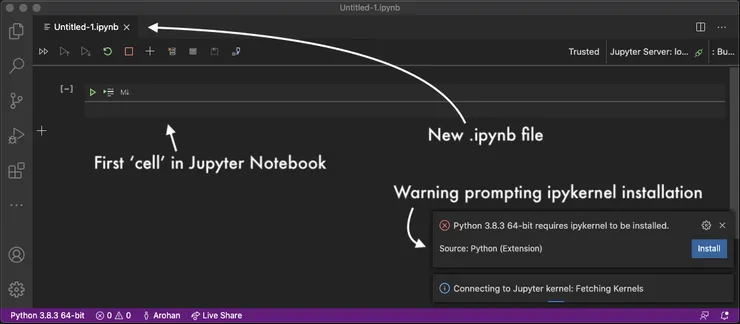
After opening your first .ipynb file (the file extension for Jupyter Notebooks) you should get a VSCode warning prompting you to install an ipykernel. Click on ‘install’ when this pops up. Once installed, you won’t need to do this again for any subsequent notebook files you create in the same virtual environment.
NB: This will change how your shell looks when you run python manage.py shell on the command line - but unless you’ve manually customised the default Django shell to your liking, this shouldn’t be a problem.
Now, copy over the contents of hello.py (the two imports) into the new .ipynb file, and press run - your code should run without any errors!
Now let’s try a simple queryset operation. Add a line to display the first user on your system (or an equivalent queryset operation):
print(User.objects.all()[0])
There’s an error!
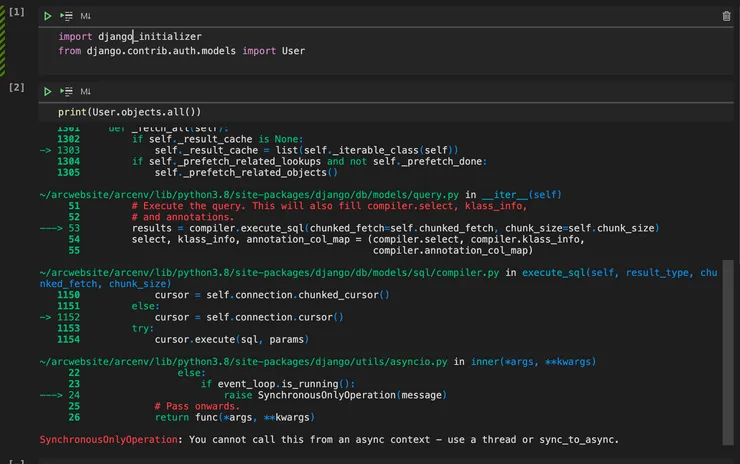 Running queryset operations with the default setup causes errors
On closer inspection, you should see the error message ends with:
SynchronousOnlyOperation: You cannot call this from an async context - use a thread or sync_to_async.
Why does this error occur?
Skip to the next section if you’d just like the fix!
Django was originally built with the WSGI standard in mind - a standard for synchronous Python web servers, frameworks and applications. With the release of Django 3.0 came support for ASGI, a standard for asynchronous applications, allowing developers to create applications designed to run in an async context.
However, certain key parts of Django rely on a global state being maintained, which is not coroutine-aware (i.e. not able to run in an async context). The most prominent example of this is Django’s ORM (object-relational mapper) - essentially, its queryset filtering features, which allows you to interact with an SQL database through Python.
Running any of these sync-only Django functions in an async context gives you the SynchronousOnlyOperation error. The ideal way to deal with this is to wrap your function in Django’s sync_ to _async(), but for a Jupyter Notebook where the async context is forced onto us by the environment (not our code), we need to manually allow sync-only operations, by setting DJANGO_ALLOW_ASYNC_UNSAFE to true. The Django documentation also has a section explaining async safety and has stated that async support for the ORM will be available in future releases.
Fixing the SynchronousOnlyOperation Error
The quickest way to fix this is by setting another environment variable. Go to django_initializer.py and add:
os.environ["DJANGO_ALLOW_ASYNC_UNSAFE"] = "true"
Which means django_initialiser.py in its final state now looks like:
# A script that's needed to setup django if it's not already running on a server.
# Without this, you won't be able to import django modules
import sys, os, django

# Find the project base directory
BASE_DIR = os.path.dirname(os.path.dirname(os.path.abspath(__file__)))

# Add the project base directory to the sys.path
# This means the script will look in the base directory for any module imports
# Therefore you'll be able to import analysis.models etc
sys.path.insert(0, BASE_DIR)

# The DJANGO_SETTINGS_MODULE has to be set to allow us to access django imports
os.environ.setdefault("DJANGO_SETTINGS_MODULE", "arcwebsite.settings")

#  Allow queryset filtering asynchronously when running in a Jupyter notebook
os.environ["DJANGO_ALLOW_ASYNC_UNSAFE"] = "true"

# This is for setting up django
django.setup()
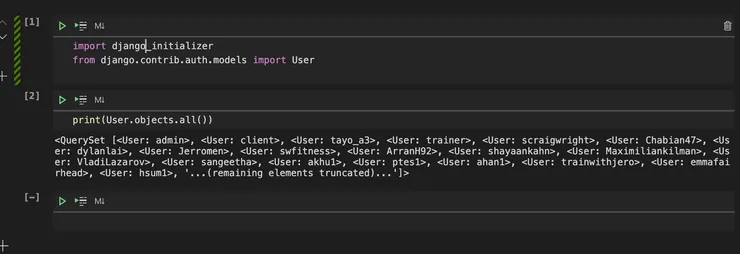
Finally, reload the window and run the ipynb script again. You should get a success!
Finishing Touches
To recap - we’ve configured Django to give us access to the framework without the server running and set up a dev environment with Jupyter Notebooks for easy prototyping and testing of data analytics scripts.
With these tools, you should now be able to run Python scripts inside of VSCode with familiar data science packages such as scikit-learn, pandas, and matplotlib, just as you would with a regular Jupyter Notebook - as well as have access to your Django database with queryset filtering.
Good luck!
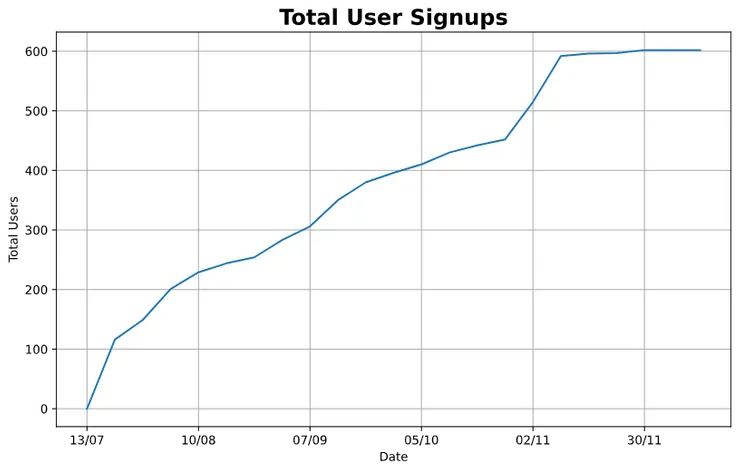
Start Tracking Website Metrics - An Example
Here’s an example script to track the total number of weekly user sign ups on your Django app from a given start date. Note that there are some dependencies required that haven’t been mentioned in this tutorial, but after installing them, you should be good to go!
# Imports
import django_initializer

from django.contrib.auth.models import User
from analysis.models import WorkoutEntry
from datetime import datetime, timedelta
import pytz
import time
import pandas as pd
import numpy as np
import matplotlib.pyplot as plt

pd.set_option('display.max_rows', 500)
pd.set_option('display.max_columns', 500)
pd.set_option('display.width', 1000)

# Set a start date
start_date = datetime(2020, 7, 13, tzinfo=pytz.UTC)
today = pytz.utc.localize(datetime.today())

# Setup for weekly metrics
week_start = start_date
weeks = []
while week_start <= today:
    weeks.append(week_start)
    week_start += timedelta(days=7)
    week_strings = [week.strftime("%d/%m") for week in weeks]

# Count number of cumulative sign ups
tot_users = [] # total users
pc_growth = [] # percentage growth week on week
for (index, week) in enumerate(weeks):
    weekly_signups = User.objects.filter(is_active=True).filter(date_joined__gte=start_date).filter(date_joined__lt=weeks[index])
    tot_users.append(len(weekly_signups))
    if index > 1:
        pc_growth.append(np.around((100* (tot_users[index] - tot_users[index-1]))/(tot_users[index-1]), 2))
    else:
        pc_growth.append(0)
users_per_week_df = pd.DataFrame({"tot_users":tot_users, "pc_growth":pc_growth}, index=week_strings)

print(np.mean(np.around(pc_growth, 2)))
print(users_per_week_df)

fig, axs = plt.subplots(figsize=(10,6))
axs.plot(users_per_week_df["tot_users"])
axs.set_xticks(axs.get_xticks()[::4])
axs.set_xlabel("Date")
axs.set_ylabel("Total Users")
axs.set_title("Total User Signups",{'fontsize': 18, 'fontweight': 600})
axs.grid()
plt.show()
Setting up Python in VSCode with the Black Formatter [optional]
We’ll be adding the Python extension to VSCode, setting a virtual environment and setting up a formatter that you can customise to your preference.
The first step is to ensure a great developer experience for programming in Python in VSCode. For this, you’ll first need the VSCode Python extension, which you can find by simply searching for ‘Python’ in the extension sidebar. As of June 2020, there’s also the new ‘Pylance’ extension, which is also suitable.
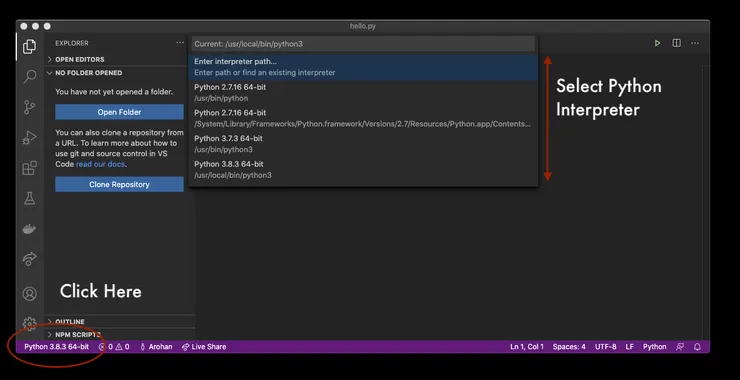
Download this and reload the developer window (cmd+shift+P, type in ‘reload’ and you should see the command) and open a .py file. You should then see the Python version and interpreter in the bottom left corner of the screen. If it doesn’t show your chosen virtual environment settings, click on it to update the settings to the interpreter of your choice (select from the dropdown or type in the path required).
Next, we’ll set up the formatter - we’re going to use Black (Github). As Black is usually installed and run via the command line, we’ll have to do some extra work to integrate it into VSCode, and run every time we save a file.
There’s no Black VSCode extension, so we’ll have to install it the old fashioned way. In your terminal, run:
(myenv) $ pip install black
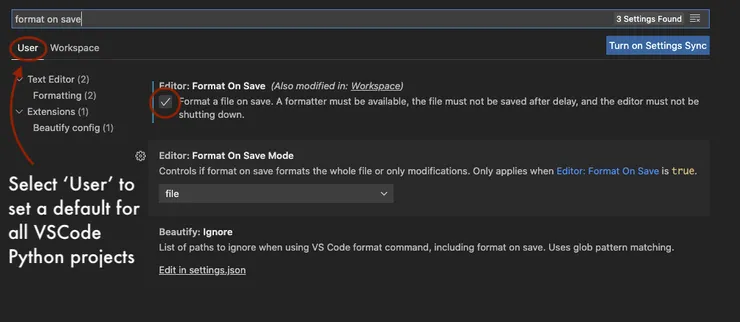
Next, open your workspace settings (cmd+shift+P, type “settings”, and select ‘Workspace Settings’ without JSON). In the search bar at the top, search ‘format on save’, then check the checkbox:
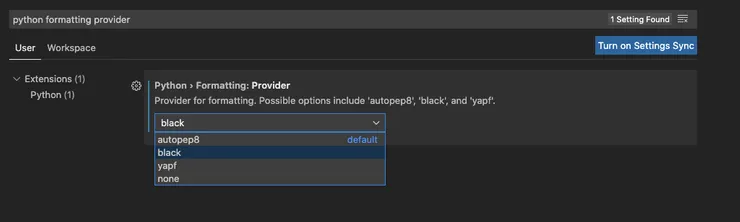
Finally, type in ‘python formatting provider’ and select ‘black’ from the dropdown:
Now reload your window, create a .py file and each time you save, you should see the words ‘formatting with black’ flicker on and off on the bottom information bar (in line with your python interpreter details). The next step is optional, and for those who want to customise Black.
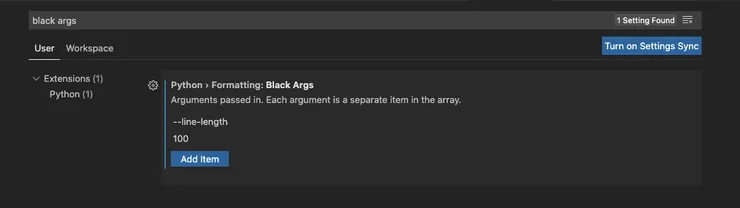
When running Black from the command line, you can pass in a list of arguments for custom preferences. To set these, go back into your VSCode settings and search ‘black args’. You can then pass in individual strings. For example, to set maximum line length to 100 characters:
That’s all you need - now your VSCode should be set up to code in Python, with automatic formatting on save.