Using web technologies to build Adobe extensions
Mario Igkiempor11 min read
If you need to build an extension for Adobe Creative Cloud products (like Illustrator), but don’t know where to start, this article is for you. I will share our experience of creating an extension, a sample repo to get you started, some tips and tricks, and a few gotchas we encountered.
A minimal extension can be found here. To quickly get up and started:
$ git clone https://github.com/MariosIgkiempor/minimal-cep-extension
$ pnpm project-setup
$ pnpm dev
Then, open Adobe Illustrator. You should see a screen like this:
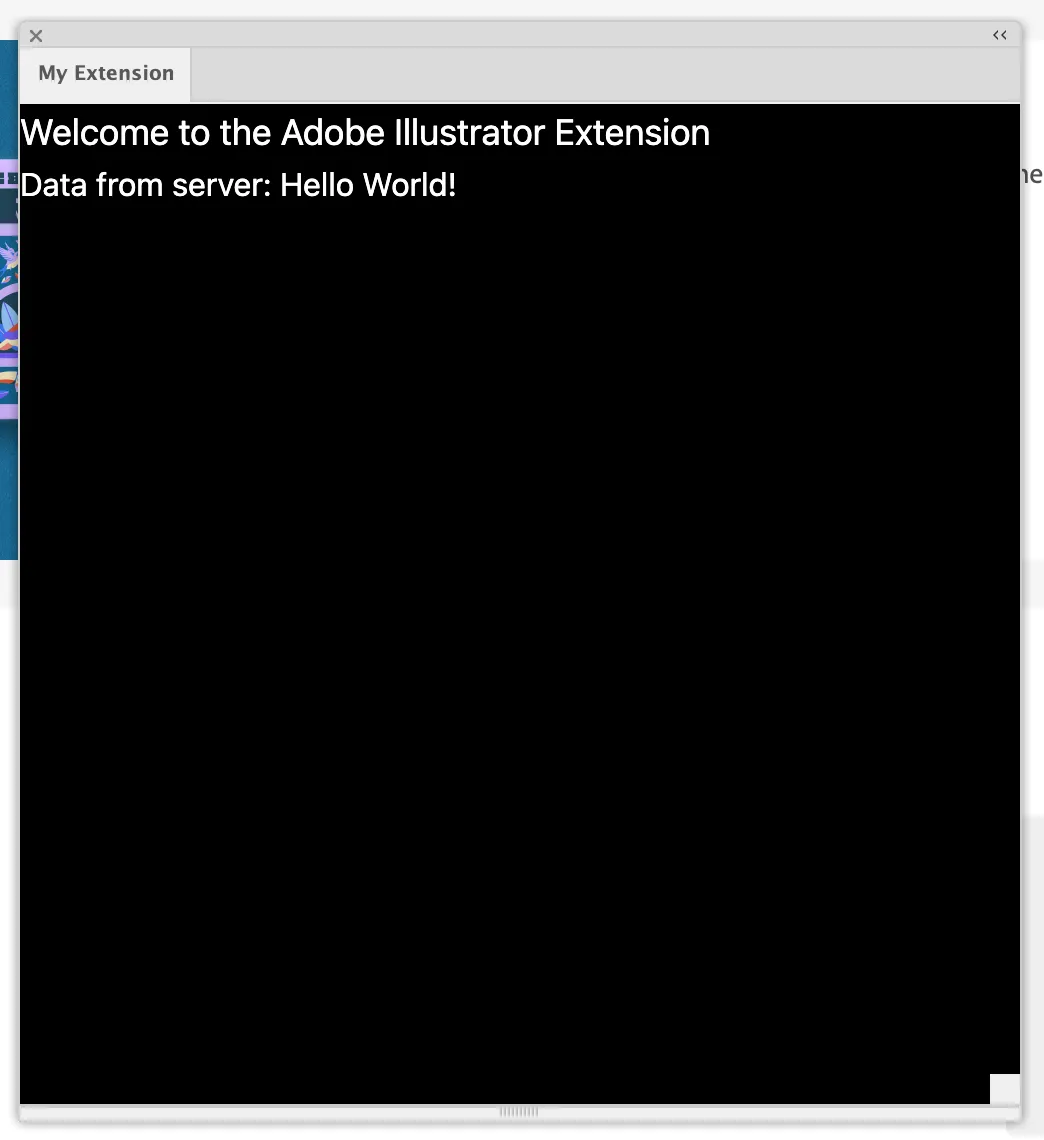
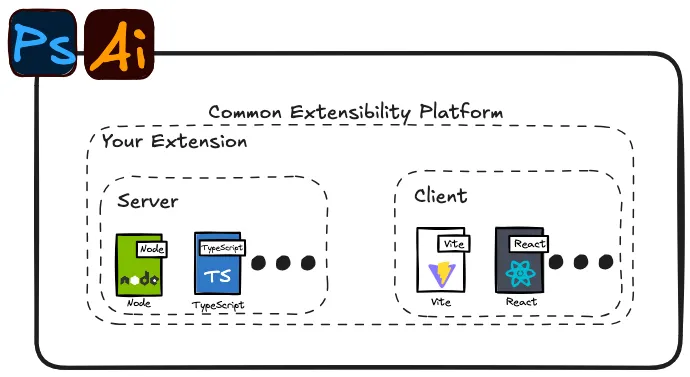
This minimal extension implements a server-client infrastructure, using Express and React, which I will explain in this post. But first let me explain how Adobe extensions are created.
Adobe Extension Platforms
While reading about creating extensions for Adobe products, you may encounter a few different platforms:
- The C++ SDK to create plugins
- This is a common, but older way of creating extensions
- The web-based Common Extensibility Platform (CEP) for extensions.
- The Unified Extensibility Platform (UXP), a newer web-based plugin platform
- Unfortunately, this is not available for Illustrator, which we needed to make an extension for.
We’ll focus on the CEP for this article.
What is the CEP?
CEP is an integrated web-based environment for creating extensions for Adobe Creative Cloud products.
Adobe package a (very old) version of Chrome and a (even older) version of NodeJS with the applications that support the CEP. You can use any combination of these platforms to create your plugin.
These extensions can interact with the “host” Adobe application (e.g. Illustrator, Photoshop, etc.) through a proprietary subset of JavaScript called ExtendScript, which provides functionality like opening and saving files, and interacting with the contents of the native host app.
Project Structure
The CEP is pretty relaxed in how you structure your project.
You must include a /CSXS/manifest.xml at the root of your project for Adobe apps to register your extension.
You probably also want the CSInterface.js library somewhere in your code base, to interact with the host app.
Other than that, you are free to include any other libraries, frameworks and assets.
Your project structure might look something like this:
project/
├─ CSXS/
│  ├─ manifest.xml
├─ lib/
│  ├─ CSInterface.js
├─ src/
│  ├─ main.js
│  ├─ index.html
The Manifest
When an Adobe app launches, it will load all of the extensions in the designated installation folders, regardless of if they’re being used or not (this made “hot-reloading” annoying to implement). For each extension, the app will parse its manifest, which is an XML configuration file which explains to the app how the extension will behave.
The Adobe CEP Getting Started Guides Github Repo documents how to configure your manifest.xml.
Some things that were not obvious:
- Your “extension” is actually a bundle, which can contain multiple extensions. This is how you would implement a server / client infrastructure within 1 extension
- Each extensions’ entry point must be a single
index.html. - Even if you are making an invisible extension (like a server or background process), you still need to provide a
geometryandsizeattribute in your manifest. Your extension will not load if it doesn’t have a size attribute, even if it is not rendering anything.- Illustrator fails silently in this case
- See the example Manifest below
- If you want your extension to open its window when the host app launches, include the
<AutoVisible>true</AutoVisible>setting in your manifest.- Without this, the user would have to click
Window > Extensions > Your Extensionto open it
- Without this, the user would have to click
- You can customize the icons Icons for your extension - see example below
Below is a sample manifest file, which showcases configuring multiple extensions in a single bundle.
<?xml version="1.0" encoding="UTF-8" standalone="no"?>

<ExtensionManifest xmlns:xsi="http://www.w3.org/2001/XMLSchema-instance" ExtensionBundleId="com.myextension" ExtensionBundleName="myextension" ExtensionBundleVersion="1.0.0" Version="12.0">
  <ExtensionList>
    <Extension Id="com.myextension.server" Version="1.0"/>
    <Extension Id="com.myextension.client" Version="1.0"/>
  </ExtensionList>
  <ExecutionEnvironment>
    <HostList>
      <Host Name="ILST" Version="17.0" />
    </HostList>
    <LocaleList>
      <Locale Code="All"/>
    </LocaleList>
    <RequiredRuntimeList>
      <RequiredRuntime Name="CSXS" Version="12.0" />
    </RequiredRuntimeList>
  </ExecutionEnvironment>
  <DispatchInfoList>
    <Extension Id="com.myextension.server">
      <DispatchInfo>
        <Resources>
          <!-- ⚠️ Your entry point still needs to be a HTML file -->
          <MainPath>./server/index.server.html</MainPath>
          <CEFCommandLine>
            <!-- ⚠️ Required parameter to enable Node.js support -->
            <Parameter>--enable-nodejs</Parameter>
          </CEFCommandLine>
        </Resources>
        <Lifecycle>
          <AutoVisible>false</AutoVisible>
        </Lifecycle>
        <!-- ⚠️ Still need to define UI properties, despite it being an invisible extension -->
        <UI>
          <Type>Custom</Type>
          <Icons>
            <Icon Type="Normal">./images/IconLight.png</Icon>
            <Icon Type="RollOver">./images/IconLight.png</Icon>
            <Icon Type="DarkNormal">./images/IconDark.png</Icon>
            <Icon Type="DarkRollOver">./images/IconDark.png</Icon>
          </Icons>
          <Geometry>
            <Size>
              <Height>10</Height>
              <Width>10</Width>
            </Size>
          </Geometry>
        </UI>
      </DispatchInfo>
    </Extension>
    <Extension Id="com.myextension.client">
      <!-- Normal client extension config -->
    </Extension>
  </DispatchInfoList>
</ExtensionManifest>
Client-Server Architecture
We needed a Node.js process running in the background. In our case, this was an Express server, but the same principles can be applied to any Node.js process, library, or framework.
The setup is… interesting: since the entry point to a CEP extension is always an index.html file, you need to load your Node JS app inside a browser.
Luckily, CEP injects the cep_node object into the browser which allows you to load code into the NodeJS context.
If you need a client-server architecture for your extension:
- Setup your extensions manifest (see above)
- Remember, your “extension” is actually a bundle. You’ll need to define two “extensions” in your manifest: one for the “client”, and one for the “server”.
- In your server manifest configuration, you’ll need the
<Parameter>--enable-nodejs</Parameter>setting (see example manifest above). This exposes thecep_nodehelper object
-
Set up your server entry point:
<!-- ./server/index.server.html --> <!DOCTYPE html> <html> <head> <meta charset="utf-8" /> <script type="module"> // ⚠️ cep_node is an object that the CEP runtime exposes const path = cep_node.require("path"); // ⚠️ use the CSInterface to query for the path of our extension const csInterface = new CSInterface(); const extensionRoot = csInterface.getSystemPath(SystemPath.EXTENSION); // ⚠️ load the application into the cep_node context cep_node.require(path.join(extensionRoot, "server", "main.js")); </script> <title>Local Server</title> </head> <body></body> </html> -
Write your
server/main.js- this is a normal Node app running on the version of Node packaged with your version of CEP. -
Write your client as normal
Development and Debugging
Debug Server
Adobe provide a built-in debugger for their apps. To enable this, create a .debug file at the root of your repository. This file should contain an XML definition of your debugging setup:
<?xml version="1.0" encoding="UTF-8"?>
<ExtensionList>
  <Extension Id="com.myextension.client">
		<!-- ⚠️ For each Adobe app you want to debug, add a Host to the HostList with a unique port -->
    <HostList>
	    <!-- ⚠️ App Name Options: DRWV, FLPR, IDSN, AICY, ILST, PHSP, PHXS, PPRO, PRLD, AEFT, DEMO -->
      <Host Name="ILST" Port="8705"/>
    </HostList>
  </Extension>
  <!-- ⚠️ Remember, each Extension Bundle may contain multiple extensions. You can define multiple debug ports per Bundle, one for each Extension -->
  <Extension Id="com.myextension.server">
    <HostList>
      <Host Name="ILST" Port="8805"/>
    </HostList>
  </Extension>
</ExtensionList>
With your .debug file in your Extension Bundle folder, and one of the specified Host apps running, you can navigate to http://localhost:<DEBUG_PORT> in your browser to see the debugger for that extension running in the specified app.
We found it most useful for “frontend” extensions, where you get the full suite of Chrome Debug Tools available to you.
The debug server starts a Websocket server that forwards events to and from the host application.
This means you can visit http://localhost:<DEBUG_PORT>, take some actions in your browser, and see these reflected in your host app.
“Hot”-Reloading
The fact that Adobe Illustrator loads extensions at start-up makes the development process slow: any time you make a code change, you have to re-start Illustrator.
Here are some steps you can take to ease this process:
- Symlink your development repo to the Adobe extensions folder
/Library/Application\ Support/Adobe/CEP/extensions- This way you don’t have to manually copy the folder every time you make a change
- Add a refresh button to your frontend - you can hit this to refresh the page, which will reload the script tags in your
index.htmland load the latest changes- The simplest implementation would be
<button onclick="location.reload()"> - You can (and probably should) hide this when you release
- The simplest implementation would be
-
If you are running a Node app without a frontend (eg a server), run the Node app separately in development, and package it for production
- We had an
index.server.dev.htmlwhich was mostly empty, and aindex.server.prod.htmlwhich loaded the server for production - In development, we ran
npm run devto run the server- This let us view
console.logs in our console - Without this, we would not be able to view logs from the express server - these do not appear in the browser devtools, even with a
.debugconfigured properly
- This let us view
- We had an
-
You could configure Vite to not append the hash it usually does to build artifacts
- Usually Vite will append a hash to its build artifacts (like
index-<hash>.js) - Since the usual entry point is an
index.htmlfile, you would have to point theindex.htmlfile at the hashedindex-<hash>.js - When Vite re-builds, the hash will change, and your
index.htmlwill be pointing at an out-of-date hash - If you tell Vite not to hash its artifacts, you can use
vite devand run your development server as usual
- Usually Vite will append a hash to its build artifacts (like
-
You could also use a polyfill (or make your own), which would allow you to run the whole extension in the browser
Debugging our Node Process
Since we were running our Express server in a separate terminal (to allow “hot-reloading”), and not through the normal CEP browser context, we could not see logs from debug Chrome Debug Tools.
This required us to have a separate entry point index.server.dev.html for our development setup.
This entry point did not load the server into the Node.js context using the cep_node object, so that we could run the server separately.
We then had a separate index.server.prod.html entry point for our production server.
This entry point did load the server into the Node.js context in production so that we could package the server and distribute it.
Logs
Illustrator dumps logs to files in the ~/Library/Logs/CSXS directory. In this directory, there are different log files - some are logs that come from the Adobe host app, some are logs from your extension. You can tail any of these files, or
tail ~/Library/Logs/CSXS/*
to view all logs.
More info available here.
If your extension is a frontend extension, you can use the browser’s Console and Network tabs for more information.
Packaging
Adobe provide a command line tool (ZXPSignCmd) to package your extensions.
There are binaries available on MacOS and Windows, and (in-theory) both produce cross-platform extensions. I say “in-theory” because as of writing this, there is a bug preventing extensions signed on one platform from being loaded on another. Adobe is working on a fix. While cross-platform packaging is broken, you will have to package your extension on your target operating system.
To package your extension, you must first create a certificate. You can do this using the ZXPSignCmd, or using a Certificate Authority.
To create a certificate using the ZXPSignCmd:
./ZXPSignCmd -selfSignedCert <COUNTRY_CODE> <CITY_CODE> <ORGANISATION_NAME> <PERSON_NAME> <CERTIFICATE_PASSWORD> ~/path/to/destination/certificate.p12 -validityDays <VALIDITY_DAYS>
Once you have a certificate, you can package your extension:
./ZXPSignCmd -sign <INPUT_PACKAGE_DIRECTORY> <OUTPUT_PATH> <CERTIFICATE_PATH> <CERTIFICATE_PASSWORD>
Once you have your .zxp file, you are ready to distribute.
More information about ZXPSignCmd is available here.
Distribution
The Adobe Creative Cloud application comes with a command-line application called UnifiedPluginInstallerAgent (UPIA).
This tool allows you to install ZXP packages, simply by running UnifiedPluginInstallerAgent --install <PATH_TO_ZXP> .
You can also uninstall extensions: UnifiedPluginInstallerAgent --remove <EXTENSION_ID> .
On MacOS, the executable is located in
/Library/Application Support/Adobe/Adobe Desktop Common/RemoteComponents/UPI/UnifiedPluginInstallerAgent/UnifiedPluginInstallerAgent.app/Contents/MacOS/
On Windows, the executable is in
C:\Program Files\Common Files\Adobe\Adobe Desktop Common\RemoteComponents\UPI\UnifiedPluginInstallerAgent\UnifiedPluginInstallerAgent.exe
This tool also allows you to list and remove extensions. More information can be found here.
We ran into some unexpected (and unexplained) error codes when using the UPIA. This page explains some of the error codes you might see when using the tool.
Resources
- The CEP 12 HTML Extension Cookbook is a great resource provided by Adobe which explains
- The Extendscript API Reference by Yearbook Machine

Mario Igkiempor
Developer at Theodo UK