How to add cache in your web application
Quentin Scabello7 min read

In my recent project, I added a cool new feature: if our third-party provider didn’t have your company address, you can pop it in yourself ! But guess what ? When I tried it out in a test environment, it didn’t play ball, even though it worked like a charm on my local setup. The culprit ? A sneaky cache issue when calling the third-party provider. Dive into this article, and I’ll share what I uncovered and learned !
First, what is a cache?
A cache is a hardware or software component used to temporarily store data in a computing environment. Caches were created to improve processor performance by allowing them to access data without retrieving it from central memory.

Browser Caching
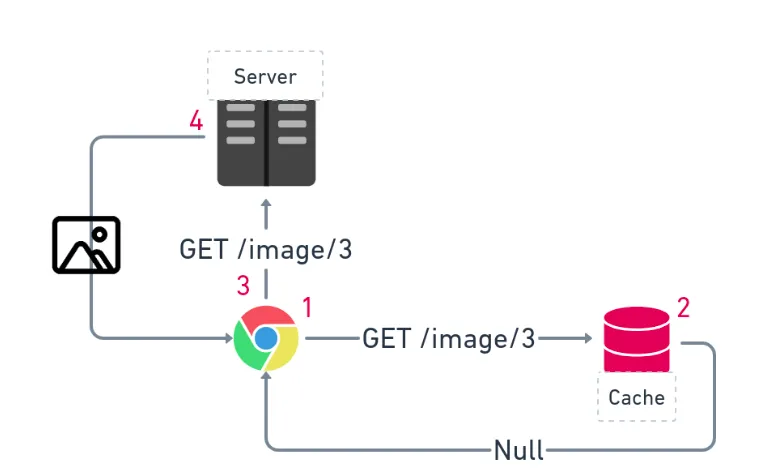
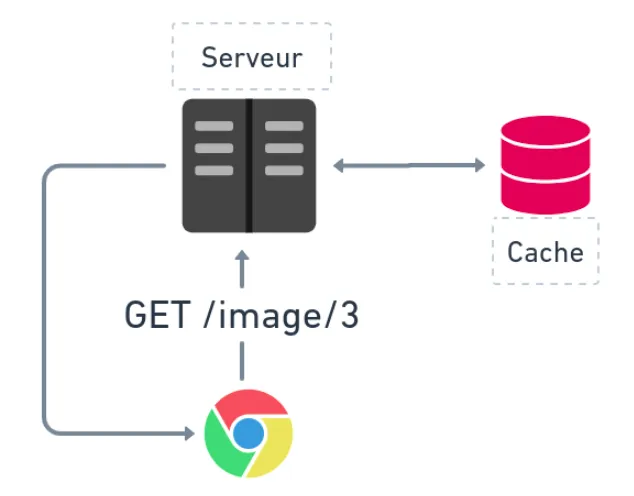
Let’s talk about browser cache. Every browser has a cache. The way it works is quite simple: when your browser requests a resource from a server, it checks its cache for that resource. If it finds it, it will not request the server; if not, it will call the server. When the server responds with the resource, the browser will cache the data.
Cache-Control
The browser will use the “cache-control” header from the response to cache the requested resource. This header contains directives for browser caching. To simply understand caching, a resource is considered fresh when it’s still valid and can be reused. The resource is considered stale when it has been in the cache for too long and has expired. It cannot be reused.

Here are some examples:
- No-cache. The resource can be cached, but it needs to be validated with the origin server for every reuse
- Public / Private. The answer may be cached in a shared / private cache
- Must-revalidate. The resource can be stored and reused while fresh. When the resource becomes expired. It must be validated with the origin server before reuse
- Max-age. The max-age=N response directive indicates that the response remains fresh until N seconds after the response is generated.
You can find all the directives for cache control on the mcn documentation.
Validating a stale resource
To validate a resource, your browser can request the origin server using a header like last-modified or Etag. The Last-Modified header contains a date indicating the last time the resource was modified. If this date is available, your browser will send a request to the origin server with an If-Modified-Since header. If the resource has not been modified since that date, the server will respond with a 304 Not Modified status code, indicating that the cached version can be used. Otherwise, the server will provide the updated resource.
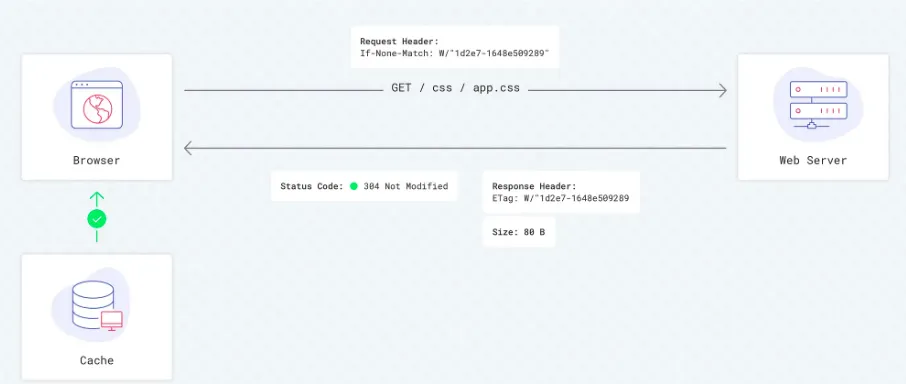
The Etag header is a unique identifier for a resource that is generated by the server. If the resource changes, the Etag changes as well. To validate a resource using its Etag, send a request to the origin server with the header “If-None-Match” followed by the Etag. The server will respond with a 304 status code or the updated resource. The advantage of checking a resource is that a 304 response from the server is much smaller than a full resource. There is no body and nothing to parse or download
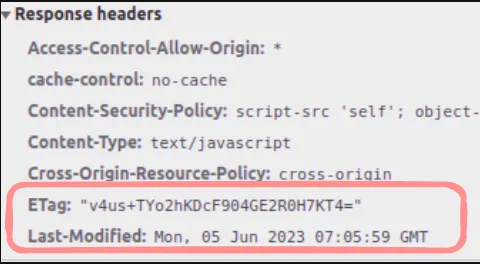
You can easily find cache information in the DevTools by checking if a request uses cached resources (indicated by a 304 status code), or by directly viewing the cached data in the Application tab.
Caching in a Java application
Let’s talk about caching in web applications. Caching is a broad concept with many use cases, such as:
- Caching an HTTP request made by a client or server to a third-party
application.
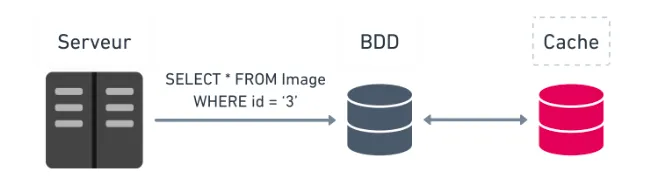
- Caching a database request.
- Caching the result of a method on the server that may perform a database or HTTP
request.

To resolve my problem, I had to delve deep into the third option. For Java web applications, there are several well-known caching solutions available, including Memcached, Varnish, Ignite, and Redis. I used Redis, which was already used in my project.
Redis
![]() Redis (for Remote Dictionary Server) is an open-source key/value database. Redis is known to be fast, having a large
variety of stock types and having a possibility of data persistence.
Redis (for Remote Dictionary Server) is an open-source key/value database. Redis is known to be fast, having a large
variety of stock types and having a possibility of data persistence.
There are two main libraries for Redis in Java: Lettuce and Jedis.

To establish a connection between the server and the Redis instance, we will use Lettuce. For caching purposes, Jedis will be used in the code.
To enable caching behaviour, we need to create a configuration file with two annotations:
@EnableCaching and @Configuration.
@Configuration indicates that the class has one or more @Bean definition methods. @EnableCaching
triggers a process
where every Bean is scanned for a potential public method with @Cache. If some methods are found, a proxy is
created to
intercept the method calls and handle the caching behaviour.
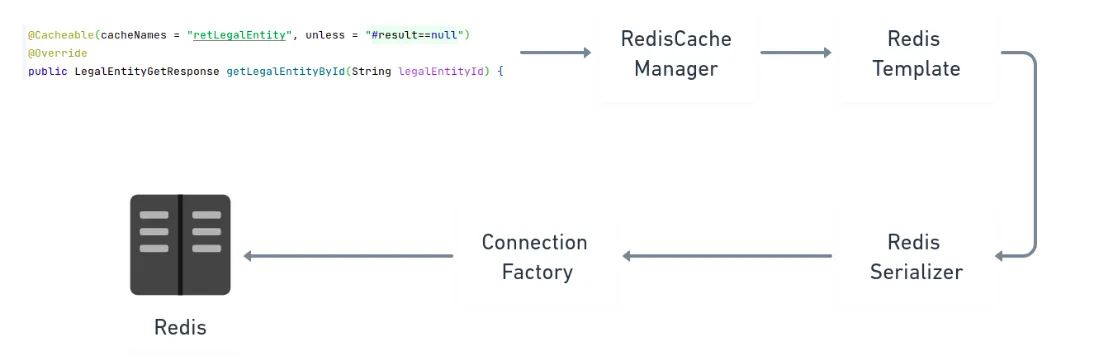
Cached method calls are intercepted by a component named RedisCacheManager, which calls the RedisTemplate.
This last
component is essential because developers can use it to perform specific operations in the cache, such as reading,
writing, or testing the existence of a value. The RedisTemplate then uses the connection to call the Redis
instance.
However, before that, the RedisTemplate needs to serialize the cached object since Redis doesn’t understand Java
objects. That’s where the RedisSerializer comes into play. It serializes or deserializes objects to be used by
Redis or
the application.
This completes the Redis work chain.
Good practices when caching
Finally, we will discuss some best practices for using Redis.
Pay attention to your key
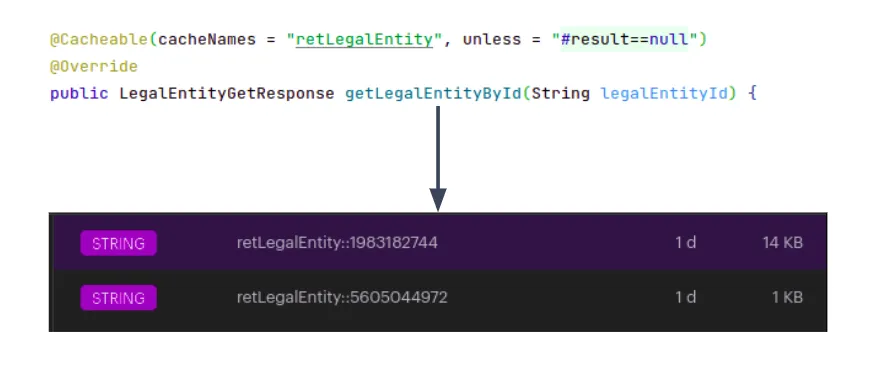
As previously stated, Redis is a key-value database. When caching the result of a cacheable method, Redis uses the
method arguments to create the key. If your method only has zero, only one entry will be in your cache. Of your method
has one simple argument (such as a number or a string), the key will be simple.
 However, if your method uses more
arguments or more complex arguments, such as lists or custom objects, you need to be careful.
However, if your method uses more
arguments or more complex arguments, such as lists or custom objects, you need to be careful.
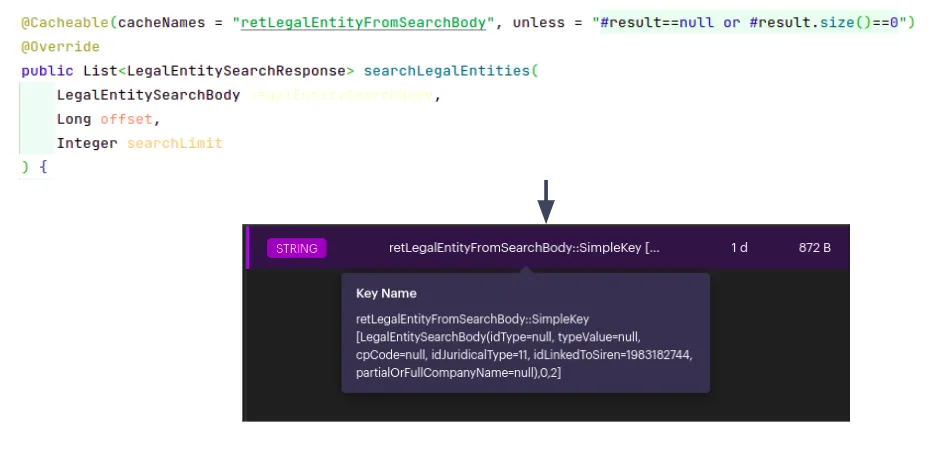 As you can see, Redis will build a key using all the arguments. If you want to retrieve this value, you will need to
build the string representing all your arguments. That’s very difficult. To resolve this problem, you can build a custom
key by using the parameter KeyGenerator from the annotation
As you can see, Redis will build a key using all the arguments. If you want to retrieve this value, you will need to
build the string representing all your arguments. That’s very difficult. To resolve this problem, you can build a custom
key by using the parameter KeyGenerator from the annotation @Cacheable. You just need to implement an interface
composed of one method.
Pay attention to the freshness of your data
It is important to ensure the freshness of your data in the cache. For instance, consider caching a method that returns
user information with an address. If a user changes their address, you need to catch this change and either modify your
cached data or delete the corresponding line in your cache.
You can modify or delete a value in your cache using either of two methods:
Use the RedisTemplate. It offers many useful functions for performing CRUD operations in your cache.
Use annotations such as @CachePut or @CacheEvict.
Use @CachePut on the method that modifies your cached data to update
the modified data in the cache.
public class UserService {
    ...

  @CachePut(value = "user", key = "#userId")
  public User patchUserInfo(User user, Long userId) {
    return to(userRepository.save(to(user, userId)));
  }
}
Use @CacheEvict to delete the value in your cache.
public interface UserRepository extends JpaRepository<UserEntity, UUID> {

  @CacheEvict(cacheNames = "user", key = "#userEntity.userId")
  @Override
  UserEntity save(UserEntity userEntity);
}
Conclusion
By using the cache-control header, browsers are able to cache resources such as images, scripts, or HTTP responses. In Java, Redis can be used to easily cache data throughout your application.
Caching can greatly enhance performance by minimizing redundant HTTP or method calls. However, it is important to exercise caution when implementing caching, as a small mistake can result in troublesome bugs. It is not a miraculous solution that resolves all performance issues.