Communicating with BLE devices with Expo mobile apps
Rohan Samuel10 min read

In this article, we will be understanding what BLE (Bluetooth Low Energy) is, the use cases for BLE, how the GATT profile defines how BLE devices communicate with each other, and using these concepts to build a React Native mobile app with Expo and Expo Config Plugins that can scan, connect, read and write data to a nearby BLE device.
What is BLE (Bluetooth Low Energy)?
BLE (Bluetooth Low Energy) is a low power personal area network that connects devices over a max range of <100m. It is not the same as standard Bluetooth because it provides connectivity via lower energy consumption (0.01 W - 0.5 W compared to the 1 W of Bluetooth) whilst connecting over a similar max range of 100m, which is great for hardware because fewer batteries are needed to power BLE chips, so manufacturing costs are quite low. BLE also transmits data in short burst instead of continuous data transfer like Bluetooth but the latency difference is 6 ms vs 100 ms. It is also supported by all smartphones and most Linux, Mac and Windows devices.
How do devices communicate via BLE?
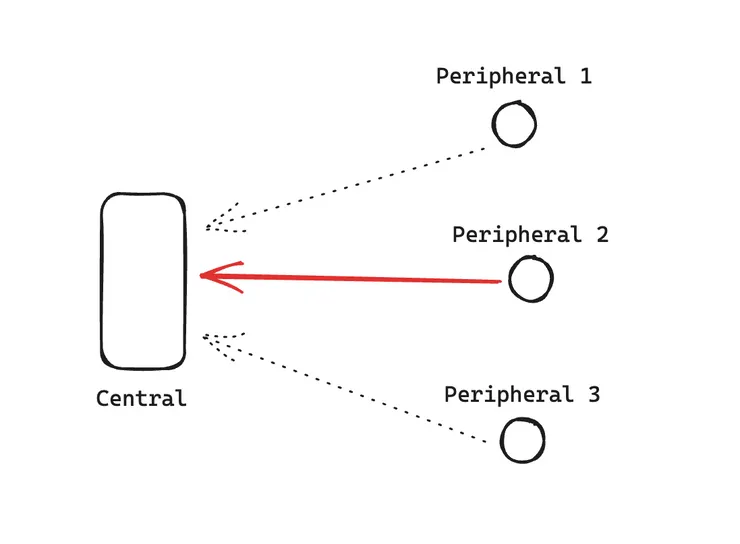
When devices connect together using BLE, they use the concept of a client and server model, or central and peripheral. A peripheral is a device that advertises data and a central scans for peripherals to connect to.
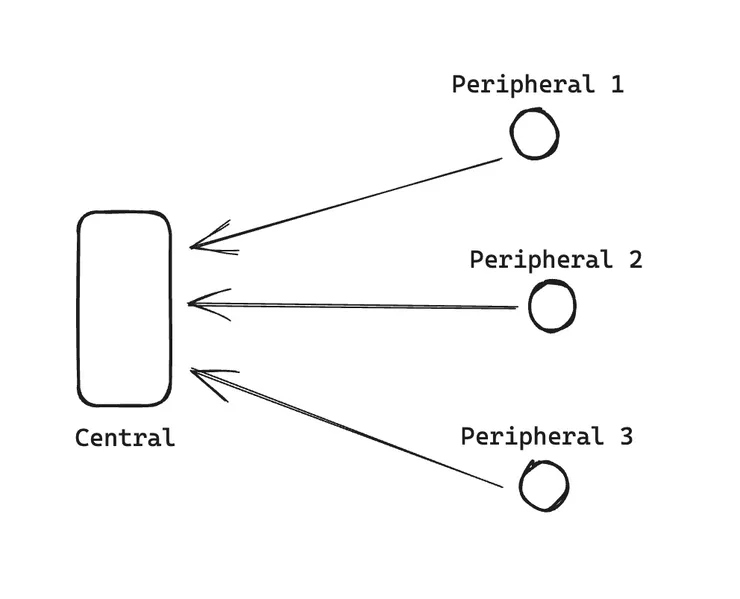
Once advertised and a device is discovered, then a connection can be established between a central and peripheral. The central is able to read the services of the peripheral and proceed with data transfer.
The communication and data transfer is defined using a GATT (General Attribute) profile - a specification of how data can transferred between BLE devices. The device that initiates communication and requests data is the GATT client, requesting data from the GATT server.
Every BLE device will have their own GATT profile. These will contains a collection of services the GATT server (BLE device) provides.
A Service is a feature provided by the BLE peripheral, they contain nested objects called characteristics.
A Characteristic representation of a piece of information that the server exposes for clients.
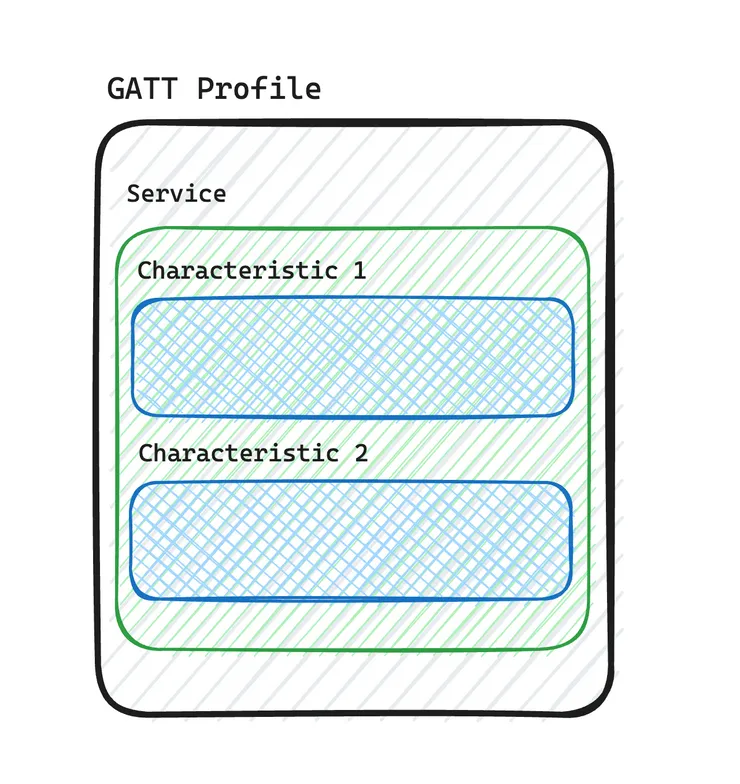
Here is an example of a GATT profile for a heart rate monitor. It contains 2 services:
- Device Information
- Heart Rate
These services contain related characteristics that provide information about the heart rate monitor and the read/write permissions for each characteristic.
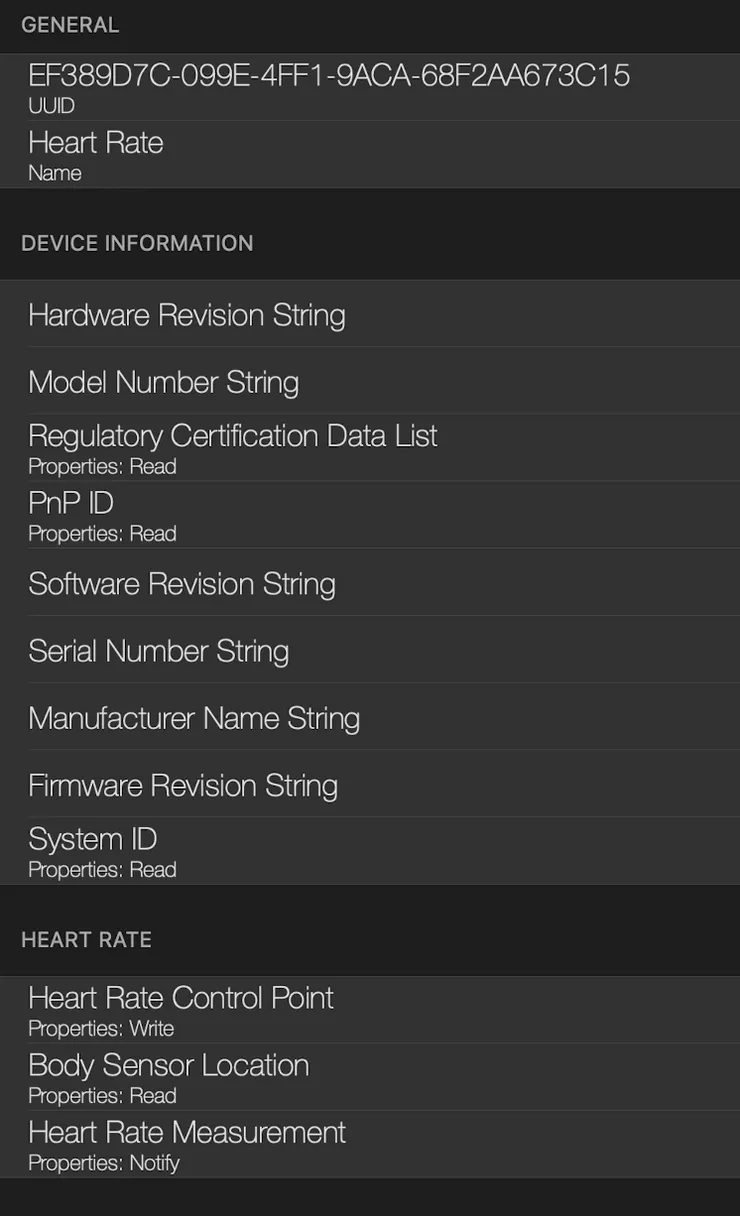
Characteristics can be categorised into different data transfer methods:
- Read - client can read data on a particular characteristic.
- Write - client can write values onto a particular characteristic.
- Notify - subscribing to a characteristic if the value stored inside it changes e.g. heart rate measurement will update constantly and send the value back to the GATT client.
Summary:
To summarise our information into requirements needed for a mobile app with BLE communication:
- A BLE device will advertise itself with advertising data → our smart phone/app needs to scan for the device and once scanned, connect to the device.
- After connection, our app needs to access the information and methods provided by the device’s services and characteristics.
- Our app needs to handle read, write and notify characteristics during data transfer processes.
Creating our BLE app
The main tools that we will be using to create our mobile app with BLE features are:
- Expo
- LightBlue - a service provided on Mac, iPhone and Android for emulating BLE signals and scanning devices for service and characteristic analysis.
react-native-ble-plx- a library with APIs to initiate connection and transmission of data between two devices.
Alternative BLE Libraries
An alternative to react-native-ble-plx is react-native-ble-manager . This library provides all the features provided by the former, but includes features like bonding (connecting to a device, saving the device info, and reconnecting to it without the need to manually re-connect to it).
The first option is the most used out of the two and it provides Expo support in the form of an Expo Config Plugin, so we will be using it for the rest of the blog. If you find yourself needing more complex features, then the second option is worth a look but bear in mind that react-native-ble-manager does not come with Expo support.
Setting up Expo
To create our app with Expo, run the following commands:
# Create Expo project files
npx create-expo-app my-ble-app

# Navigate into your project files
cd my-ble-app
Once the project files are created and you have the boilerplate code, you can check it all works on the Expo Go app after running this command to start the application:
npx expo start
Installing react-native-ble-plx
Typically, developers would not be able to run the features provided by the application because the Expo SDK does not have the native module for BLE built into it, so developers usually eject Expo and remove the managed workflow to switch to a vanilla React Native project. However, with Expo Config Plugins, we can avoid ejecting!
For this particular package, Expo provides a config plugin for react-native-ble-plx, which extends the current Expo config to configure the app to use the native BLE permissions. We can add the config in the app.config.js or app.json file.
/* app.config.js */

{
	//...
	plugins: [
	  [
	    '@config-plugins/react-native-ble-plx',
        {
          isBackgroundEnabled: true,
          modes: ['peripheral', 'central'],
          bluetoothAlwaysPermission: 'Allow $(PRODUCT_NAME) to connect to bluetooth devices',
          bluetoothPeripheralPermission: 'Allow $(PRODUCT_NAME) to connect to bluetooth devices',
        },
      ],
   ],
}
Once this is done you will need to set up the project to use a development build by setting config on eas.json to internal distribution, or you can use expo prebuild.
/* eas.json */

{
		//...
    "development": {
      "developmentClient": true,
      "distribution": "internal",
      "android": {
        "image": "latest"
      },
      "env": {
        "APP_ENV": "dev"
      }
    }
  }
}
Once this setup is complete, you will need to create a development build like so:
npx eas build --profile development
Once the build is finished, install the app on your phone and open it. Then you will need to run the dev server for your development build:
yarn start --dev-client
The server should appear on the development build on your phone and then you can run your mobile app.
You can learn more about config plugins here.
Best Practices for Development
Here are some best practices learned from my previous experience with working on react-native-ble-plx.
- Encapsulate all your BLE logic inside a manager, class or state management entity.
- Render this logic at a root level if you want to have a handler that monitors Bluetooth states.
- Ensure you discover all services and characteristics before using a service/characteristic straight away - a BLE client needs to go through a discovery phase before using the data inside a BLE server otherwise an error will be thrown in your application.
- When reading or writing data, ensure you have functions for Base64 encoding/decoding - the data inside the BLE device is stored with Base64 type.
Example usage of React Native BLE PLX
-
First we create a context to hold all the helper functions for bluetooth connections:
type BluetoothConnectionContextProps = { /* definitions for all the methods/attributes to provide * e.g. startDeviceScanning, scannedDevices etc. */ }; const BluetoothConnectionContext = createContext<BluetoothConnectionContextProps | null>( null ); export const BluetoothConnectionProvider: React.FC<{ children: React.ReactElement | React.ReactElement[]; }> = ({ children }) => { /* insert BLE logic here e.g. connecting to device, disconnecting */ return ( <BluetoothConnectionContext.Provider value={/* all the methods/attributes to provide */} > {children} </BluetoothConnectionContext.Provider> ); }; export const useBluetoothConnection = () => { const context = useContext(BluetoothConnectionContext); if (!context) { throw new Error( "useBluetoothConnection must be used with BluetoothConnectionProvider" ); } return context; }; -
Scanning for devices
-
Initialise the BLE manager outside of the context:
const manager = new BleManager(); -
Create helper function to scan the devices and store them in an array:
const startDeviceScan = useCallback(() => { manager.startDeviceScan((error, scannedDevice) => { // runs callback for every device the device scans if (error) { throw new Error(error.message); } scannedDevices.push(scannedDevice); }); }, [scannedDevices]); -
Create function to stop the device scanning:
const stopDeviceScan = useCallback(() => {
  manager.stopDeviceScan();
}, []);
-
-
Connecting and disconnecting to devices:
const connectToDevice = useCallback(async (deviceId: string) => { try { const newlyConnectedDevice = await manager.connectToDevice(deviceId); setConnectedDevice(newlyConnectedDevice); } catch (error) { throw new Error(error); } }, []); const disconnectFromDevice = useCallback(async (deviceId: string) => { try { await manager.cancelDeviceConnection(deviceId); setConnectedDevice(undefined); } catch (error) { throw new Error(error); } }, []); -
Discovering device services and chars:
const discoverDeviceServices = useCallback(async () => { if (!connectedDevice) { throw new Error("Device is not connected to the app"); } await connectedDevice.discoverAllServicesAndCharacteristics(); }, []); -
Accessing Services
- During this section, if working on a project that involves BLE data transfer, you will need to have a data transfer protocol document or a list of services and characteristics provided to you to describe what attributes you can expect when connecting to your BLE peripheral, which will make it easier to track the service IDs you need, as well as the characteristic IDs to get the specific values you want to read.
const getDeviceServices = useCallback(async () => { try { await discoverDeviceServices(); const services = await connectedDevice.services(); console.log(services); } catch (error) { throw new Error(error); } }, [connectedDevice, discoverDeviceServices]); -
Get a list characteristics from a service
-
Base64 encoding and decoding
- For reading and writing values from the BLE device via
react-native-ble-plx, a solution can be to use the buffer package:
import { Buffer } from "buffer"; const decodeCharacteristicValueToString = (value: Base64) => { return Buffer.from(value, "base64").toString(); }; const decodeCharacteristicValueToDecimal = (value: Base64) => { return parseInt(Buffer.from(value, "base64").toString("hex"), 10); }; const encodeStringToBase64 = (value: string) => { console.log(Buffer.from(value).toString("base64")); return Buffer.from(value).toString("base64"); }; - For reading and writing values from the BLE device via
-
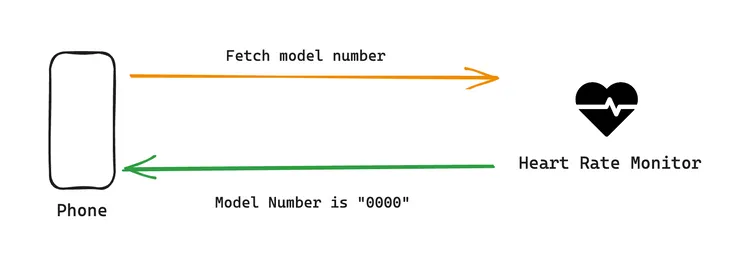
Read a characteristic:
const getModelNumber = useCallback(async () => { try { const modelNumberCharacteristic = await connectedDevice.readCharacteristicForService( HEART_RATE_SERVICE_UUIDS[HEART_RATE_SERVICES.DEVICE_INFO], DEVICE_INFO_SERVICE_CHARS.MODEL_NUMBER ); setModelNumber( decodeCharacteristicValueToString(modelNumberCharacteristic.value) ); } catch (error) { throw new Error(error); } }, [connectedDevice]); -
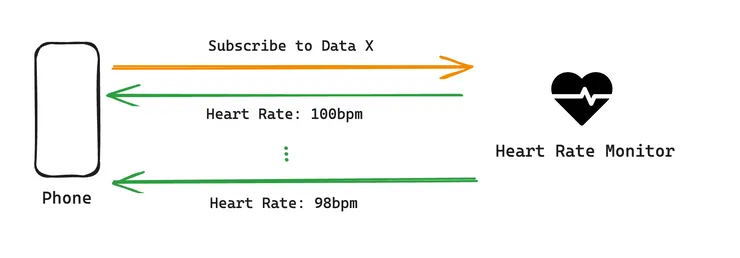
Subscribe to a characteristic:
const monitorHeartRateMeasurement = useCallback(() => { try { connectedDevice.monitorCharacteristicForService( HEART_RATE_SERVICE_UUIDS[HEART_RATE_SERVICES.HEART_RATE], // service ID HEART_RATE_SERVICE_CHARS.HR_MEASUREMENT, // characteristic ID (error, characteristic) => { console.log( Buffer.from(characteristic.value, "base64").toString("utf8") ); setHeartRateMeasurement( Buffer.from(characteristic.value, "base64").toString("utf8") ); } ); } catch (error) { throw new Error(error); } }, [connectedDevice]); -
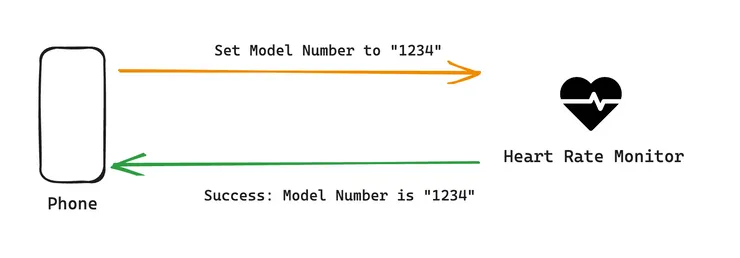
Write to a characteristic:
const setHeartRateControlPoint = useCallback(
  async (newControlPoint: string) => {
    try {
      await connectedDevice.writeCharacteristicWithoutResponseForService(
        HEART_RATE_SERVICE_UUIDS[HEART_RATE_SERVICES.HEART_RATE],
        HEART_RATE_SERVICE_CHARS.HR_CONTROL_POINT,
        encodeStringToBase64(newControlPoint)
      );
    } catch (error) {
      throw new Error(error);
    }
  },
  [connectedDevice]
);
-
Finally, you will have an application that can scan for potential BLE devices to connect to, allow you to both connect and disconnect, and transfer data to and from your application to the device.
Summary
Mobile applications built to communicate to Bluetooth devices can be done with Expo through setting up development builds and expo config plugins.
Once this is done, the remaining work required is setting up an interface in the form of either a provider or another pattern to abstract away the Bluetooth commands - this will allow you to use the functions anywhere, and to have handlers that handle different states the Bluetooth manager can be set to.
One important consideration is knowing what information your device provides, accessing the information in a consistent way and using a device that can give you accurate data and can respond to your write commands.