Getting started on CloudCannon with Next.js
Ana Schlienger17 min read

CloudCannon is an up-and-coming CMS, both super interesting and powerful! It is backed by Git, a strength we will see in this article because it makes it easy for the site manager to maintain. Even though it is used by large editorial teams at Netflix and Twitch, the developer community is pretty small so there is not a lot of content outside of the developer documentation provided by CloudCannon themselves.
This is why I wanted to share my experience and use it to help you get started with CloudCannon. I decided to create a recipes website as our example for this guide.
In this article I am using Next.js, so all the tips will be tailored for this framework, but CloudCannon supports any other SSG you like (SvelteKit, Jekyll, Hugo, …).
Outline
Prerequisites
You can skip this part if you already have a front-end up and running and directly jump to the Integrate CloudCannon section.
- Start your project with Next.js
yarn create next-app --typescript
yarn dev
-
Link your code to a GitHub repo
- create a new repository on GitHub (without ReadMe, license files, etc)
- in your new repo, copy the remote repository URL
- then in your terminal, run each of the following commands
cd next-app
git init -b main
git add .
git commit -m "First commit"
git remote add origin <REMOTE_URL>
git remote -v
git push -u origin main
You are all set! you can start developing now!
Create the architecture of the website
What type of content, and where?
The main reason to use CloudCannon is to be able to edit ALL the content of your website easily, without touching the code. It gives you the possibility to edit almost everything, and not only the classic CMS stuff.
If you want to build a blog, maybe you want to be able to edit and add articles, but maybe also the authors! In my case, I want editable recipes and categories (classic CMS), and also to have the flexibility to change the links in the header menu.
But you can be even more creative and also make the content of every page editable: home page, about, contacts, etc by defining the title, subtitle, description, footer, notes…
Build with Next.js
Use the Next.js doc to quickly set up your website.
You can use a library such as MUI or Tailwind to quickly build a nice layout
Define how you want to structure the pages, etc
Depending on your website, you will maybe want different pages, etc. Usually, with CMSs and SSGs, the architecture is pretty basic with just a few main pages.
For my recipe website, I need only three pages: the homepage, the recipes, and the categories. However, I want to leave the door open to adding other pages (About …)
Refer to the Next.js routing documentation to learn how to structure your folders. Basically, the routing follows the folder structure, so it is highly visual and easy to set up.
├── content
├── src
├── schemas
│   ├── components
│   ├── lib
│       ├── categories.ts
│       ├── data.ts
│       ├── recipes.ts
│   ├── pages
│       ├── categories
│           ├── [slug].tsx
│       ├── recipes
│           ├── [slug].tsx
│       ├── _app.ts
│       ├── _document.tsx
│       ├── categories.tsx
│       ├── index.tsx
│       ├── recipes.tsx
│   ├── styles
├── cloudcannon.config.cjs
Draw a quick Front-End layout
Before thinking about using CloudCannon, I suggest you build a quick structure of your website, maybe with empty pages and no styling, to give you a better overview of the data you will have at your disposal.
Considering that CloudCannon only deals with content, you can also build your full website, style it, and then integrate the CMS. You could also add CloudClannon to an existing website.
Integrate CloudCannon
- First, you need a CloudCannon account, nothing surprising here.
- Then you will need to create a website! CloudCannon also offers to create Projects and Domains, but you don’t need that for now. In the CloudCannon sidebar, navigate to Sites in the sidebar, and click Add new site.
- Choose a name, and you’re set! The next step is linking this site to your GitHub repo.
Git integration
In this guide, we used GitHub, but CloudCannon supports other Git providers and has documentation for each of them (GitHub, Bitbucket, GitLab, self-hosted GitLab). If you don’t use a Git provider, you can alternatively upload your folder directly to CloudCannon. All steps are detailed here.
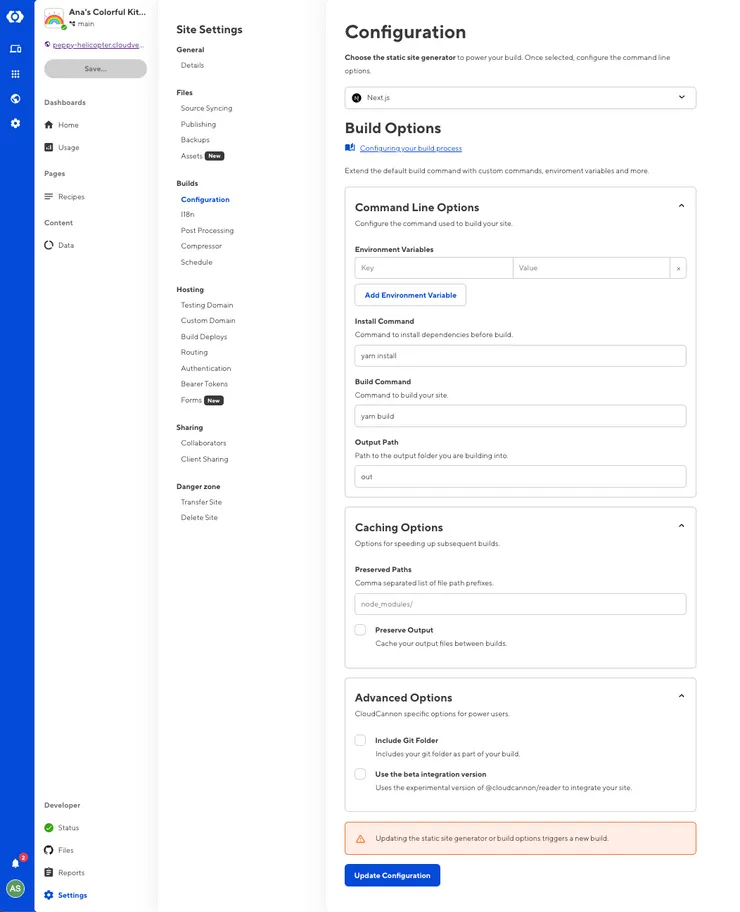
- Follow the steps in the CloudCannon guide to connect your GitHub repo.
- There are a bunch of build settings to configure, but nothing extraordinary. Here are mine:
Decide how you want to edit your data
This is one of the parts that I find most important to understand about how CloudCannon works, so read carefully.
CloudCannon is an extremely powerful tool because it allows you to edit all kinds of data, stored in various ways, without ever touching your source code.
You probably already decided what is the main content you want to edit (for me, it’s recipes), but think again. Is there something else you might want to update later on or to give the user the possibility to customize themselves? Here are some examples:
- the menu links
- the footer of each page
- the content/links in the footer
- the pages themselves (other than the recipes). Now you maybe only have a home page and an about page, but maybe later on you will need a newsletter page or a contributors page.
Don’t worry, you can always change your mind and decide later. Flexibility is key.
Let’s see what options we have now. CloudCannon offers two ways of defining your content:
Editing your content with Collections
“Collections allow you to show groups of related content in the Site Navigation. Each collection corresponds to a folder in your site files. Navigating to a collection shows a preview of each file and allows your editors to see all the content at a glance.”
Collections are great to define a type of data that will be repeated in different parts of the site, such as blog posts, articles, recipes, journal entries, etc. They share some properties but the content itself will vary from one to another.
It is heavily suggested to use markdown files with a front matter header for these files. The front matter header will contain the properties you want to be consistent throughout the collection. The content of the file is regular markdown that you will convert to HTML to display on your website.
As I am writing recipes, I have a collection of recipes, and within this collection, a .md file will be stored for each recipe. We are not going to write the markdown files ourselves, it is CloudCannon that will create them for us - we only need to provide the data in the CloudCannon editor.
---
_schema: default
title: Bagels
date: 2021-10-01T15:59:53Z
description: the easiest way to have breakfast
categories:
  - vegan
  - brunch
  - breakfast
cook_time: 2h
ingredients_html: >-
  <ul>
	<li>flour</li>
	<li>water</li>
  <ul>
instructions_html: >-
 <ol>
  <li>mix all the ingredients</li>
  <li>form a bagel shap</li>
  <li>boil for a few miutes</li>
  <li>then bake in oven</li>
 </ol>
prep_time: 40min
preview: >-
  public/images/bagels.jpg
video_url: ""
---

Extra content here!!
Notes that might not go in the Front Matter template
but that you can still display on the recipe page if you decide to.
Editing your content with Data
“Defining data allows you to populate select and multi-select inputs. Each data set corresponds to a file or folder in your site files.”
Think of data as predefined lists of items you can reuse throughout your website in different ways. In their example, they used data for authors (stored in a single csv file) and offices (stored in an offices folder). You can also reuse this data in your collections.
In my example, I used data to create the different recipe categories (breakfast, snack, vegan, etc), each category having a name and a link property.
[
  {
    "name": "Breakfast",
    "link": "breakfast",
    "preview": "https://www.eatingbirdfood.com/wp-content/uploads/2012/09/butternut-squash-protein-pancakes-2-300x300.jpg"
  },
  {
    "name": "Brunch",
    "link": "brunch",
    "preview": "https://www.eatingbirdfood.com/wp-content/uploads/2021/02/oatmeal-bowls-overhead-150x150.jpg"
  },
	...
]
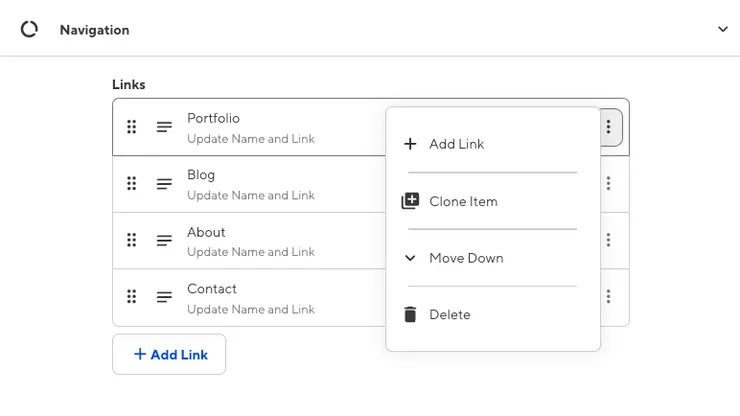
I also used data to store the links that I want to display in the header menu.
{
  "links": [
    {
      "name": "Home",
      "link": "/"
    },
    {
      "name": "Recipes",
      "link": "/recipes/"
    },
    {
      "name": "Categories",
      "link": "/categories/"
    }
  ]
}
Which type of file to use
When it comes to the type of file to use, it is literally up to you. CloudCannon has a great variety of parsers included and the following common file extensions are covered.
csv(.csv)front-matter(.md,.mkd,.markdown,.html,.htm)json(.json)properties(.properties)toml(.toml)yaml(.yaml,.yml)
Write the config file
This might be the only tedious part. Because honestly who likes to write config files? Lucky for us, CloudCannon provides good (enough) examples and it is easy to adapt them to your needs. This is where you will tell CloudCannon all about your editable data.
In their documentation, they make it seem like you should use their @cloudcannon/reader tool, but actually, you don’t need to use it: what you need to know is that they use it to parse your config file and build their editing interface.
Instead, create your config file in the root folder.
I chose a cloudcannon.config.cjs file to mimic the template provided by CloudCannon but you can do .json/.yaml/.yml/.js/.csj - cjs being the extension for CommonJS modules.
You can use this documentation to build your config file. Basically, you need to tell CloudCannon what you want to be considered as collections, and what you want to be considered as data. You can also configure the way you want these elements to be displayed on your dashboard.
Here are some parameters that I think are useful:
-
collections_config: the most important part! That is where you define all the data you want to edit-
path: where your data will be stored in your git folder -
url: this can either be directly a string template or a function that returns a template for the items in the collection// The URL template for items in this collection url: '/people/{department|slugify}/[slug]/', // The URL function for items in this collection url: (filePath, parsed, { filters }) => { const year = new Date(parsed.date).getFullYear(); const slug = filters.slugify(parsed.title || ''); return `/posts/${year}/${slug}/`; }, -
schemas: to define a structure for the data. You can have a default schema and other specific schemas (it is well explained in the CloudCannon documentation) -
_enabled_editors: if you want to restrict the edition to certain editors (options are: visual, data, content, source)
-
-
data_config: same as collection_config, but for the data. The doc for this is more straightforward because it uses the same parameters as collection_config. -
collection_groups: a list of subfolders that will be on your CloudCannon dashboard. This is useful if you have different types of files to edit and is great to group the data.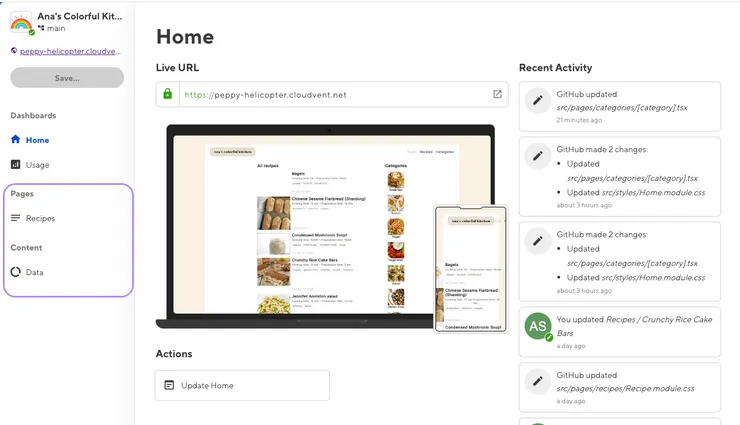
module.exports = {
  collections_config: {
    recipes: {
      name: "Recipes",
      path: "content/recipes",
      schemas: {
        default: {
          path: "schemas/recipe.md",
        },
      },
      output: true,
      url: "/recipes/[slug]",
      _enabled_editors: ["visual", "data", "content"],
    },
  },
  data_config: {
    data: {
      path: "content/data",
      disable_add_folder: true,
    },
  },
  collection_groups: [
    {
      heading: "Pages",
      collections: ["recipes"],
    },
    {
      heading: "Content",
      collections: ["data"],
    },
  ],
};
Edit and play with the data!
Fetch and use your file data
1. Fetching the data
Next.js already provides an easy way to fetch the data wherever and however it is stored and to use it to populate the website. Originally, it was made to call APIs and use the content in your components. CloudCannon reuses this structure to get your files stored in your local system.
Side note: CloudCannon is currently working on a package library directly providing the correct functions to fetch the data we need from CloudCannon. In the meantime, we need to define these functions ourselves, but CloudCannon already provided some functions for us to use.
-
To get all the files in the collection:
import { readdir, readFile } from "fs/promises"; import path from "path"; export async function getCollection(collection, options = {}) { const fileNames = await readdir( path.join(collectionsDirectory, collection) ); const collectionItems = await Promise.all( await fileNames.reduce(async (memo, fileName) => { const slug = path.basename(fileName, path.extname(fileName)); if (!slug.startsWith("_")) { const item = await getCollectionItem(collection, slug, options); return [...(await memo), item]; } return memo; }, []) ); return collectionItems; } -
To get a single collection item:
export async function getNextCollectionItem(collection, slug, options = {}) {
  const collectionItems = await getCollection(collection, options);
  const index = collectionItems
    .map(function (e) {
      return e.slug;
    })
    .indexOf(slug);
  return collectionItems[index + 1];
}
2. Feed the data to your components
-
getStaticProps: the data pulled by this function is fetched at build time. This is how you get the editable data and pass it to your components. For collections,getStaticProps****pulls in a single file, and with *data*,getStaticPropswould pull in the whole file or an array item within it. In my case, the component will receive arecipeobject containing the properties of the recipe page defined in the front matter and the additional HTML corresponding to the body of the markdown file.```jsx export const getStaticProps: GetStaticProps = async ({ params }) => { const recipe = await getCollectionItem('recipes', params.slug); const content = await unified() .use(remarkParse) .use(remarkHtml) .process(recipe?.content ?? '') return { props: { recipe: { ...JSON.parse(JSON.stringify(recipe)), html: content.value, }, }, } } ``` -
getStaticPaths: dynamically gets the links to all the pages available, so you can have custom links based on the input parameters. For collections,getStaticPathspulls in each file as a path. With data,getStaticPathsreturns nothing or each item in an array. For me, it means thatgetStaticPathswill create a new path for each recipe I have in my recipes collection, and the slug of the path will be available for mygetStaticPropsfunction to use.export async function getStaticPaths() { const recipes = await getCollection("recipes"); const paths = recipes.map((recipe) => ({ params: { slug: recipe.slug, }, })); return { paths, fallback: false, }; }
The different editors
CloudCannon provides different ways of editing the data, to make it more convenient for the user. As mentioned in the paragraph about the config file, you can enable or disable some of the editors by collection/data.
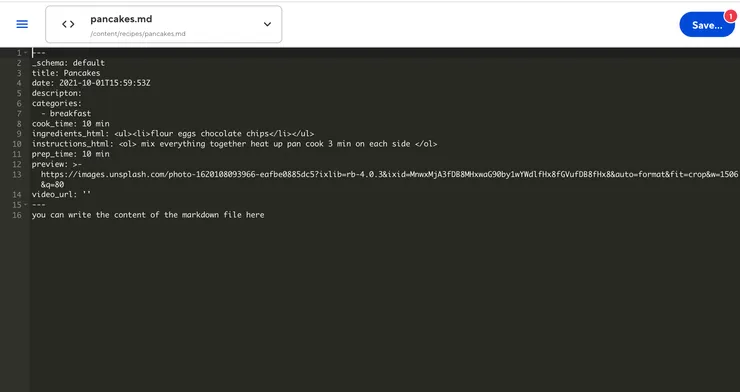
- Source Editor: Edit your code directly within CloudCannon in a familiar-looking editor.
It can be useful for the dev to have access to it for quick changes, but I do not recommend enabling it for the final user, it would be more confusing than useful for them.
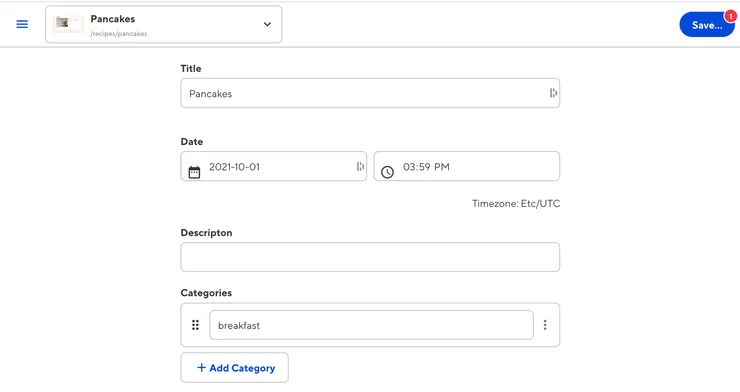
- Data Editor: Edit your data and front matter in a form full of customizable inputs.
◦ Add, remove, clone, rearrange and edit arrays
◦ Open objects and edit content to any depth
◦ Change data with date, color, number, URL, and more inputs.
In my opinion, this editor is perfect for JSON, CSV, or other forms of data files, because it goes straight to the point and makes JSON or CSV files SO easy to edit.
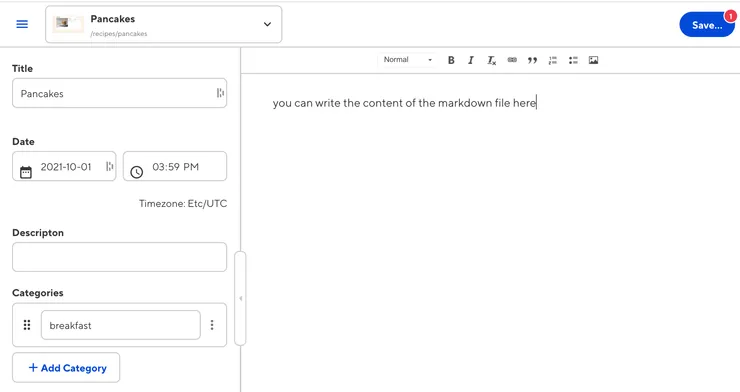
- Content Editor: Edit your markdown files and data at the same time. A big content block for your markdown and an embedded data editor on the side. This is perfect for a combination of markdown and front matter files.
This is the one I would use by default for my markdown pages (the recipes!).
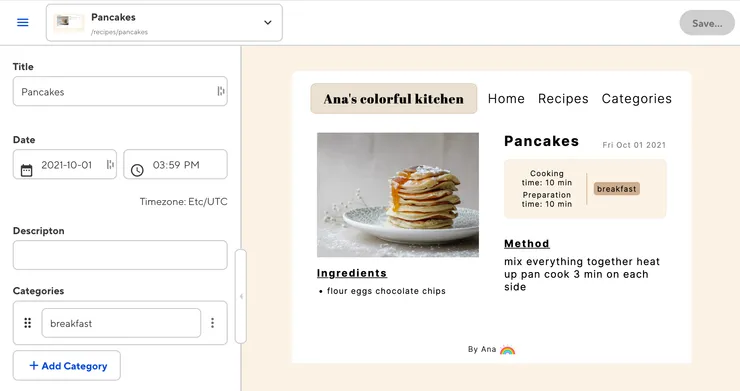
- Visual Editor: The main way to manage content in CloudCannon. It mirrors your site itself, so the site’s content is the only thing users need to know. It combines ****the content editor with your live site. You navigate to other pages by clicking links on the site. All of your styles and JavaScript remain intact and functional within the Visual Editor, you only change the content.
Here lies the real power of CloudCannon!
Turn the pages into editable data
The demo video does not cover Visual Edition, so it was harder to understand how to enable it. I used the template website and made sure every single detail linked to visual edition was the same in my code and in the template code.
The Visual Editor works with front matter, so it will be available on the pages fed by markdown files (the content of your collections).
For some reason, defining the parser in the config file prevents the markdown file from being editable directly in the Visual Editor. In the doc, it is suggested to define parser: frontmatter for the data stored in .md files. But I guess CloudCannon is smart enough to detect the file type and use the most adapted editor without specifying it.
Using slugs
To display the repeatable data, we need to create a template file containing the HTML and CSS that will be mapped over using the available files to create the different pages. This template component is called a slug.
Let’s say that you are writing articles. You want to display each article at its own URL. To do that, you will need to create a [slug].jsx (or [slug].tsx) template file, and feed it the details of the article you want to render.
Pages without slugs
It is also perfectly fine to display front-matter content in a non-dynamic way. For instance, I have a specific component for my about page, and I want to populate it with the properties I have defined in the /pages/about.md file. I can directly fetch the data I want and use it in my component.
export default function About({ page, staffMembers }) {
return (
<PageLayout page={page}>
<section className="hero diagonal">
<div className="container">
{(page.heading || page.title) && <h2>{title}</h2>}
{page.subtitle && (
<p className="subtext" data-cms-bind="#subtitle">
{page.subtitle}
</p>
)}
</div>
</section>
<section className="diagonal patterned">
<div className="container">
<p className="editor-link" style={{ textAlign: "center" }}>
<a
href="cloudcannon:collections/content/staff-members/"
className="btn"
>
<strong>✎</strong>Manage Staff members
</a>
</p>
<ul className="image-grid">
{staffMembers.slice(0, 2).map((staff, i) => (
<li key={i}>
<StaffMember staff={staff} />
</li>
))}
</ul>
</div>
</section>
</PageLayout>
);
}
export async function getStaticProps({ params }) {
const page = await getCollectionItem("pages", "about");
const staffMembers = await getCollection("staff-members");
return {
props: {
page: JSON.parse(JSON.stringify(page)),
staffMembers: JSON.parse(JSON.stringify(staffMembers)),
},
};
}
On this page, using the Visual Editor, we can directly change the properties of the About.md file
---
title: About
heading: Our team
subtitle: Meet our efficient and qualified team.
---

Content of the About page
Weird workarounds I had to do
page: JSON.parse(JSON.stringify(page))
Here is a trick that I have found that in some of the getStaticProps() functions.
recipe: {
  ...JSON.parse(JSON.stringify(recipe)),
  html: content.value,
},
This looks weird, right? It is kind of a round trip for our page object.
However, here we want to make sure that we agree on the data type, especially for Dates. When adding “1h 30” as a property, CloudCannon can either read it as 1:30 pm (so a set time) or 1 hour and 30 minutes (a duration) and sometimes it is confusing the two. Depending on the way the data is edited, the date property can either be a Date or a string. By doing that, we make sure that the data we get is a string.
In some cases, this can be a bad practice because you would lose the Date type. Here it is necessary because we want the flexibility to bypass the CloudCannon default formatting.
Explore
That’s it for me! CloudCannon is a powerful tool and there is still a wide range of options to explore. Some of the things I want to do:
- Add edit buttons displayed only in the visual editor and not on the deployed website that can take me directly to the content editor
- Link a DAM (Digital Asset Management). You can store files in an S3 bucket and use them in CloudCannon!
- Use my data inside collections (add a dropdown in a recipe to select its categories based on the categories I have defined)
Sources:
- I started my project using the demo GitHub repo from the CloudCannon tutorial video for Next.js
- I also used the feature template project urban-nextjs-template that CloudCannon provides by default in the list of your sites when you create an account.
- Thumbnail photo by Jonnathan Fonthiercgz on Unsplash