Using the SST framework to set up a state machine with AWS Step Functions
Jeanne Le Parc14 min read

Why use a state machine?
Using Step Functions and a state machine can be very useful to create complex workflows using different AWS services. For example, tasks can run in parallel and other tasks can be triggered once all those parallel tasks are completed, which is a useful behavior, difficult to reproduce efficiently. Moreover, when you build a state machine, each step of the process is broken down into a separate block of logic which can be reused by another process. Finally, as each step is in its own block, the time limit of the whole process can be increased. For example, for an API Gateway integration, the timeout is 29 seconds. If your process is longer, using a state machine could be a solution, as each step could be a Lambda function running up to 15 minutes.
Why use SST?
SST is a framework based on the AWS CDK used to deploy resources to AWS. Using the SST and CDK has many advantages. For example, thanks to the CDK, you can write the deployment files in the language you are developing in. Moreover, thanks to SST, you can test and debug your services locally with their Live Lambda Development feature. While running your services locally, you have access to a console that can be useful to easily visualize your endpoints, trigger them and much more. The SST framework also comes with specific constructs that make coding with the CDK easier.
Prerequisite
You will need an AWS account.
In this article, we will use the SST framework to deploy a state machine with AWS Step Functions.
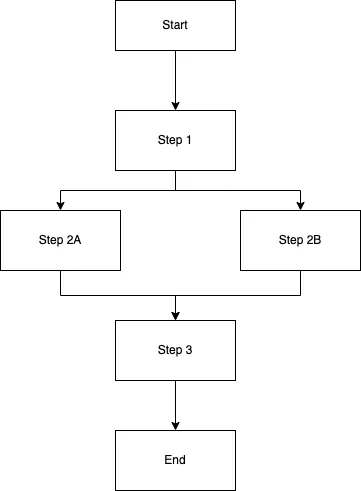
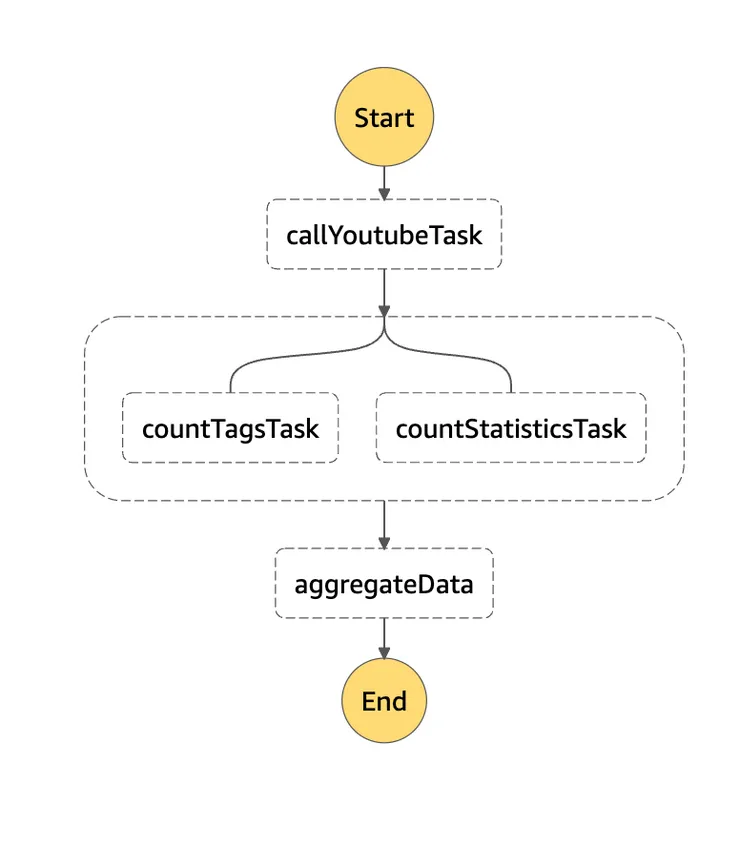
The state machine will be composed of 4 Step Functions as you can see in the diagram attached. The first step will call an external API (the YouTube API). Steps 2a, 2b and 3 will compute metrics based on the first API call made in step 1.
Let’s dive in:
Set up your new SST project
First of all, we need to spin up the new SST application. We will use the latest version of SST which, as I am writing this, is v2.
In your terminal, enter the following:
npx create-sst@latest state-machine
Then, go to the new folder that was created:
cd state-machine
And run the install command:
npm install
You can then open this new folder in your favorite code editor to explore and make all the needed changes.
The project that we just set up is divided into 2 folders:
packages/functions: The functions folder will hold the different Step Functions code.stacks: The stacks folder contains the infrastructure as code. The stack is in MyStack.ts. Right now, in this file, you should have an API with a GET endpoint.
The configuration and the deployment of the stacks are in the sst.config.ts at the root of the project.
To deploy your application, you will need to set up an AWS profile using the following command:
aws configure --profile name_of_your_profile
Provide the information required to set it up.
Once the profile is set up, you can go in the package.json file at the root of your project and update the dev script to run the following command:
"dev": "AWS_PROFILE=name_of_your_profile sst dev",
We now have everything we need to start developing and to deploy our state machine.
Now let’s create our state machine and the different Step Functions.
Create the state machine layout with a first Step Function
First, we’ll create a handler for this first function. In packages/functions/src, create a callYoutubeAPI.ts file.
import { Handler } from "aws-lambda";

export const handler: Handler = async (event) => {
  return {
    statusCode: 200,
    body: "Task1 executed.",
  };
};
Let’s leave it empty for now and go back to MyStack.ts.
We’ll rename the function from API to MyStack.
You’ll also have to rename it in sst.config.ts. Here is what sst.config.ts looks like:
import { SSTConfig } from "sst";
import { MyStack } from "./stacks/MyStack";

export default {
  config(_input) {
    return {
      name: "state-machine",
      region: "us-east-1",
    };
  },
  stacks(app) {
    app.stack(MyStack);
  },
} satisfies SSTConfig;
Back in MyStack.ts, in the function MyStack, we will create the first task/step of our state machine. The functions should be defined as Tasks, so that they can be added in the chain of states.
- LambdaInvoke is a construct of the AWS CDK that allows to invoke a Lambda function as a Task.
- The LambdaInvoke construct takes a Lambda function as an attribute and will need a name and the path to the handler (handler).
import {
  StackContext,
  Api,
  Function,
} from "sst/constructs";
import { LambdaInvoke } from "aws-cdk-lib/aws-stepfunctions-tasks";

.
.
.
.
.
//Inside the function MyStack
const callYoutubeTask = new LambdaInvoke(stack, "callYoutubeTask", {
    lambdaFunction: new Function(stack, "callYoutubeTask-func", {
      handler: "packages/functions/src/callYoutubeAPI.handler",
    }),
  });
Then, we’ll create the state machine:
- In
stateDefinition, we create the chain of states. That’s where we’ll add the next steps later on. - In
stateMachine, we actually create the state machine.
import { Chain, StateMachine } from "aws-cdk-lib/aws-stepfunctions";

.
.
.
.
.
//Inside the function MyStack
const stateDefinition = Chain.start(callYoutubeTask); //the chain of states of our state machine

 const stateMachine = new StateMachine(stack, "StateMachineExample", {
    definition: stateDefinition,
  }); // the actual state machine with its name and its definition = its states and transitions
Then, you’ll need to create your route to start the state machine:
- The API has one route, a GET whose path is “/start-machine” .
- The function called when this route is triggered is located in the file
packages/functions/src/startMachinethat’s what you specify in thehandler. It should be a path starting from the root of your project. - In the environment attributes, we pass the ARN (Amazon Resource Name) of the state machine that we will need to start our machine.
const api = new Api(stack, "apiStartMachine", {
  routes: {
    "GET /start-machine": {
      function: {
        handler: "packages/functions/src/startMachine.handler",
        environment: {
          STATE_MACHINE: stateMachine.stateMachineArn,
        },
      },
    },
  },
});
Finally, it is important to give our route the permission to start the state machine. That’s what we do by using the attachPermissionsToRoute function.
api.attachPermissionsToRoute("GET /start-machine", [
  [stateMachine, "grantStartExecution"],
]);
To show the API endpoint in the output, let’s add the following code at the end of the function:
stack.addOutputs({
  ApiEndpoint: api.url,
});
This is what your MyStack.ts file should look like now as a whole:
import { StackContext, Api, Function } from "sst/constructs";
import { LambdaInvoke } from "aws-cdk-lib/aws-stepfunctions-tasks";
import { Chain, StateMachine } from "aws-cdk-lib/aws-stepfunctions";

export function MyStack({ stack }: StackContext) {
  //The creation of the first Step Function that will use the handler located in packages/functions/src/callYoutubeAPi
  const callYoutubeTask = new LambdaInvoke(stack, "callYoutubeTask", {
    lambdaFunction: new Function(stack, "callYoutubeTask-func", {
      handler: "packages/functions/src/callYoutubeAPI.handler",
    }),
  });

  //The creation of the chain of states
  const stateDefinition = Chain.start(callYoutubeTask);

  //The creation of the state machine
  const stateMachine = new StateMachine(stack, "StateMachineExample", {
    definition: stateDefinition,
  });

  //The creation of the API with a GET route "/start-machine" that will call the handler located in packages/functions/src/startMachine
  const api = new Api(stack, "apiStartMachine", {
    routes: {
      "GET /start-machine": {
        function: {
          handler: "packages/functions/src/startMachine.handler",
          environment: {
            STATE_MACHINE: stateMachine.stateMachineArn,
          },
        },
      },
    },
  });

  //To grant the permission to our route to start our state machine
  api.attachPermissionsToRoute("GET /start-machine", [
    [stateMachine, "grantStartExecution"],
  ]);

  //To show the API endpoint in the output
  stack.addOutputs({
    ApiEndpoint: api.url,
  });
}
We now need to create the startMachine.handler that we mention when we define our API.
In packages/functions/src, create a startMachine.ts file.
In your terminal, run the command below to install the dependency.
npm install @aws-sdk/client-sfn
This endpoint will set up a Step Function client and this client will start the state machine by sending a command. It will return a 200 status code and the state machine will move on to the first state, which is the callYoutubeAPI handler.
import { APIGatewayProxyHandlerV2 } from "aws-lambda";
import { SFNClient, StartExecutionCommand } from "@aws-sdk/client-sfn";

export const handler: APIGatewayProxyHandlerV2 = async (event) => {
  const client = new SFNClient({}); //Create the Step Function client

  // Send a command to this client to start the state machine which ARN is specified
  await client.send(
    new StartExecutionCommand({
      stateMachineArn: process.env.STATE_MACHINE,
    })
  );
  return {
    statusCode: 200,
    body: "Start machine started",
  };
};
Testing the state machine so far
Let’s test our endpoint and state machine!
We will use the Live Lambda Developement feature. So, we will launch the application locally with
npm run dev
Then, we call our endpoint to start the state machine. You should find your endpoint in the terminal after you run the previous command. The route to call is simply “/start-machine”.
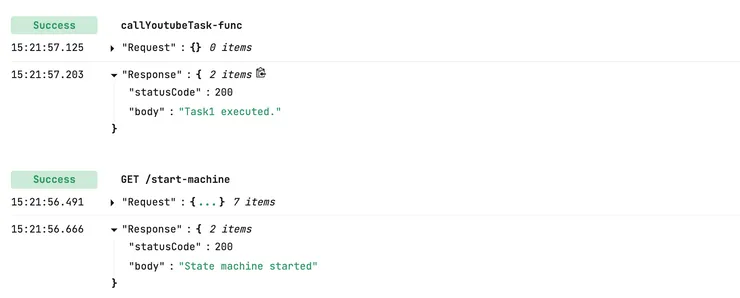
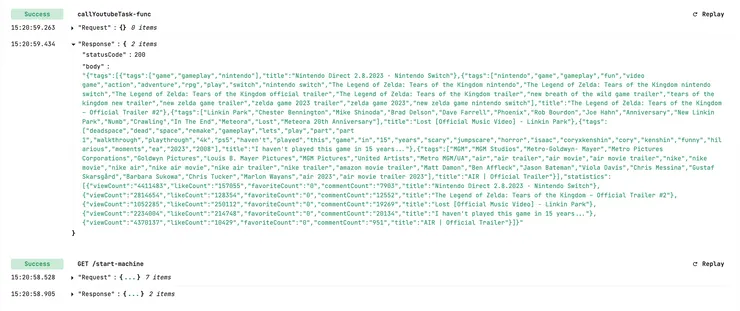
We receive the following body: “State machine started”.
Now, we can use the SST console to see the logs of our different handlers. You can find the link to your SST console in the terminal after you ran the dev command or by going to this link: console.sst.dev. You should see that the callYoutubeTask was also triggered:
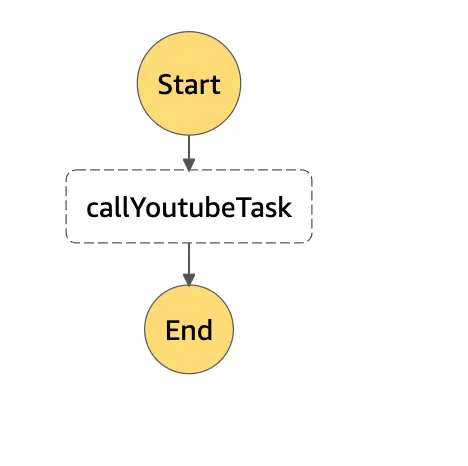
In the AWS account, in the Step Functions > State machines menu, we can now see our state machine and check that the order of the tasks is what we want it to be:
Update the first task to call an external API
We can now update the content of the callYoutubeAPI handler to be whatever we want. We will use the YouTube API to get information about the most popular videos. To use the YouTube API, you need an API key that you can generate in the Google Developers Console.
Add this API key in an .env.local file at the root of your project.
WARNING - If you use a source control system (like git), don’t forget to add this file to the .gitIgnore or equivalent.
API_KEY = your_api_key;
In callYoutubeAPI.ts, let’s update the code to:
- make an axios call to the YouTube API using our API key to get the most popular videos
- get the tags of these videos
- get the statistics of these videos
- return this information in the body, so that future tasks can access and use it
You will need to install the following dependency:
npm install axios
import { Handler } from "aws-lambda";
import axios from "axios";
export const handler: Handler = async () => {
const { data } = await axios.get(
`https://youtube.googleapis.com/youtube/v3/videos?part=snippet%2CcontentDetails%2Cstatistics&chart=mostPopular®ionCode=US&key=${process.env.API_KEY}`
);
const videos = data.items;
const tags = videos.map(
(video: { snippet: { tags: string[], title: string } }) => ({
tags: video.snippet.tags,
title: video.snippet.title,
})
);
const statistics = videos.map(
(video: {
snippet: { tags: string[], title: string },
statistics: any,
}) => ({
...video.statistics,
title: video.snippet.title,
})
);
return {
statusCode: 200,
body: JSON.stringify({ tags, statistics }),
};
};
For it to work properly, in MyStack.ts, we need to add the API key as an environment attributes to our callYoutubeTask:
const callYoutubeTask = new LambdaInvoke(stack, "callYoutubeTask", {
  lambdaFunction: new Function(stack, "callYoutubeTask-func", {
    handler: "packages/functions/src/callYoutubeAPI.handler",
    environment: {
      API_KEY: process.env.API_KEY ?? "",
    },
  }),
});
Repeat the testing step now to see that the new body of the callYoutubeTask-func contains tags, statistics and titles of the most popular videos.
Add the other Step Functions
In MyStack.ts, we will now add some other states to our state machine.
The following two new tasks will happen in parallel to count the tags and compute an engagement rate on the statistics:
const countTagsTask = new LambdaInvoke(stack, "countTagsTask", {
  lambdaFunction: new Function(stack, "countTagsTask-func", {
    handler: "packages/functions/src/countTags.handler",
  }),
});
const countStatisticsTask = new LambdaInvoke(stack, "countStatisticsTask", {
  lambdaFunction: new Function(stack, "countStatisticsTask-func", {
    handler: "packages/functions/src/countStatistics.handler",
  }),
});
The last one will happen after these two tasks finished and will aggregate the data:
const aggregateData = new LambdaInvoke(stack, "aggregateData", {
  lambdaFunction: new Function(stack, "aggregateData-func", {
    handler: "packages/functions/src/aggregateData.handler",
  }),
});
We now need to update the stateDefinition to add the new states.
To have two tasks running in parallel, we define a new variable parallel and define each branch in the stateDefinition variable.
const parallel = new Parallel(stack, "ParallelCompute");

const stateDefinition = Chain.start(callYoutubeTask)
  .next(parallel.branch(countTagsTask).branch(countStatisticsTask))
  .next(aggregateData);
The updated MyStacks.ts should look like this:
import { StackContext, Api, Function } from "sst/constructs";
import { LambdaInvoke } from "aws-cdk-lib/aws-stepfunctions-tasks";
import { Chain, Parallel, StateMachine } from "aws-cdk-lib/aws-stepfunctions";

export function MyStack({ stack }: StackContext) {
  //Task 1
  const callYoutubeTask = new LambdaInvoke(stack, "callYoutubeTask", {
    lambdaFunction: new Function(stack, "callYoutubeTask-func", {
      handler: "packages/functions/src/callYoutubeAPI.handler",
      environment: {
        API_KEY: process.env.API_KEY ?? "",
      },
    }),
  });

  //Task 2a
  const countTagsTask = new LambdaInvoke(stack, "countTagsTask", {
    lambdaFunction: new Function(stack, "countTagsTask-func", {
      handler: "packages/functions/src/countTags.handler",
    }),
  });

  //Task 2b
  const countStatisticsTask = new LambdaInvoke(stack, "countStatisticsTask", {
    lambdaFunction: new Function(stack, "countStatisticsTask-func", {
      handler: "packages/functions/src/countStatistics.handler",
    }),
  });

  //Task 3
  const aggregateData = new LambdaInvoke(stack, "aggregateData", {
    lambdaFunction: new Function(stack, "aggregateData-func", {
      handler: "packages/functions/src/aggregateData.handler",
    }),
  });

  //New chain definition with some parallel tasks
  const parallel = new Parallel(stack, "ParallelCompute");
  const stateDefinition = Chain.start(callYoutubeTask)
    .next(parallel.branch(countTagsTask).branch(countStatisticsTask))
    .next(aggregateData);

  //Creation of the state machine
  const stateMachine = new StateMachine(stack, "StateMachineExample", {
    definition: stateDefinition,
  });

  //The creation of the API with a GET route "/start-machine" that will call the handler located in packages/functions/src/startMachine
  const api = new Api(stack, "apiStartMachine", {
    routes: {
      "GET /start-machine": {
        function: {
          handler: "packages/functions/src/startMachine.handler",
          environment: {
            STATE_MACHINE: stateMachine.stateMachineArn,
          },
        },
      },
    },
  });

  //To grant the permission to our route to start our state machine
  api.attachPermissionsToRoute("GET /start-machine", [
    [stateMachine, "grantStartExecution"],
  ]);
  stack.addOutputs({
    ApiEndpoint: api.url,
  });
}
In packages/functions/src, we now need to create the three handlers for our new steps.
Let’s create countTags.ts:
We can access the body of the previous task with event.Payload.body.
We decide to count the number of tags for each video.
import { Handler } from "aws-lambda";

export const handler: Handler = async (event) => {
  const { tags } = JSON.parse(event.Payload.body); //Get the body from the previous task

  //Count the number of tags for each video
  const tagsCount = tags.map(
    (tagsAndTitle: { tags: string[], title: string }) => ({
      tagCount: tagsAndTitle.tags?.length ?? 0,
      title: tagsAndTitle.title,
    })
  );
  return {
    statusCode: 200,
    body: JSON.stringify(tagsCount),
  };
};
Then, create countStatistics.ts:
We decide to compute the engagementRate (the percentage of people who watched and liked the video) of each video.
import { Handler } from "aws-lambda";

export const handler: Handler = async (event) => {
  const { statistics } = JSON.parse(event.Payload.body); //Get the body from the previous task

  //Compute the engagement rate (percentage of people who liked the video)
  const statisticsCount = statistics.map(
    (statistics: {
      viewCount: string,
      likeCount: string,
      favoriteCount: string,
      commentCount: string,
      title: string,
    }) => ({
      engagementRate:
        (parseInt(statistics.likeCount, 10) /
          parseInt(statistics.viewCount, 10)) *
        100,
      title: statistics.title,
    })
  );
  return {
    statusCode: 200,
    body: JSON.stringify(statisticsCount),
  };
};
Finally, create aggregateData.ts:
This task will be triggered once the two previous ones are finished. Therefore, event will be an array containing the information coming from the two previous states. We can access the bodies through event[0].Payload.body and event[1].Payload.body.
We decide to aggregate all the data that the other functions computed.
import { Handler } from "aws-lambda";

export const handler: Handler = async (event) => {
  const tags = JSON.parse(event[0].Payload.body); //Get the body of the first previous parallel task
  const statistics = JSON.parse(event[1].Payload.body); //Get the body of the second previous parallel task

  //Sort the statistics from highest engagement rate to lowest
  const compareFnStats = (a: any, b: any) => {
    if (a.engagementRate < b.engagementRate) return 1;
    if (a.engagementRate > b.engagementRate) return -1;
    return 0;
  };
  const statisticsSorted = statistics.sort(compareFnStats);

  //Aggregate the sorted statistics and the tag count
  const aggregateData = statisticsSorted.map(
    (stats: { engagementRate: number, title: string }) => {
      const tag = tags.find(
        (tag: { tagCount: number, title: string }) => tag.title === stats.title
      );
      return { ...stats, tagCount: tag.tagCount };
    }
  );
  return {
    statusCode: 200,
    body: JSON.stringify(aggregateData),
  };
};
Final test of the state machine
You can now launch your new state machine locally by running
npm run dev
Let’s call our GET route “/start-machine” route. The state machine starts.
In the SST console, we can check that every task is being triggered in the right order.
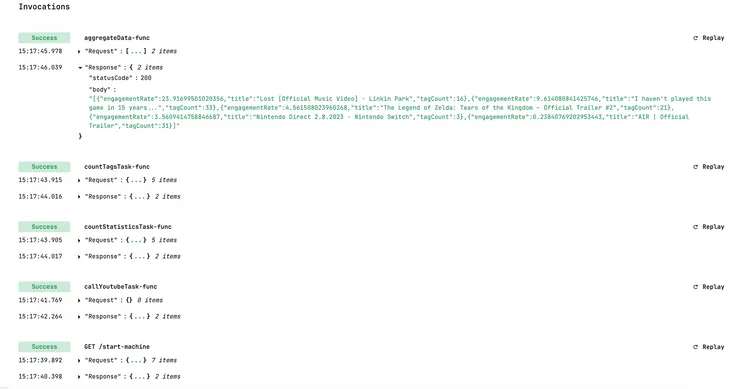
In AWS, in Step Functions > State machines, we can check our state machine.
Conclusion
This article enables you to use the SST framework to code a state machine with as many states as you want. The SST framework makes it really easy to code, deploy and test with the Live Lambda Development. It can save a lot of time. Creating a state machine helps you create complex workflows using various AWS services. In the one we created, we only used Lambda functions but it could be more complex than that.
GitHub repository
https://github.com/jeanneleparc/article-sst-step-function/tree/master
Sources:
https://itnext.io/aws-step-functions-why-you-should-use-them-eb40cc359f2a
https://docs.sst.dev/migrating/serverless-framework#serverless-step-functions