Installing native modules in the EAS build process
Francisco Costa22 min read

A step by step guide on how to write your own Expo plugin for a project that requires native dependencies that arent included in Expo. Suitable for developers who are interested in writting their own plugin or facing problems adding native dependencies to the EAS CI. Furthermore, the main example in this article is implementing turn by turn navigation on Expo using mapbox and can be used as a guide to implement turn by turn navigation on React Native
TLDR
On an Expo project, I discovered that I needed to inject native dependencies into my app. I avoided ejecting expo by creating my own plugin that added turn by turn navigation. I created this article you can follow along with the Github repo that documents the main methods and common debugging errors when creating an Expo plugin.
Intro
Having developed on expo for a while I hoped I wouldn’t be in a situation where I had to eject or touch native dependencies. But when implementing turn by turn navigation using mapbox this became a reality.
In this article, I will take you through the successful installation process and the set of debug steps I discovered worked well for me when creating a Expo plugin for both Android and IOS.
Why is this important?
The main success of this piece of work is being able to add any native dependencies you’d like into the eas build process, this allows you to maintain the same easy build process on EAS with a couple of extra tweaks and without needing to eject Expo.
General Approach and Debugging Steps
Here are some general steps you should take to ensure your Expo plugin will work on EAS CI. These steps are made up of things you will need to add to your main index.js plugin file and how to subsequently debug what the expo CI will do with that file.
When going through trying to install your own native dependencies as an Expo plugin there are some common debugging steps that can be followed to make sure what you are doing will work on EAS CI.
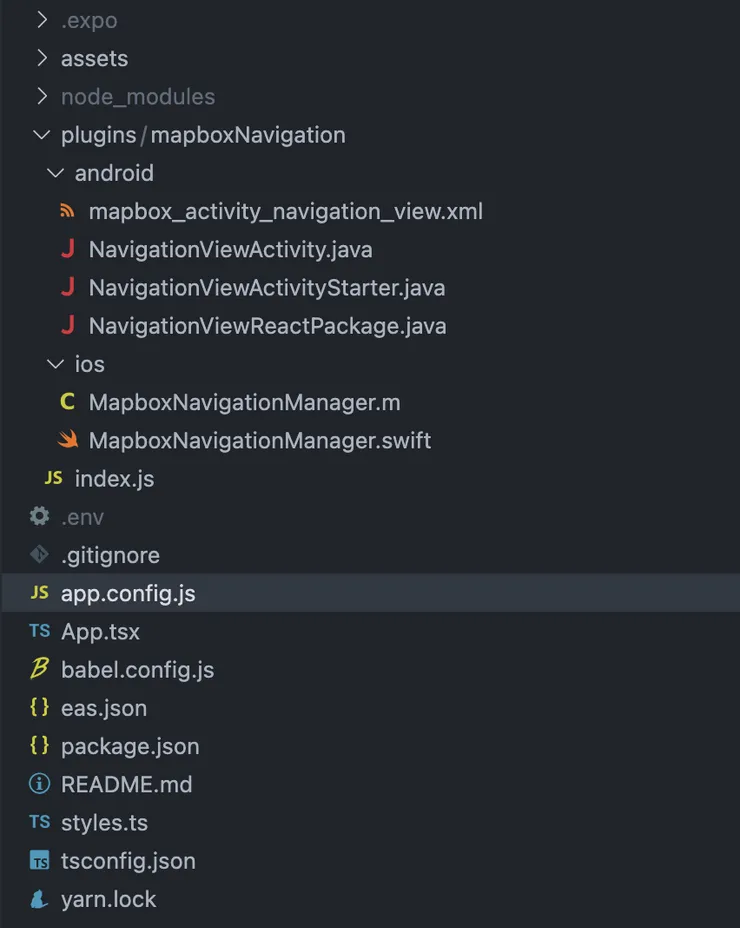
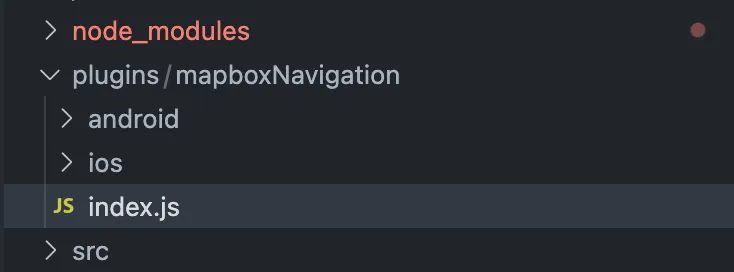
The first step of the process is making a plugin folder in your expo project and adding in an index.js file along with ios/ and android/ directories, in the plugin key in the app.config.js you need to link to this index.js file so expo knows what to build. The plugin I created for the example later has the following file structure:
Although usually when creating such a plugin you are likely just to start with an index file, then the following steps can be performed to install whatever native dependency is required:
-
Depending on the architecture of the native library you are trying to install you will need to add in different native IOS and android dependencies/ files
- Add any dependencies into the podfile or app gradle using mods from the expo config-plugins library into the index file you created for the plugin.
-
run
expo prebuild --clean, this is the step expo runs in their CI to generate the android and IOS folders that get built into the native apps.- when running this locally you will see that expo creates the ios and android folders for you using any configs in your plugin ‘index.js’ file.
- This is a very important debugging step as it allows you to see what expo CI will generate behind the scenes. It will give you valuable insight into why builds may be failing on Expo CI.
- After following Step 1 you should see the dependency you added in the correct Android/IOS directories upon running this step.
-
once you have the android/ and ios/ folders generated by the expo command in your project root get the native dependencies installed and make sure the project builds correctly - this will be a combination of adding in the correct pods necessary and any maven repositories you may need
- 💡TIP: It is easier doing either ios or android first and getting a complete working version before starting the other - this is because you can deal with errors one at a time.
-
Once you know what needs to be changed in the native files you need to modify the index.js file to include any necessary changes - see expo config-plugins docs
- These changes will be things like including a different pod dependency, changing your cocoapods output config, adding in a string value into your res/strings directory. You will usually know what needs to be changed as the build or pod install will usually fail for some reason in the build step.
-
After all of the dependencies are installed you can add any files required - with ios this is fairly straightforward
function withMapboxNavigationReactBridge(config) {
  return withXcodeProject(config, (cfg) => {
    const xcodeProject = cfg.modResults;

    // Get the Xcode project "key" that the new file entries will be added
    // to
    const { projectName, projectRoot } = cfg.modRequest;
    const group = xcodeProject.pbxGroupByName(projectName);
    const key = xcodeProject.findPBXGroupKey({
      name: group.name,
      path: group.path,
    });

    // The directory where new source files should be copied to
    const sourceDir = dirname(getAppDelegateFilePath(projectRoot));

    // A helper function to copy files into the project
    const addSourceFile = (name) => {
      // eslint-disable-next-line no-undef
      const src = resolve(__dirname, "ios", name);
      const dst = resolve(sourceDir, name);
      writeFileSync(dst, readFileSync(src, "utf-8"));
      // Update the Xcode project data stored in the cfg object
      xcodeProject.addSourceFile(`${projectName}/${name}`, null, key);
    };

    addSourceFile("MapboxNavigationManager.swift");
    addSourceFile("MapboxNavigationManager.m");
    return cfg;
  });
}
But with Android the write is more dangerous - you need to take into account the bundle name of your application and then use JS
readFileSyncandwriteFileSyncoperations to write the folder to the desired location for the RN bridge to pick it up (more on a specific example later).
An example using Mapbox turn-by-turn navigation
Following the steps dictated by the instructions above firstly I created a plugin directory with an index file which will be used to tell EAS what to do at the prebuild step of the CI:
note: for these steps to work you will need to have an expo file structure without any iOS and android folders at the root level - if expo CI detects a bare react native architecture it will skip the prebuild step and this index file will not be executed.
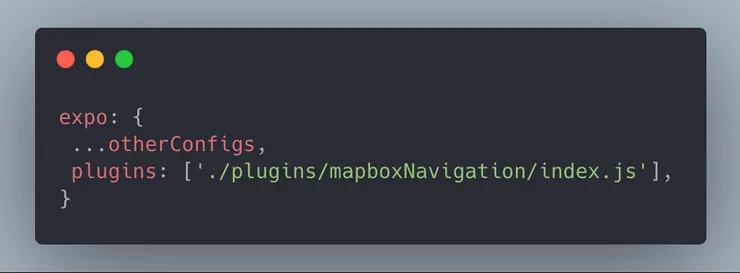
For the index file to run during the pre-build stage I will add the reference to this plugin in my app.config.js file like so:
we are now setup to start adding things to the index.js file for our plugin and begin making the adjustments we need for IOS and Android
IOS Config
For IOS, following from the library docs there are a few things to be done here:
- First you will need to configure an access token
- Then add it to the your info.plist
- Finally you will be able to install and use the mapbox navigation pod to utilise the turn-by-turn functionality
Access Token:
after setting up the access token with the correct permissions, following from the mapbox installation guide, the expo project structure allows me to inject this in my app.config.json as a simple key-value pair:
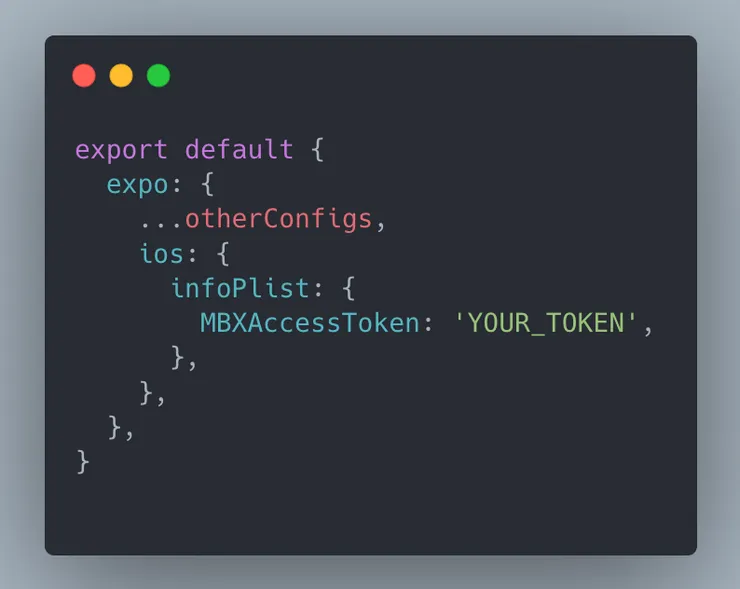
So expo will automatically add this token for me into my info.plist at build time.
Installing Mapbox Pod:
Next comes time to add the correct pod we want into our project - this seems daunting at first as you have to dangerously modify your podfile from the plugin index file previously created. But luckily expo provides some useful helper functions to do this. Initially in your index.js file you are going to want to export just a single function that takes in all of the config for the project and any extra params you need to pass through, expo recommends you name the functions that modify functionality by prefixing them with the ‘with’ keyword followed by what its modifying (this will make more sense later). Starting off, write your index so it looks something like this:
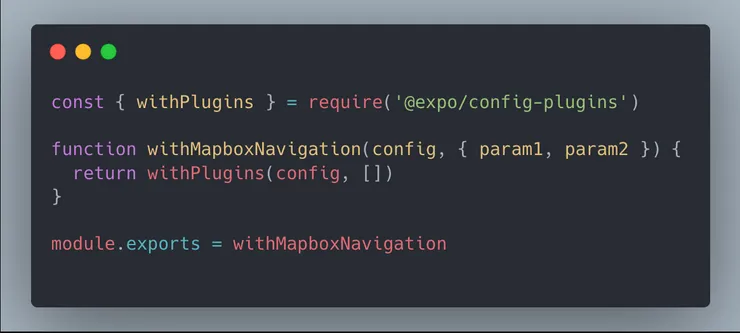
Where we will place all of our other modifier functions in the empty array in the withPlugins function from expo. The first function to write and include here is the function that is going to take our podfile and inject the dependency we need into it - this is done by using a combination of different functions from JS libraries and expo. We are using mergeContents to read files that are utf encoded and pickout bits of the file where we want to add/replace text. We use withDangerousMod from expo to modify a file at build time. And we use some extra functions from ‘fs’ and ‘path’ to read and write these IOS native files correctly. After running expo prebuild once without any modifications you can see the IOS podfile and where the modification needs to be made to add in this pod dependency. We can then use mergeContents to pickout that line from the file, add some generated code and then modify it, there is an example of how I was able to do this below:
const { withPlugins, withDangerousMod } = require("@expo/config-plugins");
const {
  mergeContents,
} = require("@expo/config-plugins/build/utils/generateCode");
const { resolve } = require("path");
const { readFileSync, writeFileSync } = require("fs");

function withMapboxNavigationPod(config) {
  return withDangerousMod(config, [
    "ios",
    (cfg) => {
      // Gets project root file from mod request
      const { platformProjectRoot } = cfg.modRequest;
      // Gets podfile from project
      const podfile = resolve(platformProjectRoot, "Podfile");
      // Opens content of podfile in utf encoding
      const contents = readFileSync(podfile, "utf-8");

      // Adds required Pod into Podfile
      const addMapboxPod = mergeContents({
        tag: "add mapbox pod",
        src: contents,
        newSrc: `  pod 'MapboxNavigation' ~> 2.8`,
        anchor: /\s+use_expo_modules!/,
        offset: 0,
        comment: "#",
      });
      if (!addMapboxPod.didMerge) {
        console.log(
          "ERROR: Cannot add block to the project's ios/Podfile because it's malformed. Please report this with a copy of your project Podfile.",
        );
        return config;
      }
      writeFileSync(podfile, addMapboxPod.contents);

      return cfg;
    },
  ]);
}

function withMapboxNavigation(config, { param1, param2 }) {
  return withPlugins(config, [withMapboxNavigationPod]);
}

module.exports = withMapboxNavigation;
After adding in this code and running expo prebuild --clean you should be able to see that the ios directory is generated and that the dependency is correctly added to the iOS podfile (unless an error is triggered which might mean your podfile configuration is different to the expected). However, trying to build this for the first time I ran into some issues which stopped me from building, I will go further in the next section into the issues that I ran into and how to debug and fix them.
Issues after prebuild:
One of the first issues I ran into was that multiple asset commands output commands were being generated, I never dug down into the root cause of this issue but it seems that adding this extra dependency to the pod file triggered a duplicate set of asset commands. To resolve this bug I disabled output files from being generated by the new podfile - this is a cocoapod specific command and requires again modifying the podfile with a :disable_input_output_paths => true command at the start of the podfile.
Separate to this issue I also discovered that not all the pods being added met the minimum IOS deployment target for the project - to handle this I ensured all pods being added had a compatible minimum deployment version with the project. This again required a podfile modification.
The final solution for adding the pod then ended up looking like this:
function withMapboxNavigationPod(config) {
  return withDangerousMod(config, [
    "ios",
    (cfg) => {
      const { platformProjectRoot } = cfg.modRequest;
      const podfile = resolve(platformProjectRoot, "Podfile");
      const contents = readFileSync(podfile, "utf-8");

      const postInstaller =
        "  installer.pods_project.targets.each do |target| \n   target.build_configurations.each do |config| \n    config.build_settings['IPHONEOS_DEPLOYMENT_TARGET'] = podfile_properties['ios.deploymentTarget'] || '12.4' \n    end \n  end";

      const postTargetPodInstaller = mergeContents({
        tag: "target installer",
        src: contents,
        newSrc: postInstaller,
        anchor: /\s+post_install/,
        offset: 1,
        comment: "#",
      });
      if (!postTargetPodInstaller.didMerge) {
        console.log(
          "ERROR: Cannot add block to the project's ios/Podfile because it's malformed. Could not implement minimum deploy target for IOS",
        );
        return config;
      }
      const disableOutputPaths = mergeContents({
        tag: "disable output paths",
        src: postTargetPodInstaller.contents,
        newSrc: ":disable_input_output_paths => true,",
        anchor: /\s+'cocoapods',/,
        offset: 1,
        comment: "#",
      });
      if (!disableOutputPaths.didMerge) {
        console.log(
          "ERROR: Cannot add block to the project's ios/Podfile because it's malformed. Could not disable output paths.",
        );
        return config;
      }
      const addMapboxPod = mergeContents({
        tag: "add mapbox pod",
        src: disableOutputPaths.contents,
        newSrc: `  pod 'MapboxNavigation' ~> 2.8`,
        anchor: /\s+use_expo_modules!/,
        offset: 0,
        comment: "#",
      });
      if (!addMapboxPod.didMerge) {
        console.log(
          "ERROR: Cannot add block to the project's ios/Podfile because it's malformed. Could not install mapbox pod.",
        );
        return config;
      }

      writeFileSync(podfile, addMapboxPod.contents);

      return cfg;
    },
  ]);
}
prebuilding again with these configurations should now result in a successful build for IOS. This leads us to the next section of actually implementing the bridging with the desired functionality for the app.
Implementing Bridge + swift code:
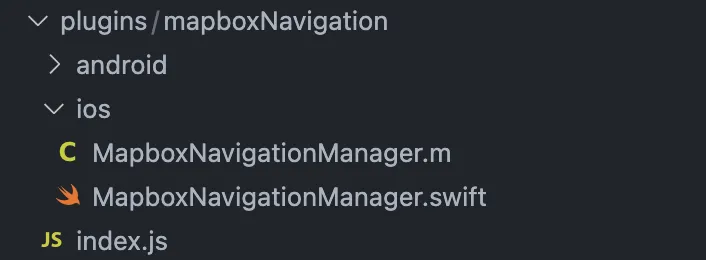
If you’ve had to make your own native module before, you know it involves writing your own objective-C and swift files along with bridging files. Luckily for IOS the bridging is largely done for you with minimal boiler plate, all that is required is an objective-C bridging file and swift/objective-C file with the actual native code. In this example following some of the example code from mapbox I opted for using swift to host majority of the native code. The objective-C bridging file and swift files in this case where added to the ios directory in the plugin folder like so:
The bridging file here just serves the purpose of exporting your swift functions to be accessible by the bridge:
MapboxNavigationManager.m
#import "React/RCTBridgeModule.h"

@interface RCT_EXTERN_REMAP_MODULE(RNMapboxNavigation, MapboxNavigation, NSObject)
RCT_EXTERN_METHOD(navigateToExample)
@end
Note that we use the React Native library “React/RCTBridgeModule.h” to export this module to be accessible from React Native, and we name this native module RNMapboxNavigation. This naming will be important when we go to access this from JS code.
The swift file to perform the actual example functionality then looks like this:
MapboxNavigationManager.swift
import UIKit
import MapboxDirections
import MapboxCoreNavigation
import MapboxNavigation
import CoreLocation

@objc(MapboxNavigation)
class MapboxNavigationClass: NSObject {

@objc
func navigateToExample() {

// Define two waypoints to travel between
let origin = Waypoint(coordinate: CLLocationCoordinate2D(latitude: 38.9131752, longitude: -77.0324047), name: "Mapbox")
let destination = Waypoint(coordinate: CLLocationCoordinate2D(latitude: 38.8977, longitude: -77.0365), name: "White House")
// Set options
let routeOptions = NavigationRouteOptions(waypoints: [origin, destination])

// Request a route using MapboxDirections.swift
Directions.shared.calculate(routeOptions) { (session, result) in
switch result {
			case .failure(let error):
			print(error.localizedDescription)
			case .success(let response):

			// Pass the first generated route to the the NavigationViewController
			let viewController = NavigationViewController(for: response, routeIndex: 0, routeOptions: routeOptions)
			let appDelegate = UIApplication.shared.delegate
			appDelegate!.window!!.rootViewController!.present(viewController, animated: true, completion: nil)
			}
		}
	}
}
This swift file exports a class with a function called navigateToExample to Objective-C. As you can see this function will direct the user from a pre-determined location to another hardcoded location. Once the result is successful it then grabs the rootViewController for the app and presents the navigation view for the user. This file can then be edited with whatever business logic requirements are needed.
To actually write these bridging files doing the EAS build process we will need to use some more methods from Expo’s config-plugins library:
function withMapboxNavigationReactBridge(config) {
  return withXcodeProject(config, (cfg) => {
    const xcodeProject = cfg.modResults;

    // Get the Xcode project "key" that the new file entries will be added
    // to
    const { projectName, projectRoot } = cfg.modRequest;
    const group = xcodeProject.pbxGroupByName(projectName);
    const key = xcodeProject.findPBXGroupKey({
      name: group.name,
      path: group.path,
    });

    // The directory where new source files should be copied to
    const sourceDir = dirname(getAppDelegateFilePath(projectRoot));

    // A helper function to copy files into the project
    const addSourceFile = (name) => {
      // eslint-disable-next-line no-undef
      const src = resolve(__dirname, "ios", name);
      const dst = resolve(sourceDir, name);
      writeFileSync(dst, readFileSync(src, "utf-8"));
      // Update the Xcode project data stored in the cfg object
      xcodeProject.addSourceFile(`${projectName}/${name}`, null, key);
    };

    addSourceFile("MapboxNavigationManager.swift");
    addSourceFile("MapboxNavigationManager.m");
    return cfg;
  });
}
Where withXcodeProject comes from the expo plugins import. This bit of code will find the IOS directory during the build process and write the files from our ios directory in our plugin folder during the build process. This implementation is crucial for the bridging to work.
After building this you should now be able to access the native methods from React Native like so:
import { NativeModules } from "react-native";

const mapboxNavigation = NativeModules.RNMapboxNavigation;
mapboxNavigation.navigateToExample();
Android Config
Similarly for Android the dependency is provided by the mapbox docs. Luckily for this project we already install the Maven dependency listed here - however for our approach we wanted to use the drop-in UI provided, for this we need to add an additional project dependency. Note - we already had the original maven repository installed as this project was already using the community mapbox plugin that adds this into the build process.
Installation Steps
Following the docs above all that is required is to add the drop-in UI dependency to the project dependencies, and then adding your token in to the projects strings so that the drop-in UI has access to it.
For the project dependency we can use a similar method to the IOS one above:
function withMapboxAppBuildGradle(config) {
  return withAppBuildGradle(config, (cfg) => {
    const content = cfg.modResults.contents;
    const mapboxDropinUIInstaller =
      '\n implementation "com.mapbox.navigation:ui-dropin:2.9.2" \n ';
    const dropinUIImplementationInstall = mergeContents({
      tag: "implementation installer",
      src: content,
      newSrc: mapboxDropinUIInstaller,
      anchor: /dependencies {/,
      offset: 1,
      comment: "//",
    });
    if (!dropinUIImplementationInstall.didMerge) {
      console.log(
        "ERROR: Cannot add block to the project's android/appGradle because it's malformed",
      );
      return config;
    }

    return {
      ...cfg,
      modResults: {
        ...cfg.modResults,
        contents: dropinUIImplementationInstall.contents,
      },
    };
  });
}
where the actual installation line is initialised as the variable mapboxDropinUIInstaller. For the access token things get a bit tricker - because the token is coming from the app config file we need to prop drill this token into the index file for use. From the app config side this is done the following way:
"plugins": [
      ...OtherPlugins
      [
        "./plugins/mapboxNavigation/index",
        {
          "RNMapboxAccessToken": "TOKEN"
        }
      ]
    ],
Then from the index file we can pull this variable in like so:
function withMapboxNavigation(config, { RNMapboxAccessToken }) {
  config = withMapboxStrings(config, { RNMapboxAccessToken });
  return withPlugins(config, [
    withMapboxNavigationPod,
    withMapboxNavigationReactBridge,
    withMapboxAppBuildGradle,
  ]);
}

module.exports = withMapboxNavigation;
where the withMapboxStrings function takes in the token and passes it to the strings android file like so:
const { withStringsXml, AndroidConfig } = require("@expo/config-plugins");

function withMapboxStrings(config, { RNMapboxAccessToken }) {
  return withStringsXml(config, (cfg) => {
    cfg.modResults = setStrings(
      cfg.modResults,
      RNMapboxAccessToken,
      "mapbox_access_token",
    );
    return cfg;
  });
}

function setStrings(strings, value, name) {
  // Helper to add string.xml JSON items or overwrite existing items with the same name.
  return AndroidConfig.Strings.setStringItem(
    [
      // XML represented as JSON
      // <string name="expo_custom_value" translatable="false">value</string>
      { $: { name, translatable: "false" }, _: value },
    ],
    strings,
  );
}
Where withStringsXml and AndroidConfig values are imported from expos config-plugins.
Adding bridging files
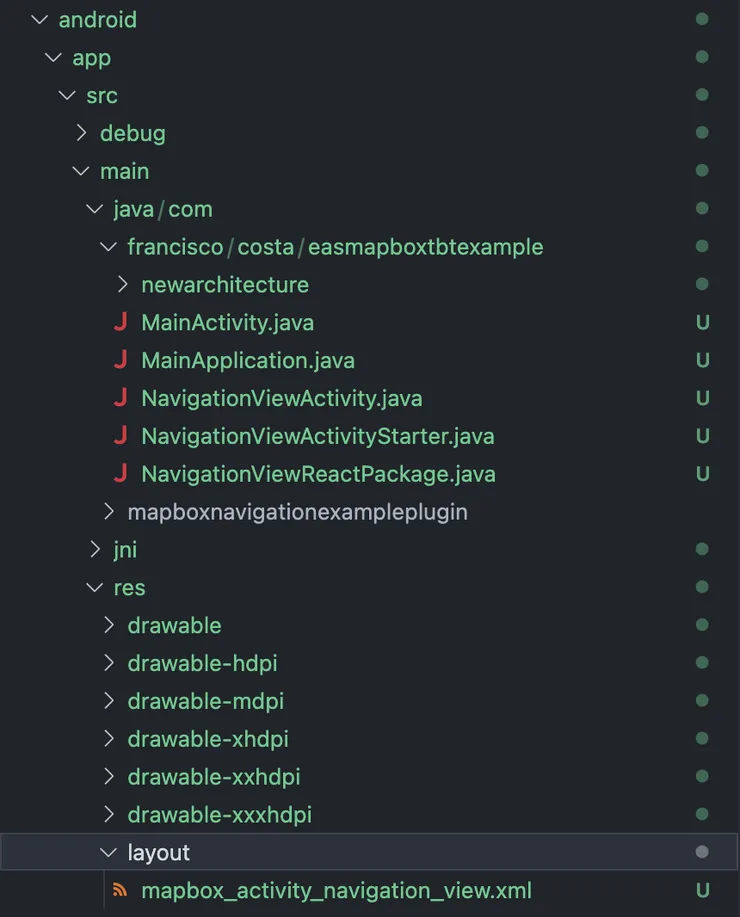
Adding the bridging files on Android is a bit more involved than IOS - there is no Android equivalent of the function withXcodeProject to easily write files to the correct directory. Moreover, we will need to edit one file and then write 4 of them for everything to be in place, one of the 4 files will need to go in the ‘res’ directory as a layout and the others into the main ‘app’ directory. The 4 files will look like this in the android directory of the plugin:

The layout file comes from the example given from the mapbox docs:
<?xml version="1.0" encoding="utf-8"?>

<com.mapbox.navigation.dropin.NavigationView xmlns:android="http://schemas.android.com/apk/res/android"
    android:id="@+id/navigationView"
    android:layout_width="match_parent"
    android:layout_height="match_parent"
    app:accessToken="@string/mapbox_access_token"
    xmlns:app="http://schemas.android.com/apk/res-auto">

</com.mapbox.navigation.dropin.NavigationView>
Next to use this layout file we will need to initiate an activity to render it to the android phone - a simple activity to do this looks like this:
package com.francisco.costa.easmapboxtbtexample;

import android.os.Bundle;
import androidx.annotation.CallSuper;
import com.facebook.react.ReactActivity;

public class NavigationViewActivity extends  ReactActivity {

        @Override
        @CallSuper
        protected void onCreate(Bundle savedInstanceState) {
        super.onCreate(savedInstanceState);
        setContentView(R.layout.mapbox_activity_navigation_view);
        }
}
To use this in React we will then need to have a function which calls this activity so that it can start. For this I used an ActivityStarterModule:
package com.francisco.costa.easmapboxtbtexample;

import android.content.Intent;

import com.facebook.react.bridge.ReactApplicationContext;
import com.facebook.react.bridge.ReactContextBaseJavaModule;
import com.facebook.react.bridge.ReactMethod;

class NavigationViewActivityStarter extends ReactContextBaseJavaModule {

    ReactApplicationContext context = getReactApplicationContext();

    NavigationViewActivityStarter(ReactApplicationContext reactContext) {
        super(reactContext);
    }

    @Override
    public String getName() {
        return "RNMapboxNavigation";
    }

    @ReactMethod
    void navigateToExample() {
        ReactApplicationContext context = getReactApplicationContext();
        Intent intent = new Intent(context, NavigationViewActivity.class);
        intent.addFlags(Intent.FLAG_ACTIVITY_NEW_TASK);
        context.startActivity(intent);
    }
}
An important piece of boiler plate at this point is the getName function that is being overwritten - this function tells React Native the name of this module that holds all of the helper functions we need.
Another specific step for Android is that after you have your module, you need to create a package to encapsulate that module and then register the package to the main react activity for it to be accessible from JS code. A boilerplate package file example:
package com.francisco.costa.easmapboxtbtexample;

import com.facebook.react.ReactPackage;
import com.facebook.react.bridge.NativeModule;
import com.facebook.react.bridge.ReactApplicationContext;
import com.facebook.react.uimanager.ViewManager;

import java.util.ArrayList;
import java.util.Collections;
import java.util.List;

public class NavigationViewReactPackage implements ReactPackage {
    @Override
    public List<NativeModule> createNativeModules(ReactApplicationContext reactContext) {
        List<NativeModule> modules = new ArrayList<>();
        modules.add(new NavigationViewActivityStarter(reactContext));
        return modules;
    }

    @Override
    public List<ViewManager> createViewManagers(ReactApplicationContext reactContext) {
        return Collections.emptyList();
    }
}
Once this is all in place under the Android folder in your plugins directory then we should be ready to start adding these files to the eas build process. First thing we need to get out the way for our build to succeed is the fact we are going to be calling an activity from JS code - this will throw an error if the activity you are trying to call isnt registered in the app manifest. Include a manifest function in your index file to handle this like so:
async function setCustomConfigAsync(config, androidManifest) {
  const { getMainApplicationOrThrow } = AndroidConfig.Manifest;

  // Get the <application /> tag and assert if it doesn't exist.
  const mainApplication = getMainApplicationOrThrow(androidManifest);
  const activityList = mainApplication.activity;

  const activityToAdd = {
    $: {
      "android:name": ".NavigationViewActivity",
      "android:label": "@string/app_name",
      "android:configChanges":
        "keyboard|keyboardHidden|orientation|screenSize|uiMode",
      "android:windowSoftInputMode": "adjustResize",
      "android:theme": "@style/Theme.App.SplashScreen",
      "android:exported": "true",
      "android:screenOrientation": "portrait",
    },
  };
  activityList.push(activityToAdd);

  return androidManifest;
}

function addManifestMods(config) {
  return withAndroidManifest(config, async (cfg) => {
    cfg.modResults = await setCustomConfigAsync(cfg, cfg.modResults);
    return cfg;
  });
}
Make sure that what you’ve called your activity file matches with the activity we added here and add any extra styling needed.
Next to add all of the files we discussed above we will need another function in the index.js file to make sure all of these are added in the build process:
function addLayoutFiles(resDirectory, filename, file) {
  const layoutDir = resDirectory + "/layout";
  const layoutDirExists = existsSync(layoutDir);
  if (layoutDirExists) {
    writeFileSync(layoutDir + "/" + filename, file);
  } else {
    mkdirSync(layoutDir);
    writeFileSync(layoutDir + "/" + filename, file);
  }
}

function withAndroidBridgeFiles(config) {
  return withDangerousMod(config, [
    "android",
    (cfg) => {
      const androidProjRoot = cfg.modRequest.platformProjectRoot;
      const navViewActivityFileName = "NavigationViewActivity.java";
      const navViewActivityPackageFileName = "NavigationViewReactPackage.java";
      const navViewActivityModuleFileName =
        "NavigationViewActivityStarter.java";
      const navViewActivityLayoutFileName =
        "mapbox_activity_navigation_view.xml";
      const pathToDir = "francisco/costa/easmapboxtbtexample";

      const activityFile = readFileSync(
        __dirname + "/android/" + navViewActivityFileName,
        "utf-8",
      );

      const packageFile = readFileSync(
        __dirname + "/android/" + navViewActivityPackageFileName,
        "utf-8",
      );

      const moduleFile = readFileSync(
        __dirname + "/android/" + navViewActivityModuleFileName,
        "utf-8",
      );

      const layoutFile = readFileSync(
        __dirname + "/android/" + navViewActivityLayoutFileName,
      );

      writeFileSync(
        androidProjRoot +
          `/app/src/main/java/com/${pathToDir}/` +
          navViewActivityFileName,
        activityFile,
      );
      writeFileSync(
        androidProjRoot +
          `/app/src/main/java/com/${pathToDir}/` +
          navViewActivityPackageFileName,
        packageFile,
      );
      writeFileSync(
        androidProjRoot +
          `/app/src/main/java/com/${pathToDir}/` +
          navViewActivityModuleFileName,
        moduleFile,
      );
      addLayoutFiles(
        androidProjRoot + "/app/src/main/res",
        navViewActivityLayoutFileName,
        layoutFile,
      );

      return cfg;
    },
  ]);
}
Here we are simply reading all of the files in our plugin/android directory and adding them to the build process. After adding this into your plugin config file we should be ready to run expo prebuild --clean and see all of the files are correctly added to the android directory created:
With the final build done, you should now be able to successfully build your apps for IOS and Android and import your functionality directly from the JS code without ever having to eject Expo.
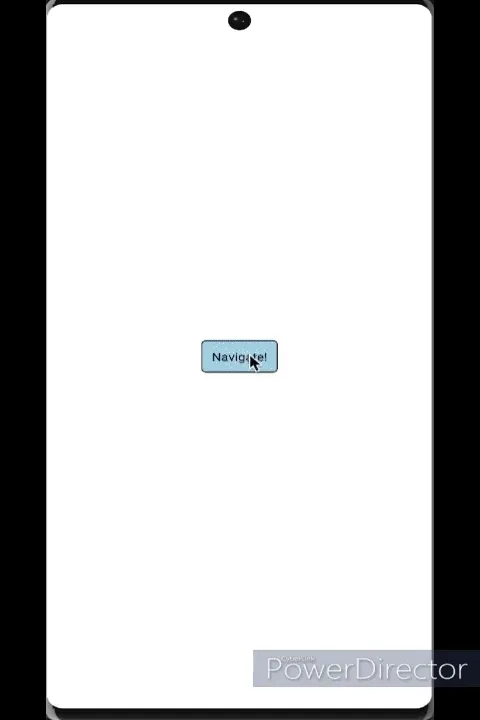
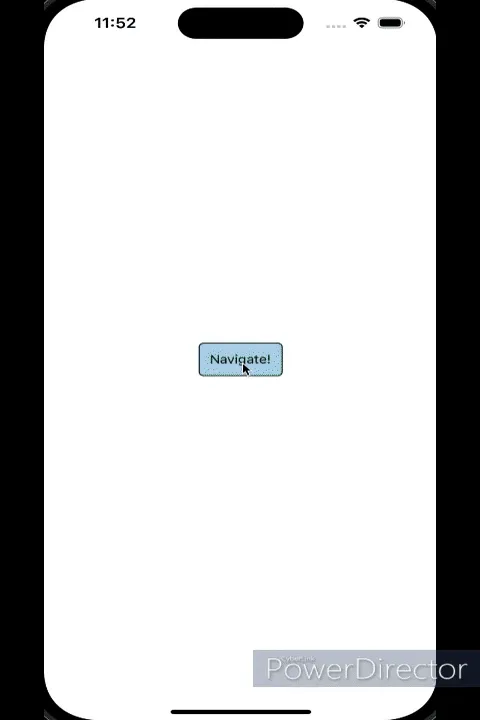
Final Result
Specific Mapbox Version issues
One mapbox specific issue I came across while doing this piece of work is that because of the pairing of dependencies, between the community mapbox library, and the mapbox navigation pods, it meant some of the dependencies I tried to add were susceptible to being out of sync with each other. For example I found that for the latest mapbox navigation pod to work (on IOS) I needed to use ‘mapbox’ as the implementation argument for the community library - where as Android would throw issues unless I used ‘mapbox-gl’ as the implementation. This meant depending on what I was building for I had to switch mapbox community implementations for the latest pod versions to work.
Next Steps
I’m happy I managed to get this solution to work but I think there is alot to improve on, at the expense of time. I have three main improvement points that I would like to carry on this work with, they are:
- Create the plugin as a separate library to the code so that dependencies are more easily managed.
- Create a self contained plugin for TBT navigation for mapbox similar to the community map library, but make it so that it’s independent of the community library.
- Typescript and refactoring - Although everything gets read from an index file it is a good idea to split off ios and android into their own separate typescript files and have the build process convert it all to JS, to be read by Expo.
I believe that these next steps would get this into a better solution for anyone else that is trying to add in this turn by turn functionality into their app.
If you are a react native developer that is struggling with native dependencies I hope this article was able to help and share some insight into how I was able to manage it with EAS. Thank you for making it to the end of the article please contact me if you have any questions on LinkedIn or via email.