How to generate Typescript interfaces from your Spring Boot backend
Jérémie Chauvel4 min read

Starting a full stack project with Spring Boot and a modern frontend framework like React in Typescript, you rapidly fall into the issue of defining your interfaces twice:
- Once on Spring Boot side where you create your response/request DTO for your controllers,
- and again on the frontend where you have to write those interfaces again in Typescript this time.
Not only is this poor developer experience, leading to a loss in productivity, it simply leads to bugs as you can easily forget to upload your interfaces on one side.
Great news! Avoiding this pitfall is actually possible and easy ?! with a quick setup, which is the topic of the following guide, let’s go!
How can we generate Typescript interfaces from our Spring Boot backend
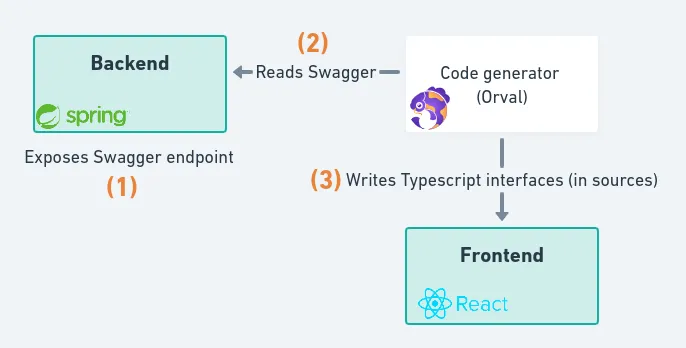
Advancement in code generation and support of standards like Swagger/Open API to describe REST APIs allow for effective code generation. Meaning we only need to set up a proper Swagger on our backend api in Spring Boot to benefit from interface generation for all our interfaces.
In practice
We will need to expose a Swagger on Spring Boot application and then to configure our code generation tool to target it.
Setting up SpringDoc
To generate our Swagger we will use SpringDoc as SpringFox is outdated and less maintained. (You can even relatively easily migrate from SpringFox to SpringDoc)
Setting up SpringDoc with Maven is classic, get the latest version, add it to your pom:
<!-- Swagger -->
    <dependency>
      <groupId>org.springdoc</groupId>
      <artifactId>springdoc-openapi-ui</artifactId>
      <version>1.6.9</version>
    </dependency>
If you are using some sort of authentication, you will need to allow unauthenticated access to the Swagger, eg:
// ... rest of your auth
 @Override
  public void configure(WebSecurity web) throws Exception {
    // Allow Swagger to be accessed without authentication
    web
      .ignoring()
      .antMatchers("/api-docs")
      .antMatchers("/api-docs/swagger-config")
      .antMatchers("/swagger-ui.html")
      .antMatchers("/swagger-ui/**");
Which you can limit to dev environment if you are not comfortable allowing your backend users to discover your API endpoints using Swagger, to do so use profiles/environment variables as you can easily disable SpringDoc.
Now start or restart your Spring Boot application, you should be able to get your Swagger (JSON) on http://server:port/context-path/v3/api-docs, for the application created for this guide it’s: http://localhost:8080/guide/v3/api-docs.
One additional step is to configure your Swagger to regroup enums usage definition (meaning when you use an enum in two DTO you will expose only one enum definition in Swagger instead of duplicating the definition):
@Configuration
public class OpenApiConfig {
  static {
    // use Reusable Enums for Swagger generation:
    // see https://springdoc.org/#how-can-i-apply-enumasref-true-to-all-enums
    io.swagger.v3.core.jackson.ModelResolver.enumsAsRef = true;
  }

  // ... you can also describe your api bellow
  @Bean
  public OpenAPI openAPI() {
    return new OpenAPI()
      .info(
        new Info()
          .title("My shiny API")
          .description("My shiny API description")
          .version("v0.0.1")
      )
      .externalDocs(
        new ExternalDocumentation()
          .description("Documentation")
          .url("https://my.shiny.api.doc/")
          // can simply be a link to a README
      );
  }
This setup is enough for code generation, however I recommend to dive deeper into SpringDoc, it also offers you an UI http://server:port/context-path/swagger-ui.html which can be an excellent way to document your api for your clients.
Setting up Orval
Orval is a recent code generator that propose code generation up to API client generation with the tool of your choice: fetch, Axios, React Query, SWR. For this guide, I will cover interface generation only, however if you are starting a project, I highly recommend setting up client generation as well.
First install Orval as a dev dependency on your project:
npm install orval --save-dev
then create an orval.config.ts file in your frontend:
import { defineConfig } from "orval";

export default defineConfig({
  evo: {
    output: {
      mode: "tags",
      schemas: "model/api",
      mock: false, // enable/disable test mock generation
      // I recommend enabling this option if you generate an api client
      prettier: true, // recommended if you use prettier
      clean: true, // recreate the whole folder (avoid outdated files)
    },
    input: {
      // use your own Swagger url: http://server:port/context-path/v3/api-docs
      target: "http://localhost:8080/guide/v3/api-docs",
    },
  },
});
Once your backend is running, you can generate your interface running npx orval --config ./orval.config.ts.
I recommend setting up a script in package.json:
{
  ...
  "scripts": {
    ...
    "gen:types": "orval --config ./orval.config.ts"
  }
}
That’s it! Now you only need to launch this command to update your frontend interface when you modify your backend, no more duplication 🎉
Going further
You can go a bit further as mentioned in passing in this guide:
- SpringDoc provides a great UI to self document your API, and you can customize the Swagger generated for your clients,
- Orval has many features including client generation, creating mock for your API, I highly recommend looking into it,
- the next step would be to automate client side type generation in CI to test that every pull request has up to date types, you can do so without running your backend as SpringDoc propose a maven plugin to generate the Swagger JSON.