Simplify your full-stack applications with XState
Daniel Belo Gonçalves10 min read
XState is a popular state management library for JavaScript and TypeScript using finite state machines (FSMs) and state-charts. The general use of FSMs has been widely popularised over the last few years by React and Redux, but state machines have held a key role in the core of computer science long before the days of complex interfaces on the modern web. The same concept which informed the building blocks of the Turing machine, are today used to manage your navigation between Twitter threads. Finite state machines’ sustained, battle tested, popularity stems from the fact that they follow intuitive patterns which come naturally to humans; when you’re thinking about how you’ll “cook” your ready meal at home, you likely don’t picture a series of if statements, but instead might see it as a series of steps and transitions between them.
Today we use FSMs in day-to-day software development to add structure to seemingly abstract flows of logic. When you think of all possible permutations of a user’s path through the Twitter UI, they are seemingly infinite. But drawing them out in a state-transition diagram demonstrates that the logic is in fact quite simple. To software developers structure and simplicity are bliss, not (only) because we’re lazy, but because simple and robust code is easier to maintain and test.
Why XState
XState is just one of many modern state management libraries used by JavaScript and TypeScript developers. Some of the more popular ones are Redux, MobX and Recoil, with XState being the new kid on the block.
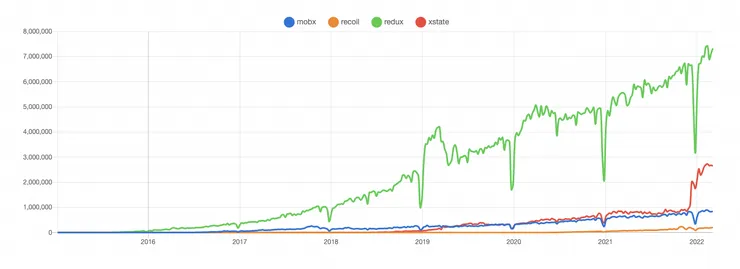
With well-established competition, it’s natural to wonder how XState fits in the market.
XState could be described as the only true established state-machine in the JavaScript ecosystem, since it adheres to the W3C specification. This means that when we write state machines with the XState API, these are being converted to a standardised XML notation under the hood. This XML could then theoretically be imported into another (standard compliant) state management framework, making it completely language agnostic.
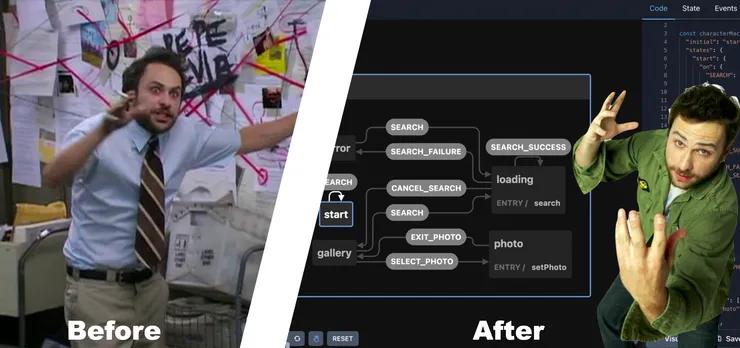
The visualiser is, in my opinion, XState’s most powerful distinguishing feature. This tool leverages Finite Automata’s user-friendliness and readability by automatically generating the state diagrams for us. Even better, the visualiser enables us to define the state machines with a drag and drop interface! Remember, these features aren’t (only) because developers are lazy, but are really there to provide an intuitive bridge between developers and people without a technical background. UI design tools, such as Figma’s user flows or more traditional sequence diagrams, look almost exactly the same, with edges connecting nodes in a relatively simple diagram. This enables non-technical stakeholders to easily read and validate your work, or even design it themselves.
Using XState in the Backend
Although their use is predominantly discussed for frontend use cases, state machines can also provide backend developers with a robust platform to handle cases where an entity (which might be stored in a database or simply passed though an API) might find itself in multiple different states.
These applications of XState differ from their UI counterparts by the fact that the state machines are not the source of truth for the state - this typically being the database. XState can take properties of the entity and infer its state; which means that as long as we assume that the entity only changes via the state machine, it is still safe and deterministic (more on this later). Note that this means our servers are still stateless, and we still reap all the benefits of this fact such as horizontal scaling.
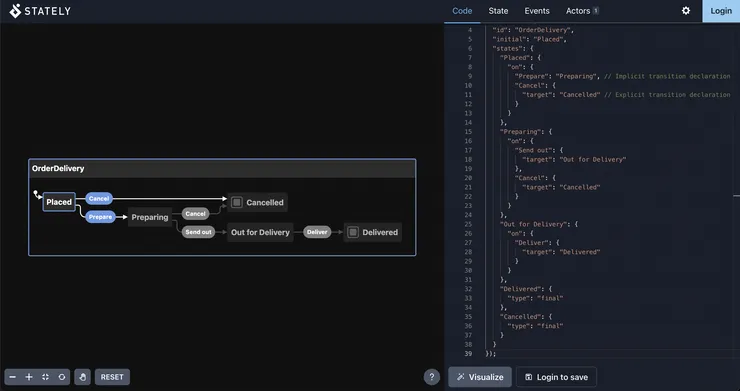
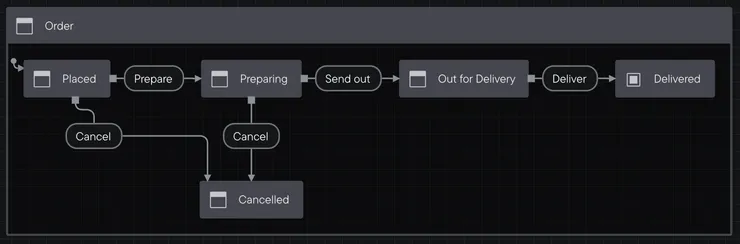
Let’s take a simple example of a food delivery app and see how it might handle an order on its way from a restaurant’s kitchen right to your door following the this state diagram:
1. Defining the machine, states and their transitions
import { createMachine } from "xstate";

const deliveryMachine = createMachine({
  id: "OrderDelivery",
  initial: "Placed",
  states: {
    Placed: {
      on: {
        Prepare: "Preparing", // Implicit transition declaration
        Cancel: {
          target: "Cancelled", // Explicit transition declaration
        },
      },
    },
    Preparing: {
      on: {
        "Send out": {
          target: "Out for Delivery",
        },
        Cancel: {
          target: "Cancelled",
        },
      },
    },
    "Out for Delivery": {
      on: {
        Deliver: {
          target: "Delivered",
        },
      },
    },
    Delivered: {
      type: "final",
    },
    Cancelled: {
      type: "final",
    },
  },
});
After installing and importing the library, we can start by defining our states in the JSON format. Here we have 3 types of states: the initial one (defined by this declaration before the list of states); regular states (for now these are just empty objects); and the final states. XState supports one other history type which we won’t cover here but they provide a way to return to a previous state of a region (nested or compound states) when we transition back to it.
Now, just having a set of states isn’t much help to us if we can’t get out of the initial sate. This is where we’d use transitions, which are nothing more than a set of objects in the on property of a state that name the event and point the interpreter to the target state after the transition has taken place.
Reading the documentation you might see two ways of declaring the transition, both are highlighted in the example above and are equivalent.
2. Actions and Effects
Until now our state machine is really only useful as a process visualisation tool. To complete it, stuff needs to happen in different states. For example, anytime we transition to the next state, we fire an update to the customer’s app telling them their pizza is one step closer to them.
These actions (also called fire-and-forget effects) can be invoked either at the entry to a state (no matter the transition to enter it), the exit of one (no matter the transition to exit it), or on a specific transition object. It’s up to you which implementation you use, but the order in which actions are run should not matter (that is, you should always ensure actions will not cause side-effects that will affect each other). XState will always execute them in the following order: exit, transition, then entry.
For example, sending the notification to the client, we might do it in one of two ways:
"Preparing": {
	"on": {
		"Send out": {
			"Target": "Out for Delivery",
			"actions": () => {
				console.log("Your Pizza is almost there!");
				// Trigger API events and updates in here
			}
		}
	}
},
"Out for delivery": {
	"entry": () => {
		console.log("Your Pizza is almost there!");
		// Trigger API events and updates in here instead
	},
	"on": {
		"Deliver": "Delivered"
	}
}
Should we for some reason need to trigger an asynchronous event during at transition (for example to call and external API, or even invoking a second machine), XState provides Invoked Effects. These are used where the outcome of an asynchronous side effect can change the state of our machine, (e.g. if we cannot successfully send a notification to an orange-clad delivery partner, then we shouldn’t transition to out for delivery). Invoked effects are declared inside the state as follows:
"Preparing": {
  "invoke": {
    "id": "callDriver",
    "src": async () => {
      // Dispatch service to book a delivery driver
    },
    "onError": {
      "target": "Cancelled"
    }
  }
}
In short, actions are used when we don’t care about the result of them, like ephemeral updates/logs or firing off events to external services. Effects are everything else, where they take a long time and the result matters to us, such as API calls.
3. Context
A simple extension to a pure finite state machine is the extended state. This model allows the finite automata to track variables on top of the state it’s in. In XState, this is called the context and it is simply an object we define when the machine is created.
But when we pair XState’s context with Typescript, we get a very simple, yet extremely powerful extension to state machines: typestates. As the name implies, typestates link the type of an object to a state value; in other words, we can infer the state an object is in with its type. Practically this is done with XState’s 3rd generic type on createMachine where we define an interface with a state value and the corresponding context type:
type OrderTypeState =
  | {
      value: 'Placed';
      context: OrderPlacedContextType;
    }
  | {
      value: 'Preparing';
      context: OrderPeparingContextType
    }
  | {
      value: 'Out for Delivery';
      context: OrderDeliveringContextType
    }
  | {
      value: 'Delivered';
      context: OrderDeliveredContextType
    }
  | {
      value: 'Cancelled';
      context: OrderCancelledContextType
    };

const deliveryMachine = createMachine<OrderState, OrderEvent, OrderTypeState>({
  "id": "OrderDelivery",
  "initial": "Placed",
  "context": {
    customerAddress: ...,
    customerPhone: ...,
    deliveryDriver: undefined,
    cook: undefined,
    ...restOfDatabaseOrderEntry
  },
  "states": { ... }
});
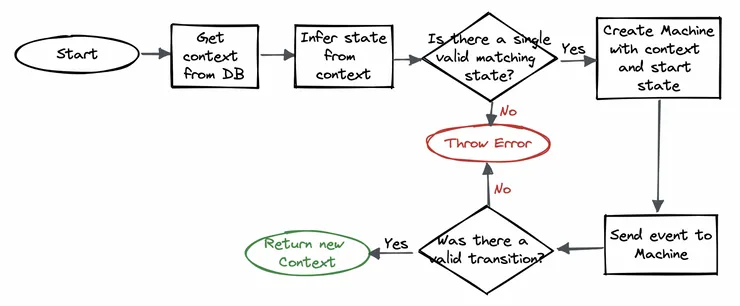
With this, we can now infer the state of our machine given a context (this was fetched from storage), and initiate a service (instance of the machine), providing the initial context and state. This means that in the current session we have a fresh instance of our machine in the right state on which we can make deterministic transitions.
import { interpret } from "xstate";

const runTransition = (
  context: OrderMachineContext,
  event: OrderMachineEvent
) => {
  const initialState = // infer initial state from context

  // Create an instance of the machine
  const service = interpret(deliveryMachine.withContext(context));

  service.start(initialState.value); // Set the start state

  service.send(event);

  service.stop();

  if (service.state.changed) {
    // Return updated context to store in database
    return service.state.context;
  }
  throw Error("Failed to run transition");
};
But there’s more!
We’ve seen how XState stands apart from it’s competitors and how even backend developers can wield its powers, but the library offers so much more that I didn’t have the chance to cover. I’ll leave you with some cool features of XState which I didn’t get round to mentioning in this article:
- Guards: These make transition checks even more robust by adding additional constraints and logic to them. Rather than only checking whether the state is right for the transition, we also ensure that the extended state (context) is correct. This can be a huge help with things like checking right user permissions.
- The actor model: What’s more fun than one state machine? Many state machines! The actor model is a design pattern where we try to break down complex machines into multiple agents, each of which is responsible for a very specific task. These agents communicate by exchanging messages and spawning other actors. XState has a huge amount of documentation around this and is unrivalled in how well it handles multi-actor systems.
- Hierarchical and Parallel states: These are somewhat of a halfway point to the actor model, but on a smaller scale. These are particularly useful to avoid state explosion since we avoid having to define all the states at a top level when they can only be accessed as children of a particular state.
- Testing: In typical dev fashion, I’ve put testing in the nice to have section. But XState offers some nifty tools out of the box for mocking side-effects and testing pure logic, all of which is well worth a read in the docs.