How to externalize large libraries from your application bundle?
Guillaume Vagner10 min read

During the past months, I spent a lot of time trying to improve the frontend developer experience of about 15 developers on a large e-commerce website. The objectives included the reduction of our bundle size and CI run times. During this time, the development team introduced 3D assets, using the BabylonJS library to provide users with a more immersive experience regarding the articles displayed on the website. Unsurprisingly, this new feature increased our bundle size by 8 MB, representing more than 40% of our application size of the time. This in turn significantly increased our build times locally but also on the CI runners.
To mitigate these consequences, the approved solution was to serve the Babylonjs library from a dedicated CDN excluding it from the bundle for each build.
I am writing this article to share my learnings on how we managed to keep this dependency and more generally any large app dependency while reducing the consequences on the build size and time to a minimum.
TL;DR
- Adding a large library increases bundle size and building times locally and on the CI/CD environments.
- Many solutions as lazy solution exist to separate large dependencies for client, but it does not solves the issues for building processes.
- To shorten building process, we externalized a large library to remove it from my application bundle.
- To do so, the library has been externalized in a script, and dynamically loaded the library logic from it, without modifying any import from my application
- Finally I measured the performance gain through a minimal example that you can find at the end of the article.
What are the impact(s) of adding large libraries as dependencies?
As a general rule, the bigger the package is, the greater the impact will be on a project’s developer experience.
Download time
First, big dependencies impact installation times. When a dependency is added to a project, the designated packages and all its sub-dependencies are added to the node_modules directory. The time to compute dependencies, download the packages and sometimes build them will increase proportionally to the size of the new package. Yet, fast Internet access and cache have made these delays short, and exporting a whole package as an external dependency would not worth it if it was only to shorten these download times.
Build size
Another concern could be the bundle size increase related to the added dependency. However, modern bundling techniques such as lazy loading, code splitting and tree shaking already solve this issue by bundling only necessary code and splitting it into chunks. Moreover, moving packages into CDN would hide the problem because the user browser would still require to fetch the library. It is just not counted in the bundle served by the server.
Build time
Finally, the biggest issue with large dependencies is the build time increase. Building the application happens very frequently in the development workflow: building locally in watch mode when adding or modifying code or remotely with CI/CD. Globally, all the library code will be parsed and built into the bundle, so the larger the package is, the longer it will take to be included in the bundle. Externalizing the dependency on a CDN allows developers to retain the package functionality without having to include it at every build step.
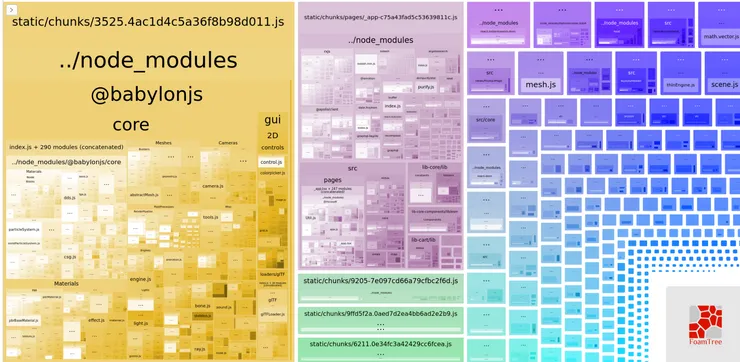
For instance, on my project, the frontend was managed by Next.JS and we regularly analyzed our bundle size with @next/bundle-analyzer. Just after installing BabylonJS and developing the 3D feature, a new chunk appeared, weighting more than 8 MB, which represented around 40% of total bundle size while increasing our CI build times by 30 seconds.
How to do it!
There are three main steps to externalize a large dependency into a CDN:
- Configure the application bundler to load a global variable as an import
- Find or build a script to globally scope the library logics
- Dynamic loading of component once the external script is loaded
Bundler configuration
The purpose of a bundler is to take all the dependencies of a project and to split them all in a little number of files containing the module logic in order to improve the loading speed of the built application. This article is only going to focus on Webpack because it is the most used currently, but the method used here can be used on other bundlers as well.
In order to bundle modules, Webpack does multiple operations:
- It recursively resolves all module imports from the application entrypoint
- It packs the associated code in a JavaScript asset and divides it into multiple chunks
To externalize a dependency, Webpack needs to know which dependency we are talking about so that it may resolve the dependency imports differently. One way of doing this is to map the webpack dependency imports to a global window.myDependency variable. This is the goal of the next part of the article.
Webpack has to be configured to not pack the dependency to externalize and to link all its uses to window.myDependency. A single configuration option allows to do that: externals (link to Webpack documentation). This parameter takes an array of string or function returning a string. During the building, when Webpack reads an import, it tests if the dependency location is included in the external array (or function callback is called). If the matching element is a string externalElement, Webpack will replace the dependency location by reading directly into the variable global.externalElement. If the matching element is a function, it will follow the same process with the returned value.
Here we want to replace the Babylon import @babylonjs/core by BABYLON due to the way they will be exposed in the CDN’s script (explained in the next part). The Webpack configuration looks like the following:
module.exports = (config, { isServer = false } = {}) => {
  config.externals = config.externals || [];
  config.externals.push(({ request }, callback) => {
    if (request.match("^@babylonjs/core")) {
      return callback(null, "BABYLON");
    }
    callback();
  });

  return config;
};

Find or create the new library script and export it into a CDN
A dependency can not be externalized directly: the associated script has to have some modification. Indeed, the classic NPM or Yarn packages contain modules which are not strictly speaking scripts. The main purpose of modules is to expose logic (function, constants, etc.) that will be imported from other files. As explained in the previous part, the variable specified by the Webpack external option has to be accessible in the global scope. The dependency script must therefore be set globally when running in the browser.
Most of the time, dependencies already provide usable scripts from an already existing CDN. This was the case for BabylonJS for example which simplifies the process a lot. If your dependency does not already provide a CDN solution, you have to build the library yourself. The simplest way to do this is to follow this Webpack documentation. That allows to assign to window or global variables the elements exposed by the library. The result script should be the equivalent of one used with CDN.
Once the necessary script is build, it can be easily hosted on a CDN like UNPKG or JS Delivr. Some libraries made this task even easier by providing these scripts through their own CDN. BabylonJS was one of these. For the ones who built their own files you can host them on a private CDN.
Conditionnal loading for components using the external script
If you followed the previous steps, you should have a fetchable script exposing one variable containing all the library logic and a Webpack configuration bounding the imports of the library to the global variable. The last part is to inject the script in the code. One approach would be to inject the script globally in the application. This would create performance issues for parts of the app that do not require the dependency. The other solution is to load the script dynamically. In this case, the library logic is not available once the application is running which means the application needs to be notified before actually being able to use the dependency.
There are multiple ways to load a script conditionally and attach a callback once loaded. The simplest is by manipulating directly the DOM: adding a script with the src pointing to the script URL and onload calling the callback function. In our case, we were working with Next.js, and since v12, this wonderful library provides a <Script /> component (documentation link) doing all this work! I used it this method to display my 3D asset (contained in the <Asset3d /> component):
import { useState } from "react";
import Script from "next/script";
import dynamic from "next/dynamic";

const Asset3d = dynamic(() => import("./Asset3d"));

const Asset3dContainer = () => {
  const [isBabylonScriptLoaded, setIsBabylonScriptLoaded] = useState(false);

  return (
    <div className="asset-3d">
      <Script
        id="babylonjs-core"
        onLoad={() => setIsBabylonScriptLoaded(true)}
        src="https://unpkg.com/babylonjs@4.2.0/babylon.js"
      />
      {isBabylonScriptLoaded && <Asset3d />}
    </div>
  );
};

export default Asset3dContainer;
Multiple elements have to be taken in account:
- In my component, BabylonJS requires the external script to be fetch to have all the logic loaded. I used a state updated through
<Script />’sonLoadcallback - Once the script is loaded, BabylonJS logic is available in
window.BABYLONso<Asset3d />can be dynamically loaded
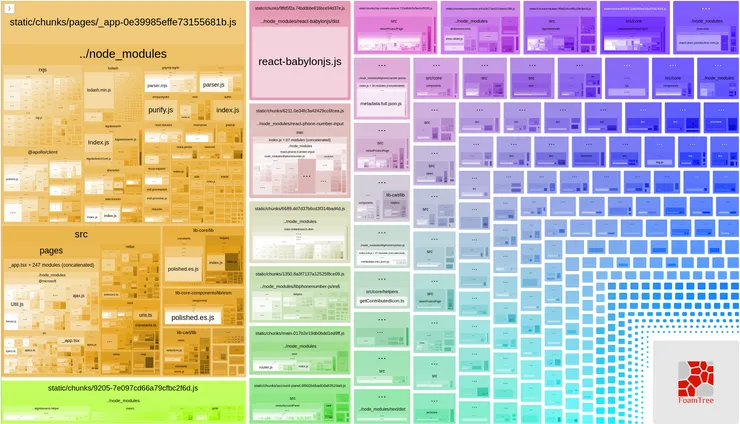
After these 3 steps, my 3D asset was finally displayed on my page! A check shows that BabylonJS chunk disappeared from my bundle!
With a wrapper as the one I showed above for your library, you should be able to display your component with all the library logic integrated while the latter is not considered as a dependency! Congratulations!

Limits
Yet, not every dependency has to be moved into a CDN. There are three limits on externalizing a dependency from an application:
- Even if a CDN package is build, it has no other optimization as tree-shaking.
- Moreover, CDN are maybe fast, but they require an Internet access during development time.
- If your project is using TypeScript, then every import from the removed library in not typed. You may either ignore these issues locally but reduce type coverage, or you reinstall this dependency as a
devDependency. In the second case, this would still mean downloading the dependency, but it won’t be included in the final bundle or in the build process (except with Next.js, but type checking can be disabled during the build if already done previously).
Thus, it is a cost-benefit trade-off between development time and use frequency of the package on one hand and building time on the other hand. In my case, the exported package was BabylonJS because 3D was only used on a few pages, but it also could be React-pdf if it is rarely used in the application, or any other large package not often used.
Conclusion
On my project, based on Github Actions data, I reduced the CI building time processes from around 30 seconds. To have better metrics, I created a minimal Next.js project which externalize BabylonJS. In the commit history, the same 3D asset is displayed, first with BabylonJS as dependency, then without it. You can look at it to see a functional example.
To test the performance of this change, I ran eight times a Next.js build command and timed it with the time command. Median building time decreases by 30 seconds, from 64.4 to 33.295 seconds! This time reduction is almost identical to the one without BabylonJS at all.
Another benefit of shorter CI runs are lower costs. According to the current Github action pricing (0.008€ per second) and around 1000 builds per month, a reduction of 30 seconds on each build saves 240€ per month on the Github action bill.
To conclude, externalizing a dependency is a complex process to setup, but it reduce all building process, by just removing the time used to build the dependency. It is worthless for small libraries, but useful for large ones, even more if they are used only on a little pages of your web application. I hope you enjoyed this article and use it to speed your CI/CD!