Why You Should Encrypt Your Disk, and How To Do It on Ubuntu with a Dual Boot
Romain Fournier12 min read
Why use disk encryption?
It goes without saying that your computer can contain sensitive information about you or the organization you are working for, such as:
- personal pictures
- password or credit card numbers saved in your browser (and so on, access to your drive, important online accounts such as administrative ones, bank…)
- emails
- administrative documents (come one, we all store scans of our id or our social security number somewhere…)
- code or projects
- financial or operational spreadsheets
Why is it dangerous?
Stolen identity
Your social security number, your id, or other administrative documents can be used to open bank accounts or credits in your name!
Fraudulent banking transaction
Stolen card numbers are very often sold to groups that will use them to perform online payments on the internet. The point is you can not realize that your number has been stolen until they use it. Then it is too late.
Blackmailing
You or your organization can be the victim of blackmailing. You for your personal pictures, for example and your organization for sensitive information, blueprints or source code.
Cyber-attack
If the stolen machine belongs to a company and contains employee credentials (VPN access for example), they can be used as an entry point on your company network, for a bigger cyber-attack such as ransomware.
Source code leak
If the source code of one of your projects leaks, it makes it easier for hackers to find security breaches in your product or application. It would also make it easier for rival companies to copy your product.
How is it technically possible and how to prevent it?
Your password does not protect your files and data
Even without your password, someone with access to your hard disk can mount it on another operating system (for example by using an Ubuntu live USB key, a very common thing) and access some of the files it contains! It is an easy hacking practice. Nowadays, shady organizations buy second-hand laptops or hard drives to collect sensitive information about their former owner and sell them.
In this video, the French Youtuber Micode shows us how he managed to collect sensitive data and files from second-hand hard disks he bought online:
Also in January 2021, Kaspersky published on their blog an edifying study on data exposed in second-hand devices: **90% of the second-hand devices contain sensitive data!**
“Kaspersky’s Global Research and Analysis Team (GReAT) has examined security in secondhand devices. […] An overwhelming majority of the devices the researchers examined contained at least some traces of data — mostly personal but some corporate — and more than 16% of the devices gave the researchers access outright. Another 74% gave up the goods when the researchers applied file-carving methods. A bare 11% had been wiped properly.”
Encryption to the rescue!
- Encryption is a way to prevent that, as an encrypted file can not be understood without the key to decode it.
- On Ubuntu, you can encrypt your home folder after installation to protect the files inside. This is a very convenient practice, however it comes with major trade-offs:
- Encryption is handled at the application level. As a consequence, it can be slow, especially when you need to copy or download lots of files (when installing software or project dependencies for example).
- Your computer also contains files outside your home directory that can also provide information on you, such as the installed library or softwares for example. Also, some programs keep information in temporary files or log files. And any information can be temporarily stored in you swap space.
- Full disk encryption leverages those two trade-offs as it provides faster kernel-level encryption, and encrypts your whole Ubuntu installation (except the boot partition).
Tutorial part: How to set up full disk encryption on Ubuntu
This article will not cover dual boot set-up, and assume that you either already have a fully-functional dual boot on your device, or your device is ready for installing Ubuntu on dual boot, or you don’t need it.
If you want to set up a dual boot, or enable Windows 10 disk encryption alongside Linux disk encryption, I recommend you switch to this longer, more complete tutorial by Mike Kasberg.
(optional) Back up your data if you want to restore it after installation
Disclaimer: you will still have to reinstall your apps, but they should restore their current settings after reinstallation.
-
(optional): remove all node modules, venv, composer dependencies, …
First, you might not want to backup folders like node_modules or other project libraries as they can be very long to copy due to the very large amount of file they contain. Moreover, it is easy to reinstall them after your reinstallation.
You can remove them manually or use the following command lines to remove all the folders with a given name in your home directory. Feel free to adapt them to the project you have.
#in your home directory cd ~ #delete all your node modules find . -name 'node_modules' -type d -prune -exec rm -rf '{}' #delete all your python venv (supposing you named them venv) find . -name 'venv' -type d -prune -exec rm -rf '{}' -
copy your home to an external drive. You can copy your entire home, or select only some folders you want to keep. Here are a few files and folders you might want to keep if you want to keep your apps settings and preferences:
- .ssh
- .config
- Documents
- Downloads
- …
This list is not exhaustive and might depend on the apps you use
Reinstall Linux with full disk encryption
For this you will need a live CD/usb key of Ubuntu.
This tutorial has been tested on Ubuntu 20.04 LTS.
If you want to keep your dual boot
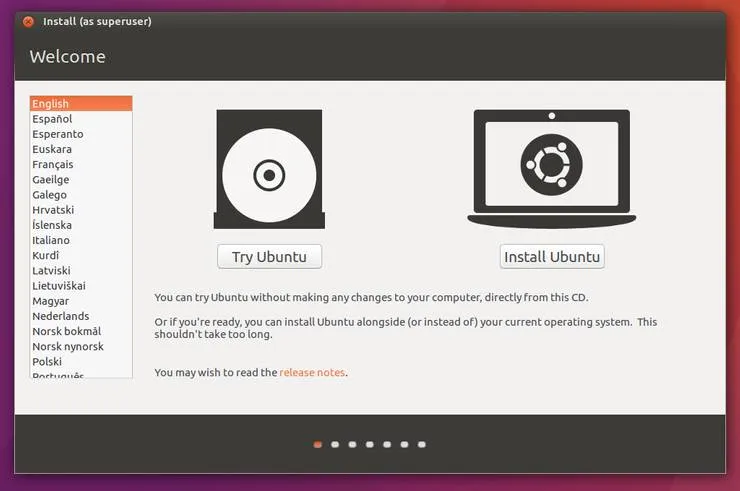
Unfortunately, the “Install Ubuntu alongside windows 10” option in the Ubuntu installer does not provide full disk encryption. We will need to set it up ourselves. If you don’t need a dual boot you can skip to the next section
- Select “Try Ubuntu” as you will need to use a few tools to prepare your disk before the installation
-
Define 2 disk partitions: one that will be encrypted and contain logical volumes for swap and root and one for boot
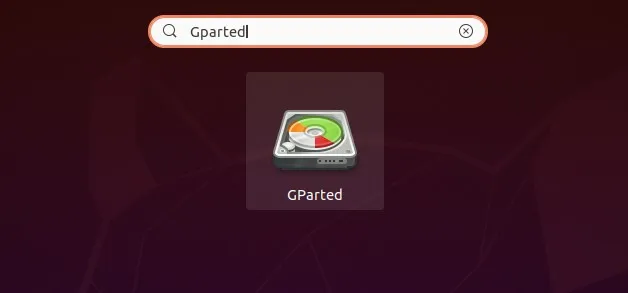
- Open GParted
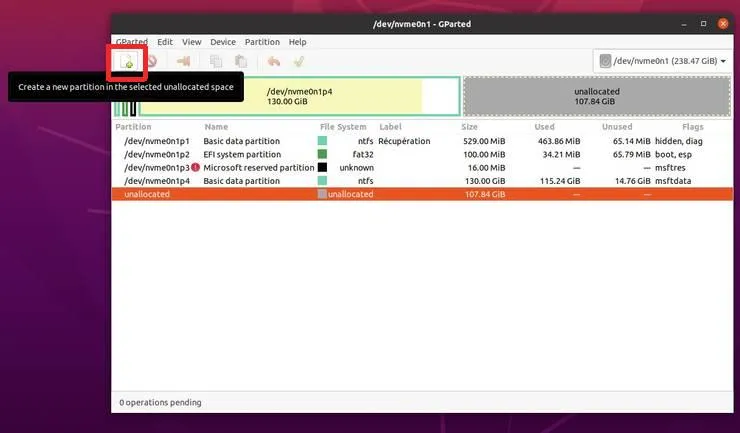
- Delete your previous Ubuntu partition if you have one (To do so select the partitions and click on the red button in the top bar. Pay attention not to delete any windows partition). Your disk should look like something like (some unused space):
-
Then create 2 new partitions:
-
A partition for boot:
- size = 500Mio
- file-system = ext4
- label = boot
-
A partition that will be containing swap volume and your Ubuntu installation:
- size = <the size you want for your Ubuntu, including swap>
- file-system = unformated
- label = root
At this point, your disk should look like something like this (2 new partitions instead of the unused space)
-
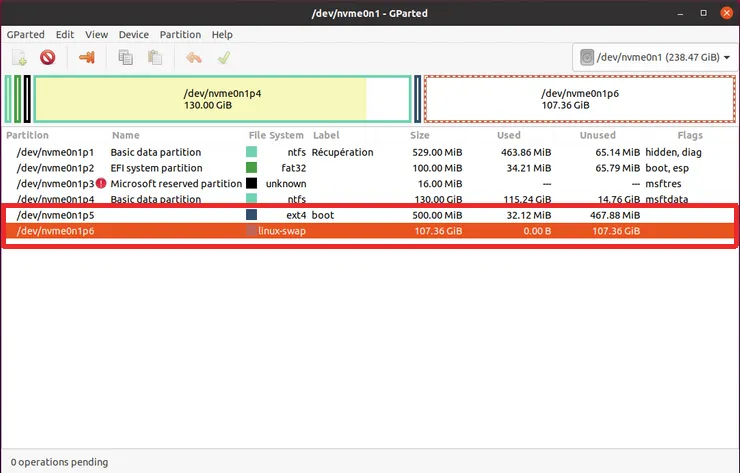
Note the name of your root partition (here /dev/nvme0n1p6) and boot partition (here /dev/nvme0n1p5). Apply your changes and then you can close GParted!
-
Encrypt your main partition and split it in two logical volumes for swap and root.
For this, open a terminal and use these commands:
-
get superuser rights:
sudo su -
encrypt your boot+swap partition:
cryptsetup luksFormat <your_root_partition>(e.g. in my case:cryptsetup luksFormat /dev/nvme0n1p6). TypeYESto validate and choose a passphrase (that you will need to unlock your disk at boot time) -
open the encrypted partition:
cryptsetup luksOpen <your_root_partition> ubuntu(in my case:cryptsetup luksOpen /dev/nvme0n1p6 ubuntu) -
create a physical volume to access this partition:
pvcreate /dev/mapper/ubuntu -
create a volume group to contain your future logical volumes (root and swap) inside this physical volume:
vgcreate vgubuntu /dev/mapper/ubuntu -
Inside this volume group, create 2 logical volumes:
- one for swap (here I use a size of 4G, feel free to adapt your swap size according to your hardware and needs. Usually swap should be around half your ram):
lvcreate -n swap -L 4G vgubuntu - one for ubuntu (root), that will use all the remaining space:
lvcreate -n root -l +100%FREE vgubuntu
- one for swap (here I use a size of 4G, feel free to adapt your swap size according to your hardware and needs. Usually swap should be around half your ram):
-
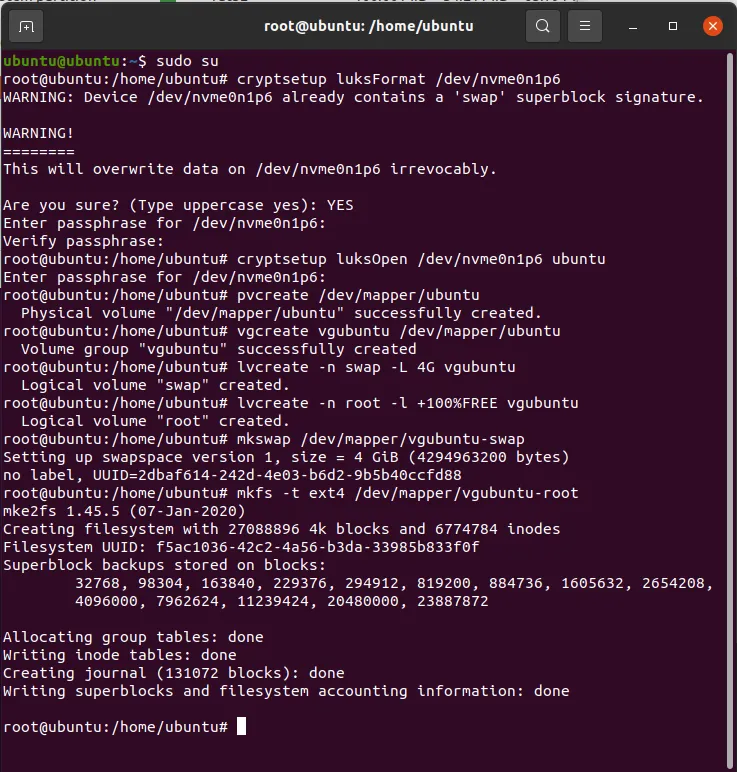
Optional: If you want to format your partitions using CLI, you can format them right now. Otherwise, this can be done using the Ubuntu installer:
mkswap /dev/mapper/vgubuntu-swapmkfs -t ext4 /dev/mapper/vgubuntu-root
At this point, your terminal should look like this:
-
-
Now that all your partitions and logical volumes are ready, you can start your Ubuntu installation (finally)!
- Open the installer, and follow the installation process until you get to this screen:
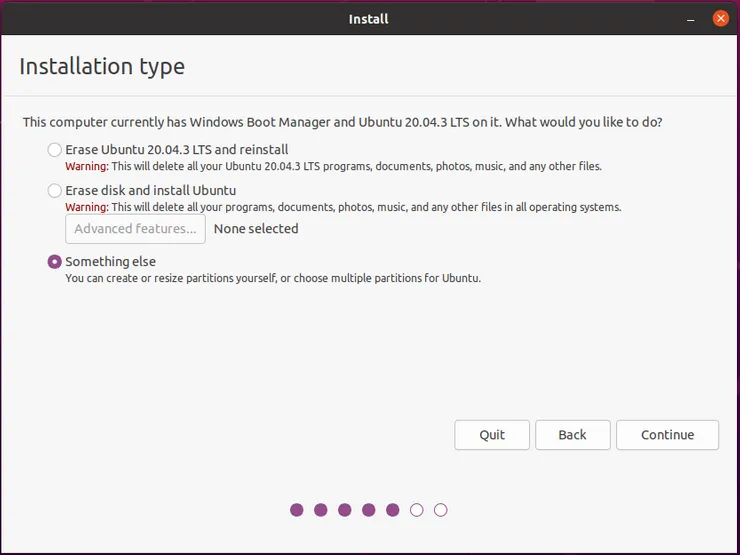
Pick “Something else” and Continue
-
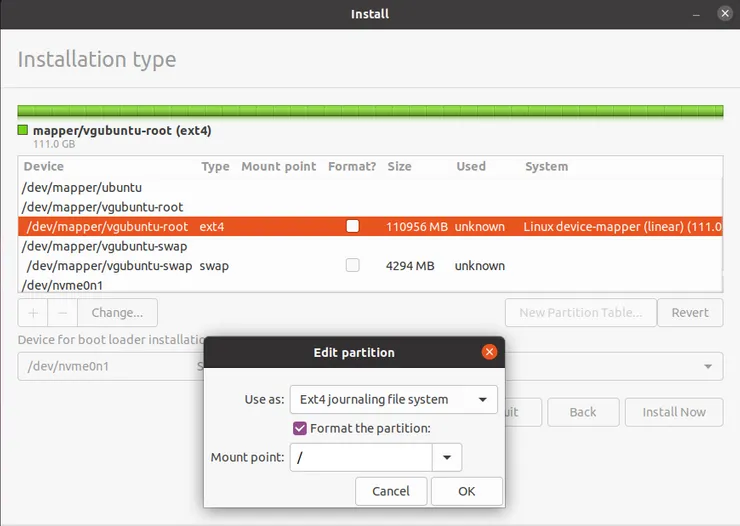
You should see all your disk volumes. Here we need to tell Ubuntu which volume to use for which use.
- Select /dev/mapper/vgubuntu-root, click Edit and pick the following settings (check format if you didn’t do it with CLI):
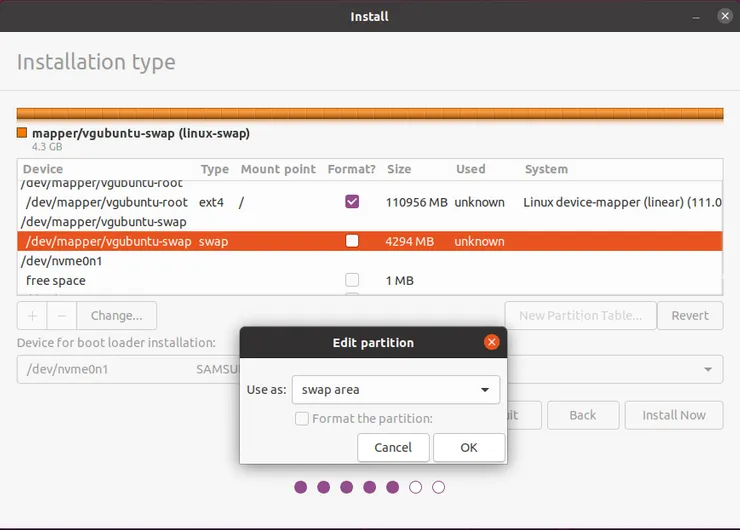
- Select /dev/mapper/vgubuntu-swap, click Edit and pick the following settings:
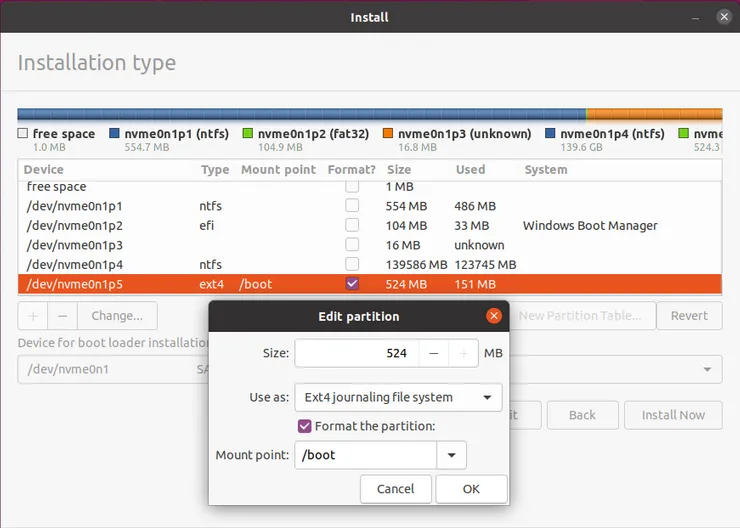
- Select the boot partition you created in step 1-c (/dev/nvme0n1p5 in my case), and pick the following settings:
- Select /dev/mapper/vgubuntu-root, click Edit and pick the following settings (check format if you didn’t do it with CLI):
-
Click install now to start the installation.

Your partition changes should look like this (if you formated them in the installer):

You can finish the installation process.
⚠️ If you want to restore your home folder, you need to create a user with the same name and password as your original one!
⚠️ Do not restart your device at the end of installation! At this point, Ubuntu is installed but it does not know that your disk is encrypted. Thus it is not able to boot yet. We will configure it in the next part.
-
Setup
/etc/crypttab, for Ubuntu to know that then encryption is encrypted and how to unlock.To do so, click “keep trying” at the end of the installation, and open the terminal. We will mount your new Ubuntu partition and use chroot on it to edit this /etc/crypttab and apply the changes.
-
Get superuser rights:
sudo su -
Get your encrypted partition UUID ( ⚠️ not the PARTUUID), it will be needed to set up the crypttab:
blkid <your_encrypted_partition>(e.g in my case:blkid /dev/nvme0n1p6).Keep it for later.
-
Mount ubuntu:
mount /dev/mapper/vgubuntu-root /target -
Mount your boot partition:
mount <your_boot_partition> /target/boot(i.e. in my casemount /dev/nvme0n1p5 /target/boot -
use chroot on the /target and mount everything:
for n in proc sys dev etc/resolv.conf; do mount --rbind /$n /target/$n; done chroot /target` mount -a -
Now, you can edit /etc/crypttab on the new installation (I’ll do it with nano for the example):
nano /etc/crypttabCopy/paste this inside the new crypttab (don’t forget to replace your encrypted partition UUID!):
ubuntu UUID=<your_encrypted_partition_id> none luks,discard -
Last but not least: apply the modifications of the crypttab:
update-initramfs -k all -c
-
🥳You’re done! Congrats, you can exit your live CD and restart your computer!
If everything worked as expected, you will be asked your passphrase to unlock your disk when you start Ubuntu.
If you don’t need a dual boot
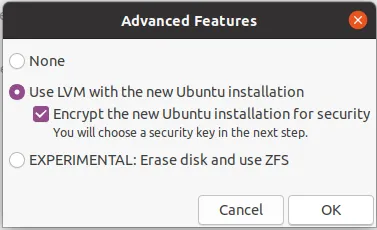
If you don’t need a dual boot on your computer, you can also erase your entire disk and install Ubuntu on it. This process is much easier. On the Installation Type screen:
- select “Erase disk and install Ubuntu”.
- Before continuing click on the “Advanced Features” button and select “Use LVM” and “Encrypt the new Ubuntu installation for security”.
You can go along with the Ubuntu installer then.
(Optional) Restore your data
Log in on your new installation and create a new user (superuser). Log out from the user you want to restore and log in on the new superuser. Then you can copy/paste your home or the files you want to restore to their proper emplacement on the home of the user you are currently not logged in.
⚠️ As said earlier, for the restoration to work properly some files will need both of your users (former and new ones) to have the same name and the same password! You can change your password later.
Once it is done, you can log back on the other user and delete the other superuser if you do not need it.
Conclusion
By following this tutorial, you learned about various fields:
About security
- Hardware security is an important part of cyber-security for organizations as well as for individuals. A device can be stolen, lost, or as you will probably throw or sell it at some point, and you want to make sure that the data inside it is not accessible if it happens.
- Your password is not required to access some of the files inside your computer if someone has physical access to your hard disk. That can happen while you own it, or even after. To prevent it, you can encrypt your device.
About device encryption
- You can use Luks to encrypt a physical volume and then split it in logical volumes for your different needs (swap, root, optionally a dedicated home volume).
- Ubuntu can handle an encrypted physical volume if it knows it from
/etc/cryptab, and then use its logical volumes as regular partitions. - You can trick Ubuntu installer by unlocking an encrypted partition using
cryptsetup luksOpen. Generaly speaking, cryptsetup is a tool to encrypt partitions and unlock them for your OS to use them (including the Ubuntu installer)
About Ubuntu
- You can copy a home folder from an Ubuntu installation and restore it on another one if you create a user with the same name and password. Unfortunately, libraries are not backed-up.
- GParted is a tool on Ubuntu to manage your physical partitions.
- Home folder encryption is not a good practice as the encryption is managed at the application level so it can often be slow. Moreover, you protect only your files. Full disk encryption is handled at the kernel level, hence it is much faster. It also ensures that absolutely no information can be extracted from your device, including your libraries, your swap space…
To go further
- If you want to know more about the process of encrypting-decoding data, and when to use file encryption:
- A video explaining How Does Full Disk Encryption Work?
- A video explaining How Does Individual File Encryption Work?
- The article on Kaspersky blog about data collection in second-hand device: https://www.kaspersky.com/blog/data-on-used-devices/38610/
Do not hesitate to browse Theodo’s blog for more interesting articles or visit Theodo’s website to learn more about us !