A Newbie's Guide to React Query
Alex Liu7 min read
Let’s say you’re building an application that relies heavily on displaying and interacting with database information (super rare situation as a dev, I know). You’re also pretty good at React and Redux, so you start building your app with those libraries.
Next, you make an API request for a dataset and put it in your Redux store. Then you render the Redux store data.
Yep, I’m following. So far so good
Next comes manipulation of that data! You build out some actions that handle adding, editing, and deleting data.
Yeah, that’s pretty standard!
Then, you trigger another GET of the data. React re-renders for you and you’re now displaying the updated data set!
But what do you do if the API you’re working with is slow? Getting that updated data back could lead to a delay in rendering the latest data, leading to a subpar user experience.
Hmm… guess I could update the store data?
True, but what then happens if the API call was not successful? Now the data in the Redux store is out of sync with the API data. How should we handle this situation? Keep track of the previous state to fall back to? How would we write up the logic for that?
Where is your god now?
Well, it seems we’ve stumbled upon a common problem — so common it feels like there should be a simple solution. Luckily for us, some great solutions are out there. Let’s dive into my favorite one!
What is React Query and how does it solve our problem?
The React Query site claims the following: “Performant and powerful data synchronization for React. Fetch, cache and update data in your React and React Native applications all without touching any ‘global state’.”
Sounds pretty good, right? As we’ve discussed earlier, holding data in our global state can cause a host of issues. As React Query’s author Tanner Linsley says, “It’s time to break up with your global state!”
Let’s take a look at some sample code:
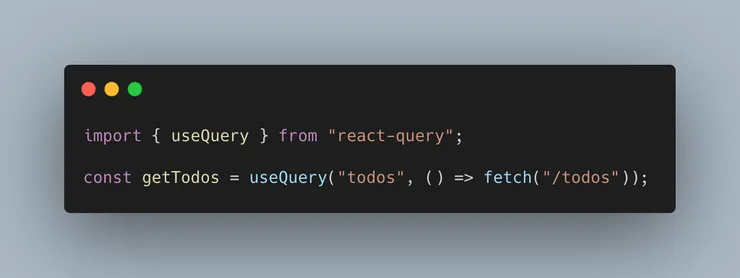
Now this is where the magic happens: the first argument in useQuery, “todos”, represents the query key.
Okay, but it just looks like a random string to me..
The query key is core to React Query — it will automatically cache query data based on these keys. Thus, you should always write and use query keys that are unique to the query’s data. While this example’s query key is a simple string, the query key can also be an array that contains strings, variables, and even objects!
Nice! Now we’re good to go, right?
Almost! Now we’re using React Query and have access to our data. And as we just learned, caching is already built-in! But are we already using it? Do we have to enable it somehow?
React Query Cache Basics
As it turns out, the code we saw above doesn’t use React Query’s cache just yet. First, we have to assign a value to the staleTime property.
…huh?
Think of staleTime as a (millisecond) countdown timer. When the timer expires, React Query then marks the query data it has cached as “stale.” As a result, the query data is refetched in the background at the next available opportunity (see the docs for a list of situations that can trigger this). You can even set this value to Inifinity, for which it will never be stale!
Gotcha. So, why again did we need to set it in the first place?
If we peek at this page in the docs, we find that React Query is configured with “aggressive but sane defaults,” one of which is the default setting of 0 for staleTime. That’s pretty aggressive if you ask me!
Alright, now show me some code!
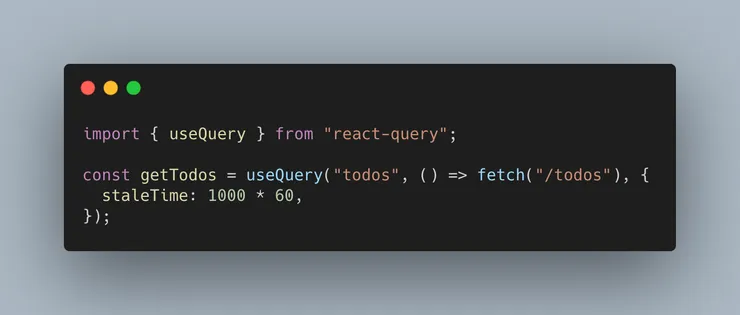
We’ve now assigned the value of one minute to staleTime! This way, the next time a query is fired with the query key ‘todos’ within the next minute, it will return the cached data. Woohoo!
Nice! But what if the data changes within that minute though?
That’s right! Since our data fetching has this staleTime property, we may not see my new data for at most another minute — or even longer if we set a longer staleTime! So what do we do now?
As you’ve probably guessed, the clever folks who write and maintain React Query have got us covered. We have an invalidateQueries method on the QueryClient that we can use that invalidates query data by marking it stale. However, we can do even better!
React Query Mutations
Enter the almighty React Query mutation! Mutations give us a way to create, update, or delete data — and allow a lot of flexibility with how the query data is affected as a result.
Sounds great, where do I sign up?
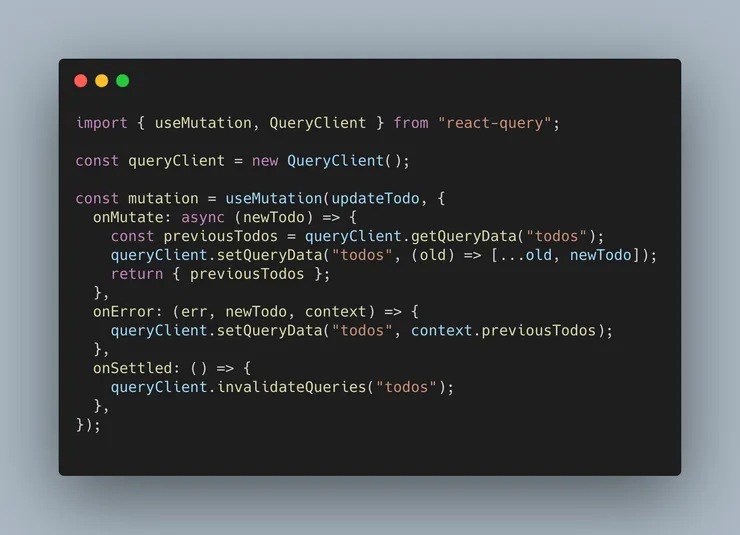
We can get started using React Query mutations with the useMutation hook. The useMutation hook provides many useful options but we’ll be focusing on a few: onMutate, onError, and onSettled.
onMutate is fired just before the actual data manipulation function — updateTodo, in the example below.
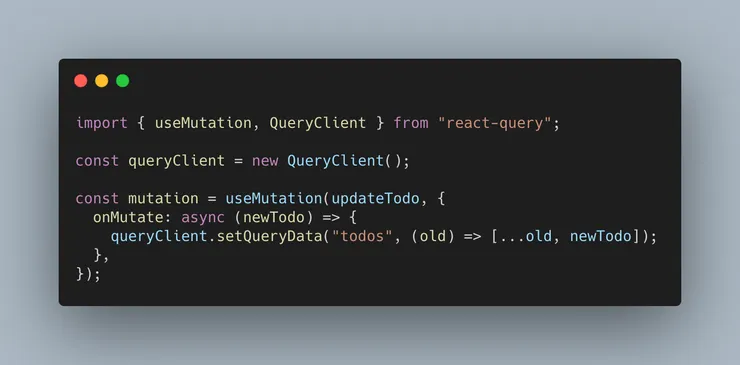
Wait, what’s happening here? setQueryData?
Good eye! We’ve also made use of yet another handy React Query feature here: Optimistic Updates. Remember how we’d have a delay in rendering the latest data if our API response came back too slow?
Yeah…
We solved that here simply by calling the setQueryData method! The first argument is the query key, and the second argument is a function where we have access to the old query data. The function expects you to return new data, so we can return the old data with our newToDo appended to it.
Great, so we’re done now!!
Not so fast! What we’ve done so far is improve the rendering of new data when things go well and we are on the happy path. But, what happens if our create, update, or delete calls don’t go as planned?
Again, thanks to React Query, we have the ability to easily snapshot the old data and fall back to it! The first step is to “snapshot” it by saving it in a variable, then returning it, like so:
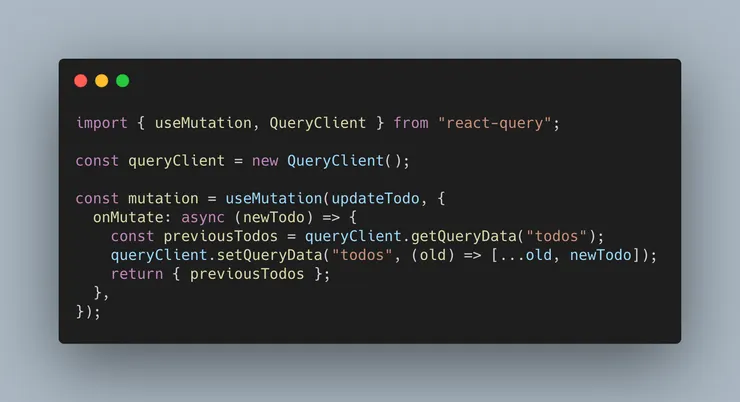
Next, we’ll simply use that snapshot in our onError function and call setQueryData with it!
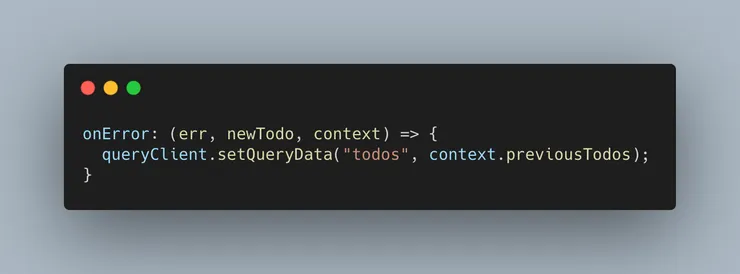
Great, now we’re done! …right?
Yep! Just kidding, we’re not done yet! There’s one more thing we should do: remember the invalidateQueries method we briefly mentioned before? This marks the data as stale and tells React Query that the query data tied to this particular query key should be refetched. The onSettled function gets fired at the end of a mutation whether the result was successful or not. This seems like a good place to mark the data as stale:

Here’s what we have now. This will handle updating the todo item, roll back in case of an error, and mark the dataset as stale to trigger a refetch. Pretty neat if you ask me!
This piece of code does all that? Awesome!
Key takeaways
- When implementing React Query, remember to always use the same query key for its matching data set
- If you want to make use of caching, be sure to set a staleTime with your query
- When adding new, editing, or deleting data, use a mutation to help you handle synchronization and fallback logic
If your application has a need for data synchronization, why not switch to using React Query?
Concluding thoughts
React Query gives us the luxury of not having to think too hard about how to keep our data in the front end up to date with our database information. Global state management is a great tool, but a lot of thought and careful planning has to go into handling edge cases and logic if things stray from the happy path. React Query makes handling all of this much easier, and even comes prepackaged with many powerful features like caching!
Looking to get a bit more in depth? Let me know if you’d be interested in a part 2 in the comments below!