Spice up Your Website with a DocuSign Electronic Signature Embedded Tool
Alexandre Lac8 min read

Introduction
Integrating electronic signing in a website is not always so easy. If you ever get tired of spamming users who already have an overflowing mailbox with DocuSign emails, then you have landed on the right article. Let me show you how to replace them with an elegant embedded tool that will boost your platform.
This article addresses the following problems:
- Finding a simple way to make people sign a disclaimer before accessing the content of a certain page;
- Using DocuSign in a modal;
- Embedding everything on your website.

Why this one-page architecture?
The goal of this architecture is to make sure users have to go through the disclaimer check before accessing the page. If you’ve got two different pages for that purpose, any decent attacker could bypass it:

Yup, it’s almost as simple as that…
Why not using DocuSign emails?
When developing a feature using DocuSign, you will probably have to pick one of these two options:
- Embed DocuSign signing;
- Send DocuSign emails (which seems to induce less coding thus sounds more attractive).
After going through a lot of pain playing around and debugging unsent emails, I figured that not having to worry about unsent, unread, or spam-categorized emails was a fair point for the first option. The second reason is simple: it’s easier to track issues, as everything - or almost - is embedded within your website. Last but not least, it came up that having a linear path would boost the UX by removing external dependencies.
Not paramount but worth mentioning, it also makes it easier to perform E2E tests on this feature.
In overall, this solution was:
- Simple enough to be quickly implemented;
- Customizable enough to fit all my different cases;
Installation
Simply run pip install docusign-esign to get started.
Let’s break it down
We will assume in this article that the user has not signed the disclaimer yet.
Server-side
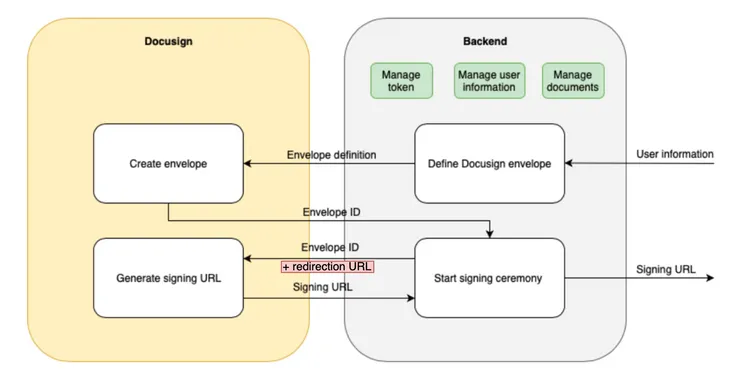
As shown in the schema above, the backend falls in two steps :
- Defining the DocuSign envelope
The backend receives user information (email, name, …) from the frontend. Then, we use the DocuSign Python Client to define our DocuSign envelope, i.e which document(s) will be part of the envelope, where they should be signed, who should sign them, and so on. This results in an envelope definition that we send to DocuSign to create it.
- Getting the signing URL
DocuSign returns an envelope ID corresponding to the created envelope. It is used to start the signing ceremony, meaning that it is sent to DocuSign to generate a signing URL. Ultimately, this signing URL is sent back to the frontend.
Bear in mind that we can pick at this stage the redirection URL, i.e to which URL the user will be redirected once the signing ceremony is finished (necessary to understand our trick!).
- Macro implementation (view)
Following this logic, the implemented view should create a DocuSign envelope and return its signing url to whomever calls the related endpoint.
docusign_service = DocuSignClient()

class DocuSignViewSet(APIView):
    def get(self):
        envelope_id = docusign_service.call_docusign_create_envelope(
            full_name=full_name,
            email=email,
            contact_crm_id=contact_id,
            document_path=document_path,
            document_name=document_name,
        )
        signing_url = docusign_service.start_signing_ceremony(
            envelope_id=envelope_id,
            full_name=full_name,
            email=email,
            contact_crm_id=contact_id,
            redirection_route=<CUSTOM_REDIRECTION_ROUTE>,
        )

        return Response(signing_url)
- Micro implementation (
DocuSignClientclass)
Click here to discover details about its implementation
To make it easier, let’s create a DocuSign class with all necessary methods. This will let us keep the same valid token during the whole process and renew it if needed.
import jwt
from docusign_esign import *

class DocuSignClient:
     token = None
Now, to communicate with the DocuSign API, what we first need is a way to get a valid EnvelopesApi object, i.e that has a valid token and correct parameters (pathname and headers), so let’s add these two methods:
     def get_client(self):
         api_client = ApiClient()
         api_client.host = <MY_DOCUSIGN_API_BASE_PATH>
         api_client.set_default_header("Authorization", f"Bearer {self.token}")

         return api_client

     def get_envelope_api(self):
         api_client = self.get_client()
         envelope_api = EnvelopesApi(api_client)

         return envelope_api
However, because we want the token to be valid and to automatically renew if not, I added the following pre-check:
     def get_client(self):
         if not self.is_token_valid():
             self.token = self.renew_token()

        # ...
As you will see below, this check is essentially a call to the DocuSign API using the current token to verify whether it is valid. If it is expired or invalid (401 status code), we renew it. We use a single login for all users in the platform. Therefore, we use the JWT Grant authentication as suggested in the documentation.
     def is_token_valid(self, method="GET"):
         headers = {"Authorization": f"Bearer {self.token}"}
         response = requests.request(
             method, f"{<MY_DOCUSIGN_API_BASE_PATH>}/v2.1/accounts/", headers=headers
         )

         if response.status_code != 401:
             return True

         return False

     def renew_token(self):
         current_datetime = datetime.datetime.now()
         jwt_token = jwt.encode(
             {
                 "iss": <MY_DOCUSIGN_INTEGRATION_KEY>,
                 "sub": <MY_DOCUSIGN_API_USERNAME>,
                 "name": <NAME>,
                 "aud": "account-d.docusign.com",
                 "iat": current_datetime,
                 "exp": current_datetime + datetime.timedelta(minutes=30), # validity duration of 30 minutes
                 "scope": "signature impersonation",
             },
             key=<MY_DOCUSIGN_PRIVATE_KEY>.encode(),
             algorithm="RS256",
         )

         headers = {"Content-Type": "application/x-www-form-urlencoded"}
         url = f"{<MY_DOCUSIGN_BASE_URL>}/oauth/token"
         payload = {
             "grant_type": "urn:ietf:params:oauth:grant-type:jwt-bearer",
             "assertion": jwt_token,
         }
         response = requests.request("POST", url, headers=headers, data=payload)

        return response.json()["access_token"]
Believe me, all these methods will simplify your life. You’ll only have to call get_envelope_api() to get a functional EnvelopeApi with a valid token.
Once done, we can then add methods to create a DocuSign envelope, which is roughly a container for documents that you send to a recipient for signing.
     def make_docusign_envelope(
         self,
         signer_full_name,
         signer_email,
         contact_id,
         document_path,
         document_name,
         anchor_y_offset="0",
         anchor_x_offset="0",
     ):
         with open(document_path, "rb") as file:
             content_bytes = file.read()
             base64_file_content = base64.b64encode(content_bytes).decode("ascii")

         document = Document(
             document_base64=base64_file_content,
             name=document_name,
             file_extension="pdf",
             document_id=1,
         )

         signer = Signer(
             email=signer_email,
             name=signer_full_name,
             recipient_id="1",
             routing_order="1",
             client_user_id=contact_id,
         )

         sign_here = SignHere(
             anchor_string="/sn1/", # the anchor string to indicate where to sign on the PDF
             anchor_units="pixels",
             anchor_y_offset=anchor_y_offset,
             anchor_x_offset=anchor_x_offset,
         )

         signer.tabs = Tabs(sign_here_tabs=[sign_here])

         envelope_definition = EnvelopeDefinition(
             email_subject="Please sign this document",
             documents=[document],
             recipients=Recipients(signers=[signer]),
             status="sent",
         )

         return envelope_definition
The make_docusign_envelope() method allows you to design a fully customizable envelope, by defining all components such as the document content, signers, locations where a signature has to be attached… You can then use it as a template like so:
     def call_docusign_create_envelope(
         self, full_name, email, contact_crm_id, document_path, document_name,
     ):
         envelope_api = self.get_envelope_api()
         envelope_definition = self.make_docusign_envelope(
             full_name, email, contact_crm_id, document_path, document_name
         )

         results = envelope_api.create_envelope(
             <MY_DOCUSIGN_API_ACCOUNT_ID>, envelope_definition=envelope_definition,
         )

         envelope_id = results.envelope_id

         return envelope_id
Indeed, call_docusign_create_envelope will make use of the previous method to create an envelope based on this template and returns an envelope ID that can be used to start the signing process (a.k.a ceremony).
    def build_docusign_redirection_url(self, redirection_route, options):
         return <MY_FRONTEND_URL> + redirection_route + options

     def start_signing_ceremony(
         self,
         envelope_id,
         full_name,
         email,
         contact_crm_id,
         redirection_route,
         authentication_method="none",
     ):
         envelope_api = self.get_envelope_api()
         return_url = self.build_docusign_redirection_url(redirection_route, envelope_id)
         recipient_view_request = RecipientViewRequest(
             authentication_method=authentication_method,
             client_user_id=contact_crm_id,
             recipient_id="1",
             return_url=return_url,
             user_name=full_name,
             email=email,
         )

         results = envelope_api.create_recipient_view(
             <MY_DOCUSIGN_API_ACCOUNT_ID>,
             envelope_id,
             recipient_view_request=recipient_view_request,
         )

         return results.url
Note that the custom redirection url built by build_docusign_redirection_url is the one that will be used frontend-wise once the signing ceremony is completed, i.e when the user clicks on the “Finish” button. Completing the ceremony will also update the envelope status in DocuSign to completed.
Client-side
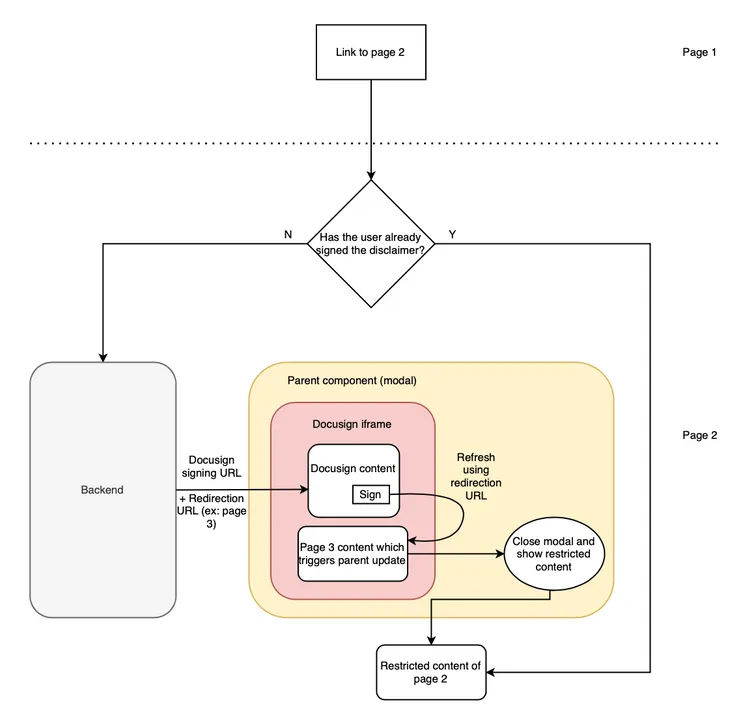
- Add DocuSign in an iframe
When the user accesses the restricted page, the backend is called to get a signing URL. Our modal contains an iframe that will use this URL to embed DocuSign content, meaning DocuSign envelope signing portal with all documents which have to be checked.
export const DocuSignModal: React.FC = () => {
  const { signingUrl } = getDocuSignSigningUrl(); // calls the previously created DocuSignViewSet

  return (
    <Modal>
      <iframe src={signingUrl} />
    </Modal>
  );
};
- Use the redirection link to update the parent component
As seen previously, once the user signed all necessary documents and clicked on DocuSign “Finish” button, the URL provided when the signing ceremony started is used to redirect the user. The issue here is that the redirection will occur within the iframe since it is a different browsing context. And of course, we do not want that.
And now the trick!
Remember what we said about having free hands on the redirection URL? Well, we used this feature to build a URL such that it points to a page containing a shadow component and contains the corresponding envelope id. It will look like so: https://my-website.com/my-redirection-page/[ENVELOPE_ID]. Once rendered, this shadow component will post a message to the parent component (i.e the modal). This message contains the envelopeId of the created envelope, which can be found in the URL.
export const MyShadowComponent: React.FC = () => {
  const router = useRouter();

  useEffect(() => {
    window.top.postMessage(
      JSON.stringify({
        success: true,
        envelopeId: String(router.query.envelopeId),
      }),
      window.location.origin
    );
  });

  return null;
};
This message sent from the iframe will be listened to by the parent component (the page itself), which can then perform actions such as closing the modal, refreshing, routing to another page…
// event.origin and window.location.origin have to be compared for security reason
const isSameOrigin = (event: MessageEvent) =>
  event.origin === window.location.origin;

useEffect(() => {
  const handler = (event: MessageEvent) => {
    if (event.data && isSameOrigin(event)) {
      const { success, envelopeId } = JSON.parse(event.data);
      if (success) {
        // Do something such as closing the modal, saving the envelopeId, ...
      }
    }
  };
  window.addEventListener("message", handler);

  return () => window.removeEventListener("message", handler);
}, []);
You’re done!
Conclusion
I hope you found interest in this article which highlights a simple way to embed DocuSign in your website. There are still many ways to improve and customize this flow, with additional features such as:
- Saving in the backend users who have already signed so that they are not asked to sign again later ;
- Tracking documents versions.
Hope that was useful, cheers!