How to Check Your Website on Mobile in the Local Environment
Victor Buridard13 min read

At Theodo, we develop solutions for both mobile and desktop. Most of the time we use the chrome device toolbar to see the visual rendering of the website when we develop in the local environment. Then when the code is deployed, we also check in the development/staging environment that everything works correctly.
However, sometimes, this is not enough. For example, this is not applicable to debug a behavior that occurs only on mobile devices. The obvious solution: finding a way to check the website on mobile, in the local environment. There are several ways to do that and each has its perks and drawbacks. In this article, I will present you with those solutions to help you find the one that suits you best.
For you to find the best solution in your use case, I will evaluate each solution with the following criteria:
- 📱 Provides an experience similar to the end-user interaction on mobile
- 📋 Easy access to logs
- 🔧 Easy to set up
Chrome device toolbar
Before you start, make sure that the feature you want to check cannot be checked with the Chrome device toolbar.
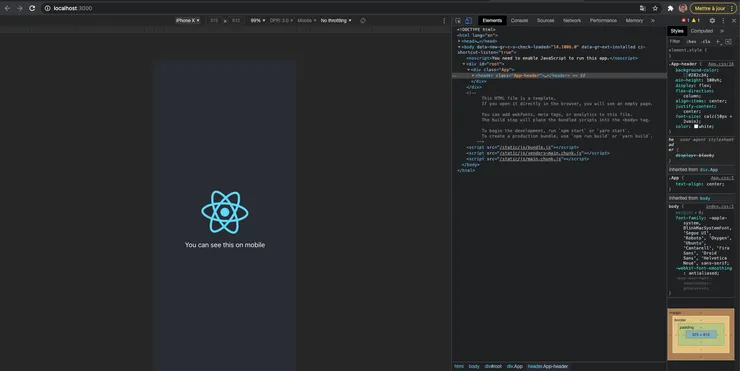 Chrome device toolbar is accessible by a single click on the mobile icon at the top of the Chrome inspector
It does what you expect and maybe more…
Chrome device toolbar is an obvious solution, known by most developers, that allows you to test responsiveness on a large variety of devices. But responsiveness is not the only thing you can test with the chrome device toolbar. All the available options are presented in great detail in the chrome documentation. If you need an incentive to go see for yourself, be aware that the device toolbar allows you to override geolocation, throttle your CPU and/or internet speed, display media queries… A less known feature of the Chrome device toolbar is that it properly sets the user-agent according to the device you choose. So if you implement a different behavior based on the userAgent, you will be able to see it.
But Chrome device toolbar is not an emulator
However, as complete as it is, the chrome device toolbar is still limited. Here is a quick list of things you may need, and that is still unavailable with this tool:
- The fluidity of scrolling and swiping. One of the main differences between desktop and mobile is the way the user interacts with the device. And this is a big drawback of the Chrome device toolbar. Your scroll could be lagging like hell on a mobile device, you would not be able to see it.
- Opening/closing of keyboard and focus. Don’t forget that the Chrome device toolbar remains more or less a desktop website visualizer that can take the shape of a mobile device. It won’t display the behaviors that are particular to mobile such as the opening of a keyboard.
- Running code that is specific to an operating system. A video player designed to run on IOS won’t run in the chrome toolbar even if you selected an iPhone.
Solution evaluation
📱 Close to end-user experience: Mediocre
- ❌ Chrome device toolbar is not an emulator.
📋 Access to logs: Excellent
- ✅ No need to change development flow to retrieve logs. Everything you need is directly available in the browser.
🔧 Easy to set up: Excellent
- ✅ A click on a button in the inspector.
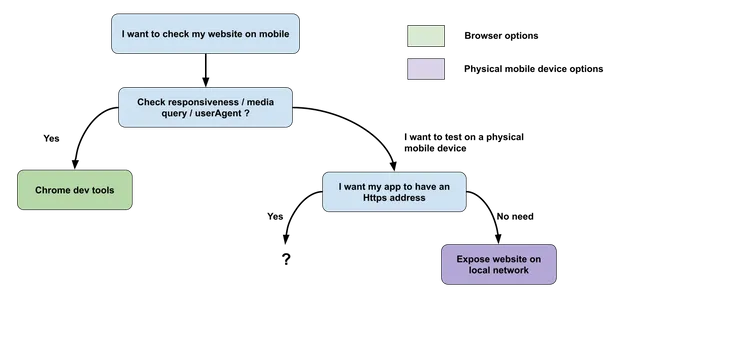
 Chrome device toolbar is enough for basic responsiveness but what if we need to access our website / debug on a real mobile device ?
Using your local network to access your website in the local environment
There is a quick solution that doesn’t require any third-party software and that allows you to connect to your website from your mobile on your local network. All you need is a mobile device and a computer connected to the same network, i.e. a wifi network, or a shared mobile internet connection.
The principles
As you probably already know, when setting up the services for your application, you give them an address which on your local environment is localhost + port number. You can make your website accessible to all the users on the local network by exposing it to your address on this network.
The reason for this is rooted in the difference between localhost and your local IP address. Localhost is an internal address in your computer used by the loopback interface, a virtualized network interface. Localhost is only used inside your computer. On the other end, the local IP address is an address given by your router for your computer to communicate with other devices on the local network.
How to set it up
- Identify your local Ip address. On Windows, you can open the terminal and execute ipconfig. On Mac and Linux, the command to execute is ifconfig. But maybe you won’t even need to do that. For example, when starting a React App, the local IP address is displayed in the console.
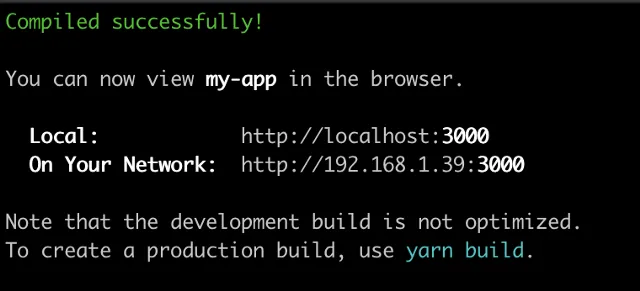 You can see your local IP address when launching a React App as “On Your Network”
- If you only have a frontend, you are already good to go. Just enter the local IP address in the URL bar of your browser with the right port, and you will see your website.
- If you have a backend, you should replace your backend adress(es) called by the frontend from
http://localhost:<your_backend_port>
to
http://<your_local_ip_address>:<your_backend_port>
Your website is now accessible at the following address on both your desktop device and to any device connected to the local network:
http://<your_local_ip_address>:<your_front_port>
A nice addition to this is to add a script such as the one below in your package.json to automatically fetch your local IP address and update your frontend/backend URLs in your environment files:
#grepping the local ip address
LOCAL_IP=$(ifconfig
| grep -Eo 'inet (addr:)?([0-9]*\\.){3}[0-9]*'
| grep -Eo '([0-9]*\\.){3}[0-9]*'
| grep -v '127.0.0.1');
# using a .env.mobile file as a template
# and moving the output into .env file
sed \"s,frontend_url,$LOCAL_IP,g\" .env.mobile > .env;
# starting the react app with the updated file
react_app start
- Make CORS allowed host changes if needed. You will only have to do the same replacement as the previous point for your front-end address.
How to see the logs
Now that you are accessing the website in your local environment on a mobile device, the next step would be to see the logs of your device so you can develop and debug your application correctly.
- MacOS ⇔ IOS. For this, you can use the Safari development tools. Connect your device to your computer using a USB cable and when asked if you trust the computer, answer yes. Open Safari and click on the ‘Develop’ tab
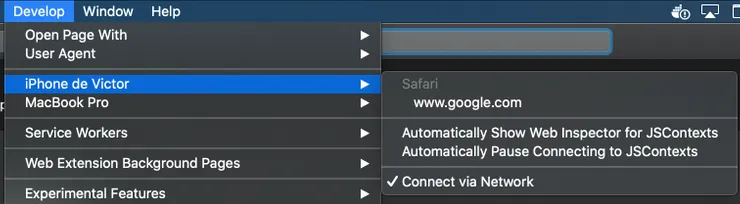 You can access your mobile logs by opening the Safari Browser. Select first the ‘Develop’ tab then the ‘name of your device’ and finally the ‘name of the page’
- **Mac/Windows/Linux ⇔ Android**: Google is providing [a tool](https://developers.google.com/web/tools/chrome-devtools/remote-debugging) to access logs by connecting your mobile to your computer using a USB cable . - **Windows/Linux ⇔ IOS**: It seems there is no obvious solution for this currently.
A versatile solution that covers (almost) any use case
What is great about this solution is that it allows you to test directly on your mobile device and also that it works not only for a frontend but also for a “complete website” with a/multiple backend and a database as well.
But:
- This solution requires updating all the addresses throughout your application. However, this can be easily solved by adding a script to your package.json
- Some third-party API requires HTTPS and won’t work with this setup.
- Your router may change your local IP address from time to time.
Solution evaluation
📱 Close to end-user experience: Good
- ✅ You are debugging directly on your mobile device.
- ❌ You can only use this method on the devices you own, so you may overlook some edge cases on other devices.
- ❌ You also may encounter errors if HTTPS is mandatory for some APIs you use. In that case, see my next solution.
📋 Access to log: Very good - No Logs
- ✅ The same quality of logs as when you are developing for computer users…
- ❌ …Except for the IOS + Windows/Linux duo.
🔧 Easy to set up: Very good
- ✅ Relatively easy to put in place and to automatize
- ✅ You don’t need to install anything.
- ❌ A bit time-consuming to set up the first time
 Now we can access our website on a real mobile device. But what if we need HTTPS ?
Using LocalTunnel to access your website in the local environment from your mobile with HTTPS
What is LocalTunnel?
LocalTunnel is a service that allows you to expose an endpoint on both a public HTTP and a public HTTPS address.
If you don’t know localTunnel, maybe you are more familiar with ngrok its best-known counterpart. However, the main advantage of localTunnel over ngrok is that you don’t have a limit on the number of endpoints you can create whereas you have to pay as soon as the second one for ngrok.
How to set it up?
You have two options to use LocalTunnel on your project
-
Start the tunnels using the command line using:
lt --port <port>
 Running localTunnel using the command line is pretty straightforward
 -
Using the npm package directly in a node project
const localtunnel = require("localtunnel");
const myTunnel = await localtunnel({ port: 3000 });
console.log(myTunnel.url);
You will still have to update your URLs in your configuration file (same principles as for the local IP address). I personally prefer the second solution because the address returned by LocalTunnel is random and the task of updating the URL for your backend/frontend in your configuration files can quickly become annoying. I developed a quick example of an independent node project that sets up your configuration files when launching the app.
Concerning logs, they are still available using the same principles as for the local IP address.
The ultimate solution to local development on mobile?
Pros:
- You are making your website accessible to anyone on the internet and not only on your local network anymore. You want your client/another developer/your manager to see the new feature before deploying it, this is now possible!
- LocalTunnel provides an HTTPS address so you won’t have any issue related to HTTP anymore.
Cons
- Complex to set up. Each time you launch localTunnel, the addresses provided are different which makes it a bit tricky to set up with a script even though it remains possible.
- You can only test on the devices/browser versions you have access to.
- Even if there is little chance of anything happening you are still making your website public. Make sure you don’t display any critical information.
Solution evaluation
📱 Close to end-user experience: Very Good
- ✅ Directly on your mobile device
- ✅ In HTTPS
- ❌ Only the mobile you own / the browser version you have access to
📋 Access to log: Very good - No Logs.
- ✅ The same quality of logs as when you are developing for computer users…
- ❌ …Except for the IOS + Windows/Linux duo.
🔧 Easy to set up: So-so.
- ✅ Can be automated
- ❌ More time-consuming than the local-network solution
 Now you can access to your website on a mobile device in HTTPS. But you may wonder what to do when you don’t have the device / the browser version you want to check
Emulators/simulators
You may be tempted to use an emulator / a simulator to access your local website. Indeed, using Android Studios or Xcode Ios Simulator to access your website during local development is possible but here are the two main reasons why this is probably a bad idea:
- Emulators are heavy. Your computer will soon be over-encumbered with mobile images
- Emulators are slow. You have to imitate the behavior of smartphone components on your computer and it requires a lot of calculation power making your application slow/laggy in the emulator.
If you want to test a specific mobile or a specific browser version, your best bet is probably to use BrowserStack.
However, if you don’t have any other options, here is a quick tutorial on how to use Android Studio and Xcode to emulate a smartphone and access your website in the local environment
Android
- Install Android Studio from their developer website
- Create an empty project
- Add the device you want using the AVD manager in the “Tool” tab
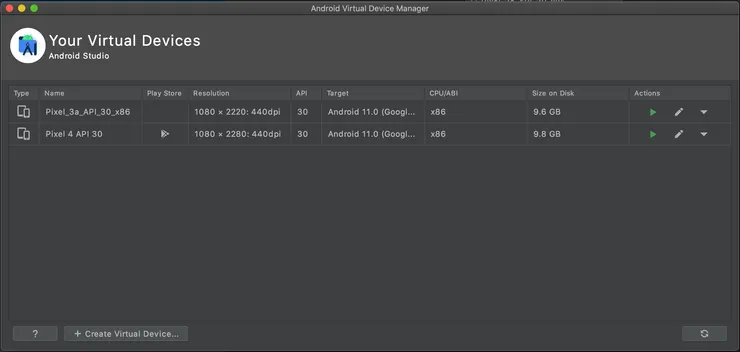 You can choose a device from a large selection using the AVD manager by clicking on the “Create Virtual Device” button
- In the new project launch the emulator on the device you want. - Once the emulator is running, open the google chrome application. You can access the localhost of your computer by entering the following address in the browser url bar.
10.0.2.2:<frontend-port>
- If you have a backend, don’t forget to change its adress in your front configuration to
10.0.2.2:<backend-port>
- To have access to logs, go to chrome://inspect/#devices in google chrome browser while the emulator is running. On this page, you will see a list of devices connected to your computer, including the emulators. By clicking on “inspect”, you will open a devTools window similar to the one you use for web development.
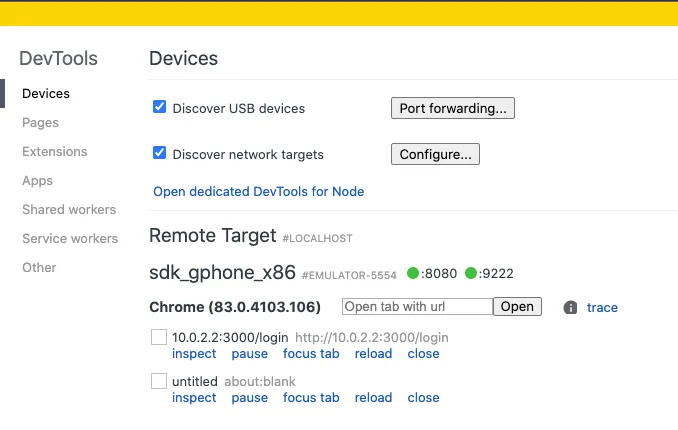 On the Chrome inspect page, you can see a list of device and for each device, a list of pages opened. Click on inspect for any page to open Chrome Dev Tools for this page
Ios
Only if you develop on macOS, you can use the simulator that is included in the Xcode development software:
- Download Xcode from the Apple developer website
- Create an empty project and click on the play button to launch the simulator. Once the simulated phone started, open the Safari browser application and go to localhost:<your_port>
- To access logs, open Safari on your computer, and in the “Develop” tab, you will see the simulator and the opened page. Click on the page you want and a new window will open with all the inspection options for this page.
 Click on the Safari “Develop” Tool and then on your simulated device to see the current open pages. If you click on a page, it will open a web inspection window
Solution evaluation
📱 Close to end-user experience: So-so
- ✅ Native behaviors can be tested for a large variety of devices
- ❌ Unable to check performance issue as the emulator itself is slow
📋 Access to log: Good - No Logs.
- ✅ The same quality of logs as when you are developing for computer users…
- ❌ Only for Chrome/Android or Ios/Safari
- ❌ Debugging with logs can be long because the pages takes a very long time to load / refresh
🔧 Easy to set up: So-so.
- ✅ Easy to use once Xcode / Android Studio are installed
- ❌ Very heavy and memory-consuming
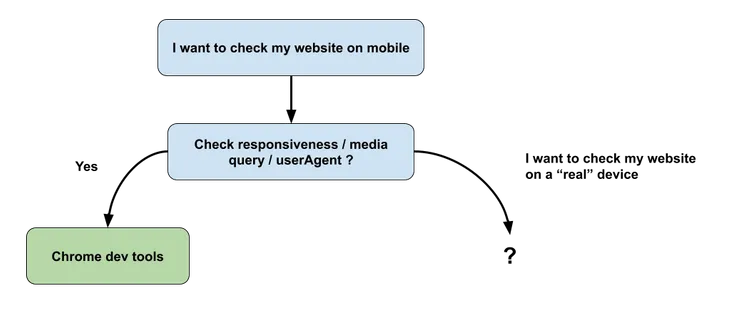
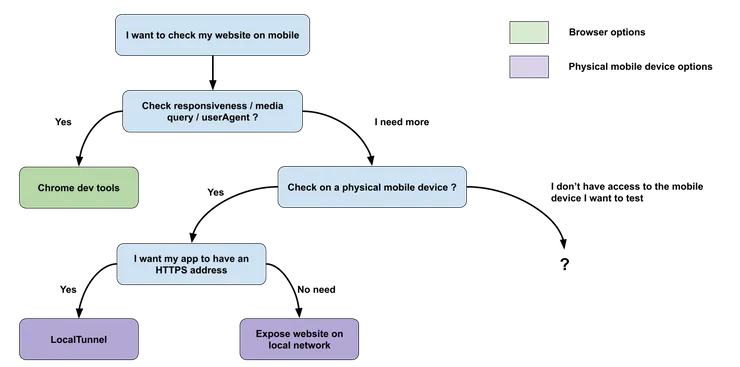
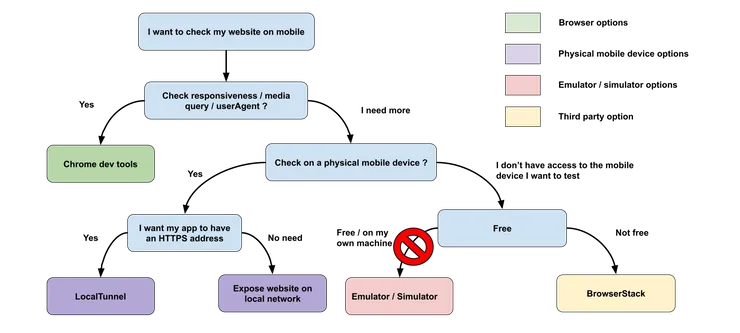 Our decision tree is complete!
Takeaway
Two last things that can help you find the best solution for your project :
- Don’t go for the most technical solution if all you need is to test basic responsiveness. The chrome device tool is already very complete.
- If you want to test complex behavior, you will probably know it beforehand. So set up your project for mobile testing at the beginning. You will lose far less time on the way.