How to easily handle admin authentication and permissions in Django with Okta
Marine du Mesnil8 min read

In my project, we are developing an admin interface to create and share documents to users who can see them and download them from the website we are creating.
However, the administration platform is dedicated to multiple teams from various countries. We don’t want them to be able to see or interact with each other’s documents. Besides, those teams are meant to change, and they should manage themselves. For each team, we want to create a super admin account able to create, delete and change permissions for its team members only.
I will show how we handled this challenge with an effortless and fast solution.
TL;DR:
In this article, I will developp three main points:
- Why use Okta to manage users and permissions, especially in Django admin?
- How to add single sign-on connection using the mozilla-django-oidc library?
- How to manage user permissions in Django from Okta ?
Why use Okta with Django admin?
One of Django’s valuable features is the management of permissions for various users. Though, it is not always simple to separate users into distinct independent groups and to allow some of them to manage only a fraction of it without seeing the other users. Besides, we wanted a system allowing the admins to connect on the Django platform with their admin account.
For our application, the authentication and user management system must:
- be secure (standard auth flows, follows security best practices, possible to implement two-factor authentication)
- be fast and scalable.
- be easy to work with from a developer standpoint.
- be simple enough for the team managers.
To handle those requirements, we decided to use Okta tools. Okta is a company founded in 2009 providing a cloud software. This software allows you to manage and secure user identity and access management. Okta’s CEO announced they had over 100 million registered users in 2019. Besides, Okta is top-notch on up-to-date security measures and auth flows.
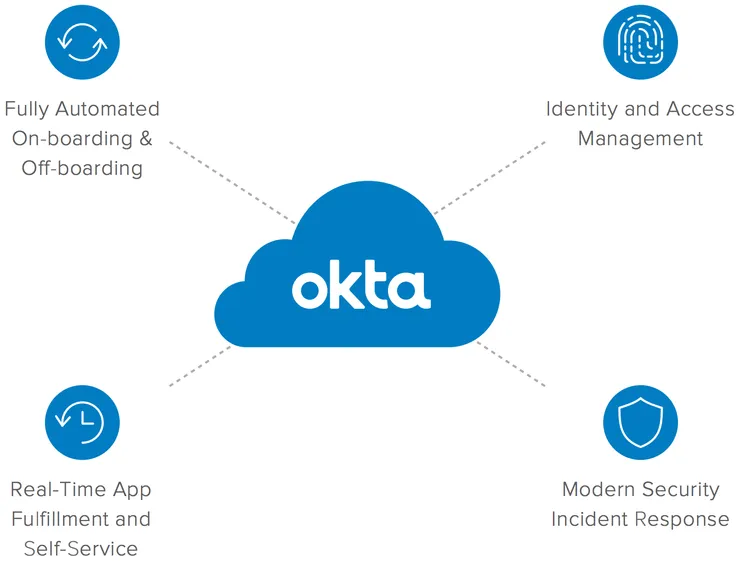 Okta main functionalities
As seen in the graph below, Okta offers four major functionalities:
- A fully automated onboarding sending emails to users to help them create their account.
- Identity access and management to provide group management and two-factor authentication.
- Accesses are given in real-time when adding users and changing groups.
- Okta cares about security and has a protocol in place in case of an incident.
In Okta, it is simple for an admin with the correct rights to create other users and grant them the right groups. This way, at each level of the organization, users and their permissions are manageable effortlessly.
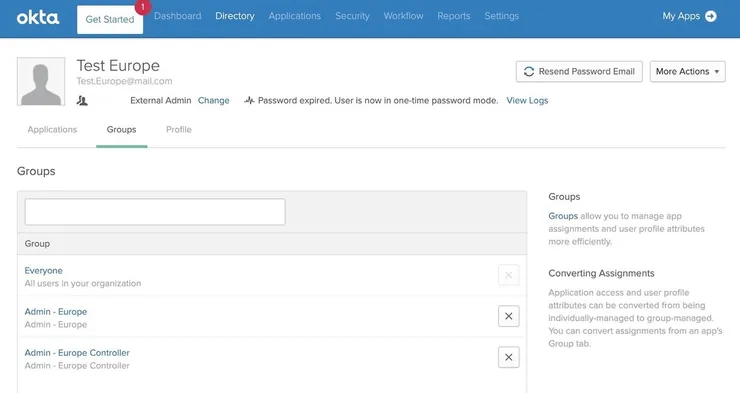 Example of a user created in Okta with its groups
I will now explain how we integrated Okta with Django admin and how we used it to manage our users’ permissions.
Implement authentication workflow to Django through Okta
To add the admin connection with Okta to Django admin, our team used mozilla-django-oidc library. “A lightweight authentication and access management library for integration with OpenID Connect enabled authentication services.” OpenId Connect, also known as OIDC, is an identity layer on top of the OAuth 2.0 protocol. The End-User identity can be verified with the authentication thanks to an Authorization server. OpenID Connect introduces the concept of an id_token, which is a security token allowing the client to verify the user’s identity. The id_token also gets basic profile information about the user. It introduces the UserInfo endpoint, an API returning information about the user.
The Sign-in protocol used follows the steps described in the next diagram.
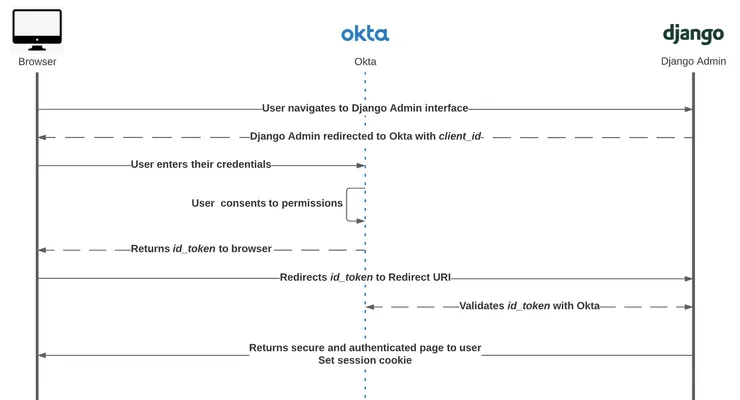 Sign-in protocol diagram
We configured the callback url with the client_id and added the client_secret in our settings to acquire the token from Okta as written in the library documentation. In our case, we used a RS256 algorithm.
# In settings.py

# Okta
OKTA_DOMAIN = os.environ.get("OKTA_DOMAIN")
OKTA_TOKEN = os.environ.get("OKTA_TOKEN")

# User information
USER_CRM_ID = None
USER_EMAIL = None

# Okta Admin
OKTA_ADMIN_DOMAIN = OKTA_DOMAIN
OIDC_RP_SIGN_ALGO = "RS256"
OIDC_OP_JWKS_ENDPOINT = f"{OKTA_ADMIN_DOMAIN}/oauth2/v1/keys"
OIDC_OP_AUTHORIZATION_ENDPOINT = f"{OKTA_ADMIN_DOMAIN}/oauth2/v1/authorize"
OIDC_OP_TOKEN_ENDPOINT = f"{OKTA_ADMIN_DOMAIN}/oauth2/v1/token"
OIDC_OP_USER_ENDPOINT = f"{OKTA_ADMIN_DOMAIN}/oauth2/v1/userinfo"
OIDC_RP_SCOPES = "openid profile email groups"
OIDC_RP_CLIENT_ID = os.environ.get("OKTA_ADMIN_CLIENT_ID")
OIDC_RP_CLIENT_SECRET = os.environ.get("OKTA_ADMIN_CLIENT_SECRET")
OIDC_VERIFY_SSL = True
LOGIN_REDIRECT_URL = f"{BASE_URL}/admin/"
OIDC_REDIRECT_URL = f"{BASE_URL}/admin/oidc/callback/"
OIDC_AUTH_REQUEST_EXTRA_PARAMS = {"redirect_uri": OIDC_REDIRECT_URL}
It is now possible to override the login template. We added a button allowing users to connect with their Okta account.
# In templates/admin/login.html
# Admins can also log in through the usual credentials flow
{% extends "admin/login.html" %}

{% block extrastyle %}
   {{ block.super }}
   <style>
       #content-main {
           float: none !important;
       }

       .okta_login_container {
           margin-top: 15px;
           display: flex;
           justify-content: center;
       }
   </style>
{% endblock %}

{% block content %}
   {{ block.super }}

   <div class="okta_login_container">
       <a href="{% url 'oidc_authentication_init' %}">Or Login With Okta</a>
   </div>
{% endblock %}
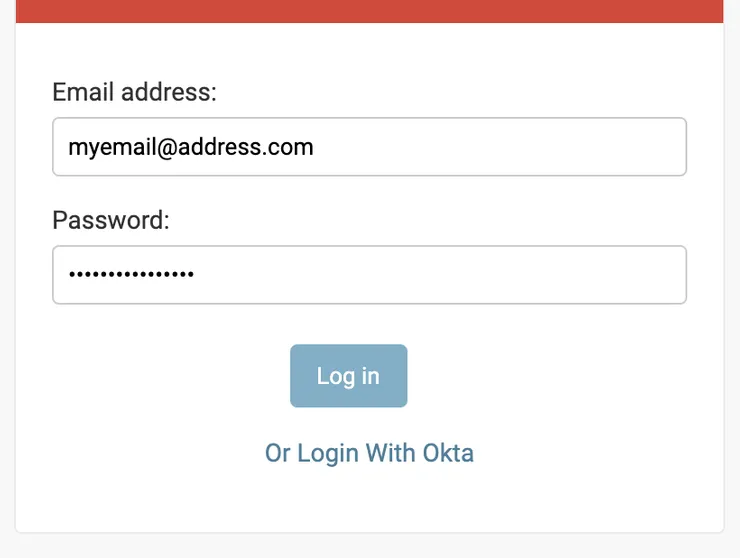 New button to log in with Okta
After adding a way to connect through Okta to Django Admin, we must save and update users. We are getting their information from Okta and adding them in Django. To do so, we override the class OIDCAuthenticationBackend from mozilla-django-oidc. We can get the information about the user’s verified email and create or update it in Django, without any permissions for the moment.
class OktaAdminAuthenticationBackend(OIDCAuthenticationBackend):
   def verify_claims(self, claims: OktaClaim) -> bool:
       return (
           super().verify_claims(claims)
           and claims.get("email_verified", False)
       )

   @transaction.atomic
   def create_user(self, claims: OktaClaim) -> User:
       user: User = self.UserModel.objects.create_user(
           claims.get("email"),
           None,  # password
           first_name=claims["given_name"],
           last_name=claims["family_name"],
       )
       user.save()

       return user

   @transaction.atomic
   def update_user(self, user: User, claims: OktaClaim) -> User:
       """Update existing user with new claims, if necessary save, and return user"""
       user.first_name = claims["given_name"]
       user.last_name = claims["family_name"]
       user.save()

       return user
Administrators can log in to the application with their Okta credentials. I will show you how to add their permissions synchronizing it with Okta.
Add groups and permissions from Okta in Django Admin
After adding users to Django admin, we must grant them the right permissions to manage the customer’s website. In my project, we had two types of administrators for each team:
-
Admins with basics rights. They can create documents for their team’s users but can’t publish them.
We named them
Admin - [Group Name]in Okta. -
Controllers. They are admins who can validate and publish documents for their team’s users.
We named them
Admin - [Group Name] Controllerin Okta.
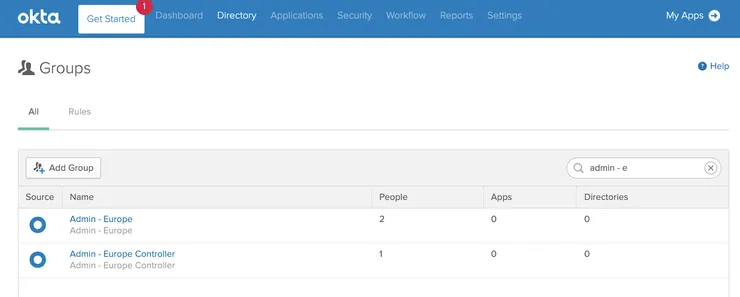 Example of two groups in Okta
In Django Admin, we decided to create two types of group. The first one is a group for each team with basic permission. The other is a general group called Administrator Controller with more permissions to validate and publish documents. The graph below shows the flow to attribute groups to administrators.
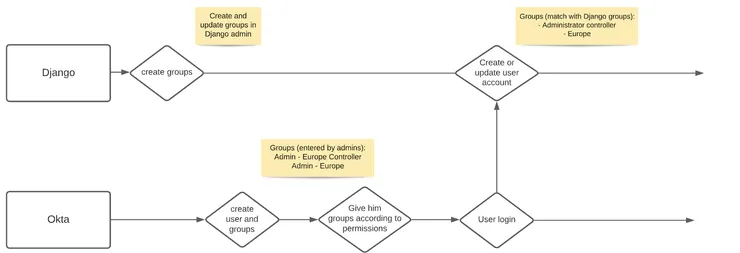 User and group creation flow
To handle those permissions, we get user information from the Okta response which contains the user groups. We can separate those groups according to our business rules as described above.
def handle_controller_groups(self, groups):
    groups_with_controller = set()
    for group in groups:
        # remove Controllers groups and add generic 'Administrator Controller'
        if bool(re.search("[Cc]ontroller", group)):
            groups_with_controller.add(ADMINISTRATOR_CONTROLLER)
        else:
            groups_with_controller.add(group)
    return groups_with_controller

def get_user_groups(self, claims: OktaClaim) -> QuerySet:
    claim_groups = claims.get("groups")
    assert claim_groups
    groups = [group[8:] for group in claim_groups]  # remove `Admin - ` prefix

    groups_with_controllers = self.handle_controller_groups(groups)

    return Group.objects.filter(name__in=groups_with_controllers)
Finally, we use those functions to get users permissions when we create and update them.
def verify_claims(self, claims: OktaClaim) -> bool:
    return (
        super().verify_claims(claims)
        and claims.get("email_verified", False)
        and claims.get("groups") is not None
    )

@transaction.atomic
def create_user(self, claims: OktaClaim) -> User:
    user: User = self.UserModel.objects.create_user(
        claims.get("email"),
        None,  # password
        first_name=claims["given_name"],
        last_name=claims["family_name"],
    )
    user.groups.set(self.get_user_groups(claims))
    user.save()
    return user

@transaction.atomic
def update_user(self, user: User, claims: OktaClaim) -> User:
    """Update existing user with new claims, if necessary save, and return user"""
    user.first_name = claims["given_name"]
    user.last_name = claims["family_name"]
    user.groups.set(self.get_user_groups(claims))
    user.save()

    return user
Our administrators can create their documents with the right permissions and only their team members can see them. Besides, controller admins can manage their team and review documents to publish them.
Conclusion
With this implementation, administrators don’t need to call us to manage their teams and they only need their Okta credentials to do their various jobs.
One of the limitations is that if a new group is created, it needs to be added in Okta and Django to allow users to have their permissions when they log in. We decided we didn’t want to create groups when we didn’t recognize them in Django to avoid issues with permissions as administrators can upload sensitive information.
I hope you enjoyed reading this article and you learned a new way to handle administrators permissions with Okta and Django admin. Hope you’ll give it a try!
You can also contact one of our python expert: