How to create a video calling app using webRTC and websockets
Lorenzo Sintini10 min read
With lockdowns and restrictions, the past year has not been great for social interactions. This might be the perfect time to build your first video call app, or to add a video chatting feature to your existing project.
If you are unsure on how that works or are having some troubles setting it up, you came to the right place. In this article I will show you how to create a very simple video calling application using react (yes, with Typescript) and SpringBoot. If you are not using this tech stack, fear not, the principles are the same and will apply to whichever framework you want to use.
At the basis of a video call app there are two things we need to use and learn: peer-to-peer network (P2P) and websockets. Let’s dive right into them!
What is a peer-to-peer network (P2P)?
You are probably familiar with client-server networks. In this model, computers are connected to a server and can only communicate to it (send or receive data). If two computers (A and B) wants to share data, they have to pass through the server:
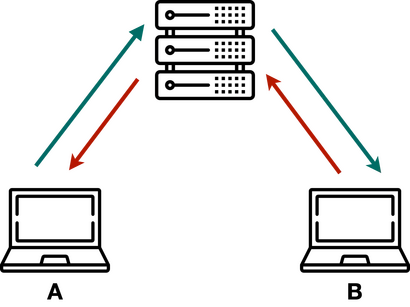
This seems a bit inefficient, wouldn’t it be easier to cut off the middleman and just let A and B talk to each other? Yes, it would, and this is what is called a peer-to-peer communication. The information is directly shared by the computers:

This can be achieved very easily using WebRTC (Web Real-Time Communications). WebRTC is an open-source framework that allows real time communication between browsers. It was released in 2011 and is supported by Google Chrome, Safari, Mozilla Firefox, Microsoft Edge, Opera, Brave and Vivaldi.
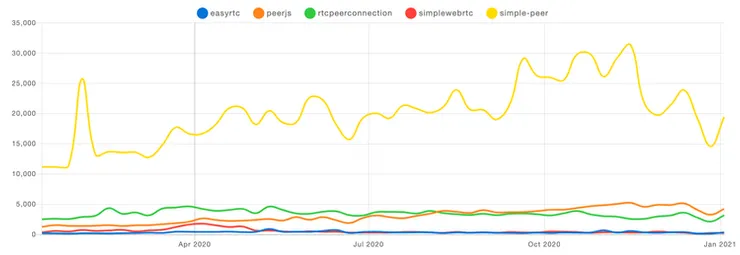
There are also javascript libraries that simplify the creation and usage of webRTC connections. The most popular ones are easyRTC, PeerJs, RTCPeerConnection, SimpleWebRTC and SimplePeer. As shown below, simple-peer is by far the most used one, and it is the library that we will use for the rest of this tutorial.
A webRTC connection takes place with a process called signaling:
- Peer A (the initiator) decides to create a connection, an offer signal is automatically created
- The offer is given to peer B
- Peer B connects to it to create an answer signal
- The answer is given to peer A
- Peer A connects to it to complete the peer-to-peer connection
What exactly are these offers and answers? These are simply objects which contain two parameters: type and sdp. The type defines whether the object is an “offer” or a “answer”. The sdp (Session Description Protocol) contains the information about the connection, such as the IP Address, the port number, and the media to be shared.
If you haven’t already asked yourself, there is a slight problem with the process described above. How will user B receive the offer? And how will user A receive the answer? This is where websockets come into play.
What is a WebSocket?
WebSocket is a communication protocol, just like the famous http. The main difference is that while an http protocol is unidirectional, a webSocket is bidirectional. Let’s see what this means and how they differ.
With http, a user can make a request to a web server (http://example.com). When this is done a connection is created, the server gives back a response, and once the response is received the connection is closed. This protocol is unidirectional because the sender has to create a request to receive a response. If new information is available, a new request has to be made to obtain it.

With webSockets (ws), a user can also make a request to a web server (ws://example.com). The difference is that when this is done a handshake is made between the user and the server which creates a connection that will never be closed, unlike the http. This ever-lasting connection can be used for bidirectional communication (without requiring the user to always have to make a new request to open a new connection). If new information is available after the original request, it will be sent to the user through the connection.

This is a very important difference, crucial when we want to have access to real-time data. When checking the score of sport match online, nobody wants to have to refresh the page every 5 second (to make an http request and open a new connection) to check whether the score has changed. With a webSocket every time the score changes the server will automatically update it on your browser.
This is exactly how we will share the webRTC offer and answer signals. Whenever user A (the initiator) creates an offer, he will send it through the websocket connection and it will automatically be received by user B (who will then do the same with the answer payload).
The final architecture
The diagram below shows what the final architecture of the app will be.
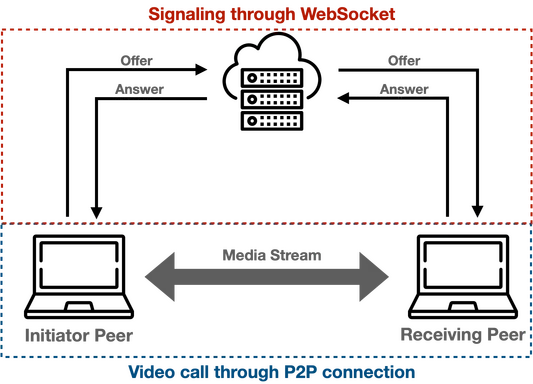
The two peer signal each other by sending and receiving the offer and answer signals. This will be done using the WebSocket. After this signaling process, the peer-to-peer connection is established and the two peers can share the webcams media streams to video call each other. Now let’s get started.
Setting up the WebSocket
The first step is to create the webSocket server, in our spring boot application project. SpringBoot has a sping-WebSocket module which makes the whole set-up extremely simple as we will see.
In the pom.xml file, add the spring-boot-starter-websocket dependency as follows:
<dependency>
    <groupId>org.springframework.boot</groupId>
    <artifactId>spring-boot-starter-websocket</artifactId>
</dependency>
Now we can create a class annotated with the @Configuration and @EnableWebSocket:
@Configuration
@EnableWebSocket
public class WebSocketConfiguration implements WebSocketConfigurer {

    @Override
    public void registerWebSocketHandlers(WebSocketHandlerRegistry registry) {
    registry.addHandler(new SocketHandler(), "/videochat").setAllowedOrigins("\*");
    }
}
The class implements WebSocketConfigurer and overrides the registerWebSocketHandlers method, which is used to add websockets endpoints. In this case we add a websocket endpoint “videochat” and with a handler given by the SocketHandler class. The latter, which we will create next, defines how all the sessions and messages coming into ws://localhost8080/videochat should be handled.
The final step is to create the class SocketHandler with annotation @Component:
@Component
public class SocketHandler extends TextWebSocketHandler {

  List<WebSocketSession> sessions = new CopyOnWriteArrayList<>();

  @Override
  public void afterConnectionEstablished(WebSocketSession session) {
    sessions.add(session);
  }

  @Override
  public void afterConnectionClosed(WebSocketSession session, CloseStatus status) {
    sessions.remove(session);
  }

  @Override
  public void handleTextMessage(WebSocketSession session, TextMessage message)
  throws IOException {
    for (WebSocketSession webSocketSession : sessions) {
      if (!session.equals(webSocketSession)) {
        webSocketSession.sendMessage(message);
      }
    }
  }
}
Let’s see what is going on above. The class extends TextWebSocketHandler for which we are overwriting three methods:
afterConnectionEstablishedis called every time a browser completes a handshake with the webSocket and creates a connection/session (remember this connection will last forever until either parties closes it). The session is appended to the sessions list.afterConnectionClosedworks similarly: when a browser closes a connection this method is called and the session is removed from the sessions list.handleTextMessageis called whenever a particular session sends a message to the webSocket. When this happens we will iterate through all the sessions connected to the webSocket and send the message to each of them except for the one whose message came from (to avoid sending a message to yourself).
Making the peer connection
Now that the websocket server is done, we can move on to the frontend to build the actual video calling application. We will create a component which return the following content:
enum ConnectionStatus {
 OFFERING,
 RECEIVING,
 CONNECTED,
}

export const VideoCall = () => {
  const videoSelf = useRef<HTMLVideoElement | null>(null);
  const videoCaller = useRef<HTMLVideoElement | null>(null);
  const [connectionStatus, setConnectionStatus] = useState<ConnectionStatus | null>(null);
  const [offerSignal, setOfferSignal] = useState<SignalData>();

  return (
    <div className="web-rtc-page">
      {connectionStatus === null && (
        <button onClick={() => sendOrAcceptInvitation(true)}>CALL</button>
      )}
      {connectionStatus === ConnectionStatus.OFFERING && (
        <div className="loader"></div>
      )}
      {connectionStatus === ConnectionStatus.RECEIVING && (
        <button onClick={() => sendOrAcceptInvitation(false, offerSignal)}>
          ANSWER CALL
        </button>
     )}
     <div className="video-container">
       <video ref={videoSelf} className="video-block" />
       <video ref={videoCaller} className="video-block" />
     </div>
   </div>
 );
};
The page contains two video elements for the user and for the receiver, these have a useRef hook each, which will be used later on to dynamically add the webcam streams.
The page also contains a state for the connection status, based on which some elements will be conditionally rendered:
null: when the page is first rendered. A button is present which can be clicked to start the call. This calls the functionsendOrAcceptInvitationon click which we will define lateroffering: when a user has started a call and is waiting for the answer on the other side. A loader is displayed while waiting.receiving: when the user receives a call. A button is present to answer the call, this also callssendOrAcceptInvitationon click, but with different argumentsconnected: when the peer-to-peer connection is completed
Now it’s time to create the function sendOrAcceptInvitation:
const [simplePeer, setSimplePeer] = useState<Instance>();

const sendOrAcceptInvitation = (isInitiator: boolean, offer?: SignalData) => {
  navigator.mediaDevices
    .getUserMedia({ video: true, audio: false })
    .then((mediaStream) => {
      const video = videoSelf.current;
      video!.srcObject = mediaStream;
      video!.play();

      const sp = new SimplePeer({
        trickle: false,
        initiator: isInitiator,
        stream: mediaStream,
      });

      if (isInitiator) setConnectionStatus(ConnectionStatus.OFFERING);
      else offer && sp.signal(offer);

      sp.on("signal", (data) => webSocketConnection.send(JSON.stringify(data)));
      sp.on("connect", () => setConnectionStatus(ConnectionStatus.CONNECTED));
      sp.on("stream", (stream) => {
        const video = videoCaller.current;
        video!.srcObject = stream;
        video!.play();
      });
      setSimplePeer(sp);
    });
};
In this function we create the simple-peer instances. The arguments of the function are isInitiator (true for the user making the call and false for the user receiving the call) and offer (the offer with the sdp of the caller, only present for the user answering).
The first step is to access the webcam media stream and set it to the videoSelf reference. Next a simplePeer instance is created, with the webcam video as the stream and with initiator value set to true/false depending if this is the caller or the recipient.
The simple-peer instance has certain events which can be fired, for which we will define the respective methods. In this case we have:
signal: when the simple-peer has a signal ready to be sent (the offer or answer). These are the signals that we have to give to the other users though the webSocket (step 2 and 4 of the signaling process). Remember that for the initiator this signal (the offer) is created automatically. A non-initiator, however, needs to connect to the offer signal in order to generate the answer (step 3). This is exactly what the line sp.signal(offer) is forconnect: when the connection between two peers is completestream: when a stream is received from the other peer. In this case, each peer will receive the webcam stream of the other user which was passed during the initialisation of the simplePeer instance. Once this is received, we set it to thevideoCallerreference
We are almost there, the last step is to create the connection to the webSocket and define what should be done when the signals are received.
const webSocketConnection = new WebSocket("ws://localhost:8080/videochat");

useEffect(() => {
  webSocketConnection.onmessage = (message: any) => {
    const payload = JSON.parse(message.data);
    if (payload?.type === "offer") {
      setOfferSignal(payload);
      setConnectionStatus(ConnectionStatus.RECEIVING);
    } else if (payload?.type === "answer") simplePeer?.signal(payload);
  };
}, [simplePeer]);
Creating the connection to the websocket is very straightforward, we simply create an instance of the WebSocket class, with the endpoint url as its argument.
We can use the onmessage property to catch all of the incoming offer/answer signals (which were sent using webSocketConnection.send() in the sendOrAcceptInvitation function). When receiving the offer we set the signal as a state and change the peerConnectionState, this will render the acceptance button and the user will be able to connect to the signal and only if desired. When receiving the answer signal, however, we automatically connect the initiating simple-peer to the other: successfully closing the connection.
Congratulations! The peer-to-peer connection is now established and the users are able to talk to each other despite the lockdown.
Wrapping it all up
As you saw it is relatively easy to create a video calling application. We were able to create a simple one in just about 100 lines of code! With simplePeer.send and simplePeer.on("data", ()=>{}) we can even send/receive messages and upgrade our application to a video calling AND messaging app.
I hope the tutorial was useful, you can find the full code here.