Ensure code quality; create your own ESLint rules
Corentin Normant9 min read
Ensure code quality; create your own ESLint rules
Introduction
We used ESLint rules to enhance code quality. This article is about how one would proceed to create one’s own custom rule. We used this procedure at Theodo to make sure our frontend code was XSS free on every project.
If you are not familiar with XSS vulnerabilities here is an article from OWASP that summarizes well what it is about.
Context and Needs
There are over 80 developers at Theodo, working on over 30 different projects. This setup presents some challenges that many tech companies face:
- Code consistency and maintainability.
- Continuous improvement of the code quality
- Optimization of the development environment
- A straightforward onboarding for the newcomers on the different projects
We came up with a solution that is easy to implement and extremely effective: creating a custom linting rule for ESLint.
I will use an example of a rule we needed for our frontend projects with an objective of no know XSS vulnerability in our code.
We started by implementing the rule to React and Vue, which covers the majority of our projects. There are a few differences to take into account when developing a rule for each of these frameworks. We will look at them in this article.
If you encounter issues configuring ESLint, especially alongside other fromatting tools such as Prettier, I recommend this article that tremendously helped me to configure my development environment.
Strategy
Nobody is infallible. Creating an automated check that alerts the developer is more reliable than documentations on the project or code reviews. Don’t get me wrong, code reviews are essential, as is a well-written documentation, but it is often not enough to enforce a coding practice. Having an automated rule also means shorter code reviews and an easier time following the best practices.
Implementing a rule that will be in the IDE also allows you to suggest the best way to do something, as soon as it is written. This is a roundabout way to train your developers, that isn’t time-consuming for you.
How to implement an ESLint rule
To understand how a rule is coded, we need to take a look at our code’s Abstract Syntax Tree and how we can use it.
The Abstract Syntax Tree (AST)
An AST is a graph representation of your code. ESLint uses it to navigate your code and to decide which actions to take and where.
The screenshot below is an example of a simple Hello World! AST of a React script, containing a dangerouslySetInnerHtml. We can see the tree structure and the names of the different nodes. For example, the FunctionDeclaration node contains the information from the function keyword, up to the closing tag.
The screenshot below is an example of a simple Hello World! AST. We can see the tree structure and the different nodes’ names. For example, the FunctionDeclaration node contains the information from the function keyword, up to the closing tag.
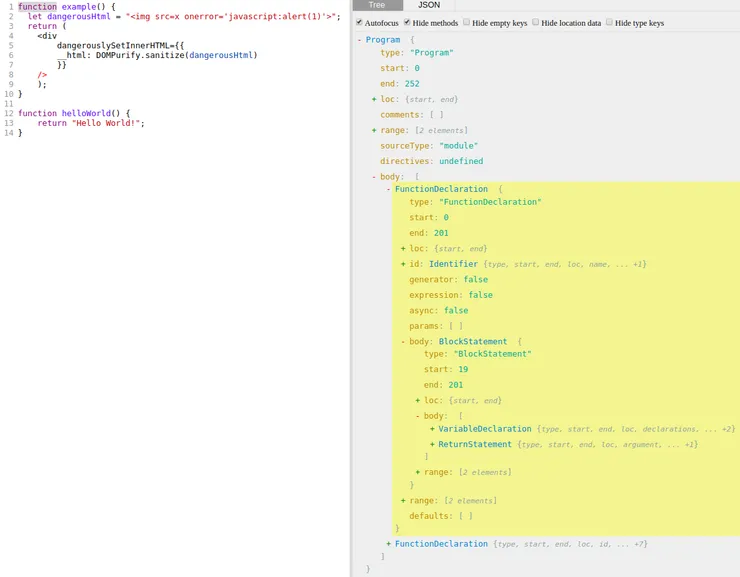
This screenshot is taken from astexplorer.net which is an extremely useful resource to visualize and navigate your AST.
It works nicely for Javascript and React. However, when exploring your Vue AST, you will need to find another way for the <template> part of a file, which is parsed as HTML. AST explorer’s own HTML configuration does not match perfectly with what my Vue code outputs. I used this tool instead, which is the same, except only for Vue.js
We’ll come back to the particularities of Vue.js later in this article.
How ESLint uses your code’s AST
ESLint uses a visitor that will parse your AST for each file it is allowed in. In this visitor function, you can define actions for each node type. If we use the same example as above, we could write something like this.
    const create = context => {
      return {
        Program(node) {
          try {
            console.log('Entering the program!');
          } catch (error) {
            context.report(node, error.stack);
          }
        },
        FunctionDeclaration(node) {
          try {
    				console.log(`Function ${node.id.name} is defined`);
    			} catch (error) {
    				context.report(node, error.stack);
    			}
    		}
    	}
In the example, I use the root node Program to trigger some action, and the FunctionDeclaration node.
This is a very basic example, where we can already see a few important things about the way ESLint will work.
-
The context object
The context passed as an argument here contains information relevant to the rule. We won’t use it here, but if you want more info here’s the official documentation: https://eslint.org/docs/developer-guide/working-with-rules
-
ESLint uses the node names to trigger some actions. Here, a
console.log. These actions will be triggered for each node with the same name in the AST. For example, there is only one Program, but usually more than one function declaration. In the above example, our console output will look like:Entering the program! Function example is defined Function helloWorld is defined -
Each node has access to its sub-nodes, and also to its parent node if it has one. This is why we can use
node.id.nameto get the name of the declared function. TheIdentifiernode'id'is a sub-node of theFunctionDeclarationnode, just like theBlockStatementnode named'body'.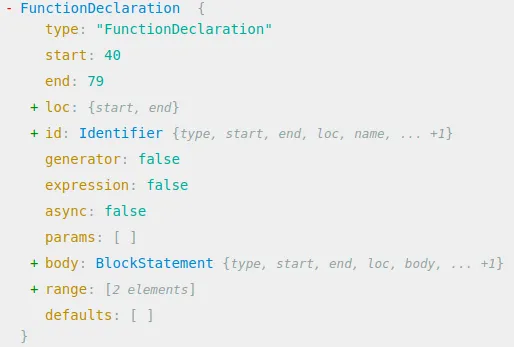
- Our approach to implementing our custom rule
Test-Driven Development works like a charm in this particular case. We obviously want to test our rule, but there are other advantages to doing so.
For those who are not familiar with Test Driven Development (TDD), it consists of three phases.
- Write a test case you want your code to pass. Run the tests. It fails. (Red test)
- Write code to pass your test, not more. Run the tests, it should pass. (Green test)
- Refactor your code.
This process is often shorthanded in Red-Green-Refactor.
The TDD method is awesome and you should use it where it fits. It does fit here for a few reasons.
-
One of them is that it allows us to ship a stable and well-documented version, with examples based on the tests.
-
In the context of our project, we were able to quickly test our custom ESLint rules in real-life projects, and obtain feedback. It was easier to convert the feedback in tests first (red tests), and then write some code to fix the issue (green tests).
-
In our case, many of our tests were easy to write, since they often were chunks of code we wanted to be flagged, or not. However, turning them green is less trivial. Here’s an example:
    // Test cases we do not want to catch with our rule
    testCase(`
          <template>
            <div class="content">
              <div v-html="message" />
            </div>
          </template>

          <script>
            import DOMPurify from 'dompurify';
            const rawHtmlInput = '<a onmouseover=\"alert(document.cookie)\">Hover me!</a>';
            export default {
              name: 'HelloWorld',
              data () {
                return {
                  message: DOMPurify.sanitize(rawHtmlInput)
                }
              }
            }
          </script>
        `),

    // Test cases we do want to catch
    testCase(`
          <template>
            <div class="content">
              <div v-html="message" />
            </div>
          </template>

          <script>
            import DOMPurify from 'dompurify';
            const rawHtmlInput = '<a onmouseover=\"alert(document.cookie)\">Hover me!</a>';
            export default {
              name: 'HelloWorld',
              data () {
                return {
                  message: rawHtmlInput
                }
              }
            }
          </script>
        `),
These two cases are similar, except in the message part, one is sanitized by DOMPurify whereas the other isn’t.
And more generally, tests protect us from breaking previously working code, and catch some edge cases during the development phase.
- Managing the Vue AST
As teased above, let’s look at the particularities of Vue files when writing an ESLint rule.
Vue files are split in 3 parts, a <template>part, a <script>part and a <style>.
The AST, in this case, does not include a unified version of the file. It is split in the same way. This means our visitor function will have to be split as well.
I use a standard ESLint parser for Vue, that exposes a function which takes the context and 2 visitors as arguments. One for the template, and one for the script.
Here is a code snippet to give you a better idea:
    const create = context => {
      // The script visitor is called first. Then the template visitor
      return utils.defineTemplateBodyVisitor(
        context,
        // Event handlers for <template>
        {
          VAttribute(node) {
            try {
              // SOME CODE HERE
            } catch (error) {
              context.report(node, `${utils.ERROR_MESSAGE} \n ${error.stack}`);
            }
          },
        },
        // Event handlers for <script> or scripts
        {
          Program(node) {
            try {
              // SOME OTHER CODE THERE
            } catch (error) {
              context.report(node, `${utils.ERROR_MESSAGE} \n ${error.stack}`);
            }
    			}
        },
      );
    };
From there it is basically the same approach as a single visitor function, like with vanilla Javascript, duplicated in each function.
I used the library eslint-vuejs (https://eslint.vuejs.org/developer-guide/#working-with-rules) that already provides a function to manage the template and script part at the same time :
context.parserServices.defineTemplateBodyVisitor(visitor, scriptVisitor) where both visitor and scriptVisitor are functions like the one presented before.
And there you go, you can check any number of things you want to alert your user about.
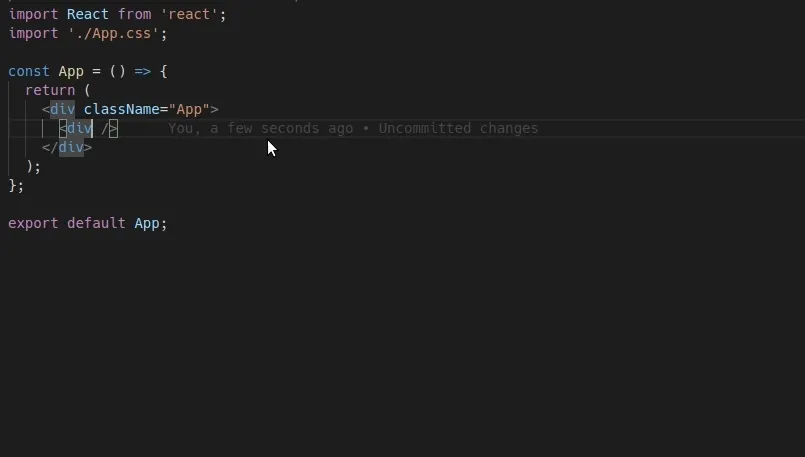
In our Vue example, we checked for v-html in the template and checked if it was verified with libraries like DOMPurify. We know v-html is generally not the way to go, but sometimes it is a necessity, and we wanted to make sure we weren’t introducing a potential XSS.
Here is what the custom rule looks like in action:
If you also think that integrating a custom ESLint rule to produce better code is awesome, definitely check out the project I used as an example, it open-sourced here: https://github.com/theodo/RisXSS
Conclusion
In conclusion, integrating custom ESLint rules in your projects will help improve the code quality, the lead time of your features, since fewer mistakes will make it to the code review part of the process, and the developer’s experience.
With a rule matching a bad practice, you can easily suggest a good practice right in the IDE, and the developers will quickly and painlessly learn it.
In our case, after some pilots, the rule was used in the development environment of the developers and guarantees us a certain level of code security.
If you want to dive deeper into the custom rules world of ESLint, a good place to start is the official documentation for developers: https://eslint.org/docs/developer-guide/working-with-rules
I will also link here two articles that helped me greatly with ESLint custom rules. If you found mine interesting, you should definitely check these out.