Why my Lambda cannot access Internet anymore from its AWS VPC?
Charles de la Roche Saint André10 min read
In this post, I try to be as clear as possible to explain how to give Internet Access to your AWS resources if they are in an AWS VPC.
For the most curious and those who like to understand things in depth, I explain at each step the AWS concepts in the grey part.
Recently, I developed an application with a React frontend, a NestJS backend and I set up a deployment with an AWS Lambda function for the backend and an AWS S3 bucket for the static frontend. My app was quite simple and mostly used a PostgreSQL database, an external API and the Google authentication.
All was working really fine in production until I decided to switch my RDS database to private mode for security reasons and then lost its access. Indeed, by default, a RDS database is in an AWS VPC and you can't access it, except if you are in the same VPC or if your RDS is public.
Thus, to retrieve access to my database, I was forced to move my AWS lambda function in the same VPC. Then came a new problem. When you move an AWS instance in a VPC, you lose the Internet access and therefore cannot anymore reach your instance from Internet and your instance cannot reach the Internet anymore.
1 - Create a VPC
You have all interest in using VPC because it helps in aspects of cloud computing like privacy, security and preventing loss of proprietary data. Moreover, some instances like AWS relational databases, need to be in a VPC and the only way to access them is to be in the same VPC.
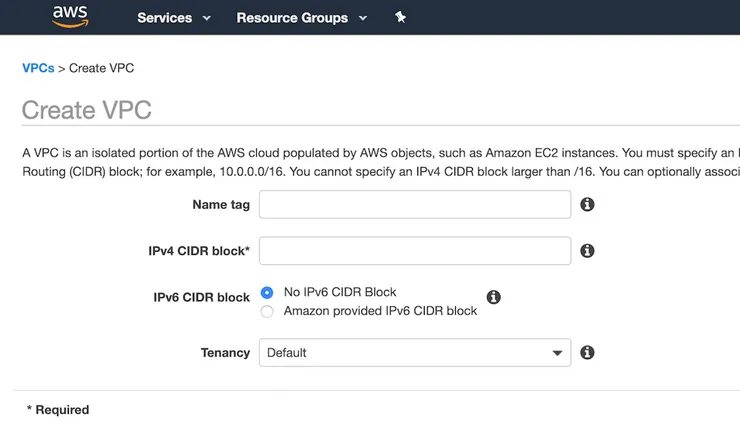
If you don’t already have a VPC (virtual private cloud), you need to create one.
To do that, go to the Services tab, select VPC, click on Your VPCs on the left menu and then on Create VPC:
- Choose the name of your VPC, for example my-wonderful-vpc
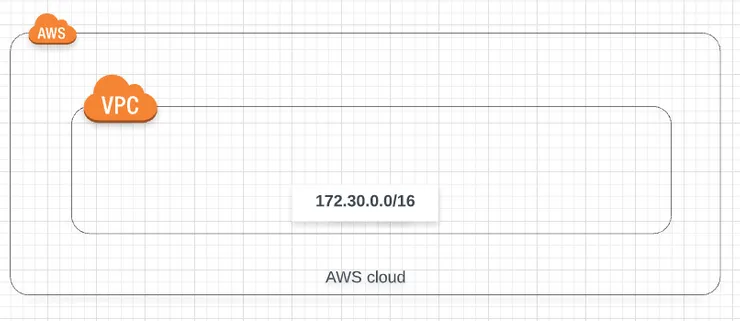
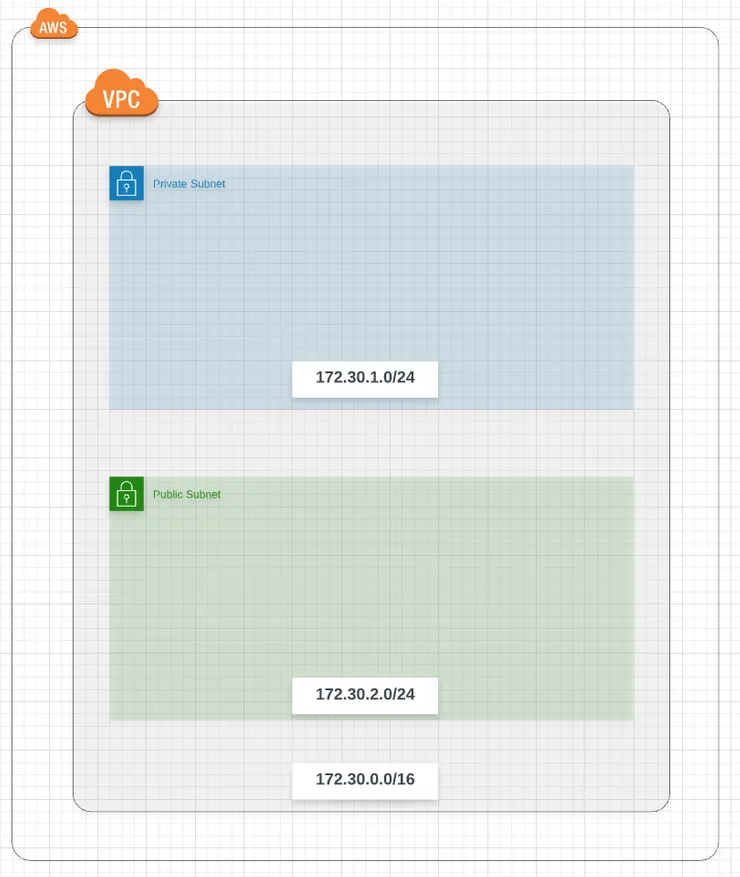
- In the CIDR (class inter-domain routing) block input, choose a range of IPs addresses for your VPC, for example 172.30.0.0/16
2 - Create private and public subnets in your VPC
To host your lambda, you need to create a private subnet inside your VPC.
Click on Subnets on the left menu in the VPC service and then on the button Create subnet:
- Choose the name of your subnet, for example my-wonderful-vpc-private-subnet
- Choose the VPC you created during the previous step (my-wonderful-vpc)
- In the CIDR block input, choose a subrange IPs addresses of your VPC IPs addresses, for example 172.30.1.0/24 (from 173.30.1.0 to 172.30.1.25)

Repeat these previous steps to create the public subnet by choosing another name (for example my-wonderfull-vpc-public subnet) and another subrange of IPs (for example 172.30.2.0/24).
You will configure your subnets as public and private in the 4th step.
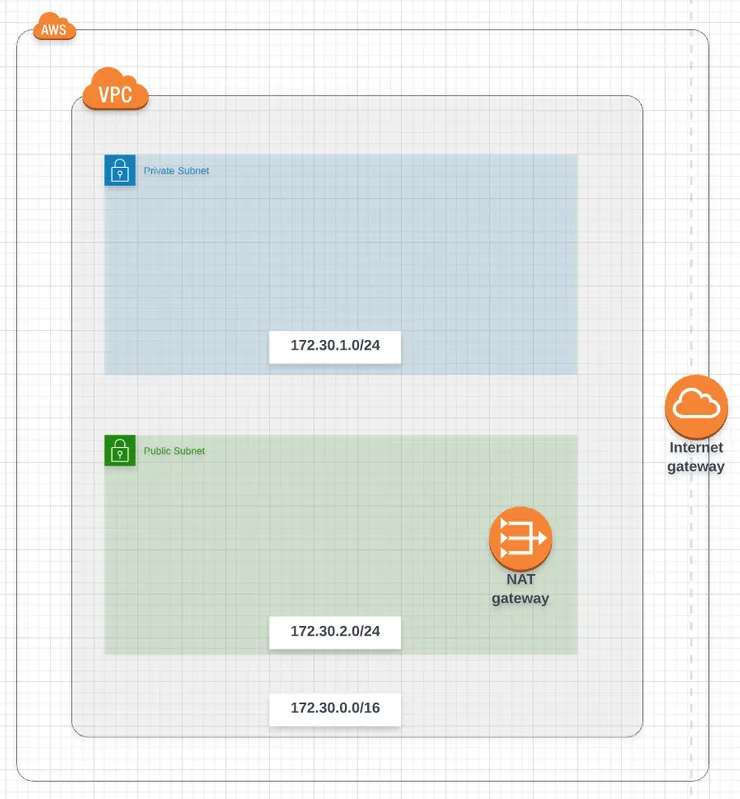
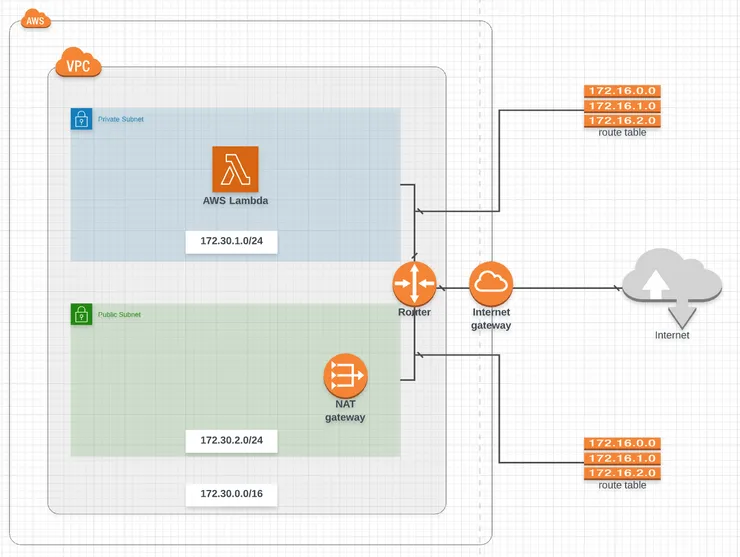
3 - Create an Internet Gateway and a NAT Gateway in the VPC
A Network Address Translation (NAT) enable instances in a private subnet to connect to the Internet, but prevent the Internet from initiating a connection with those instances. To do that, NAT maps all the private IP addresses assigned to the instances in the subnet to one public IPv4 address called the Elastic IP address.
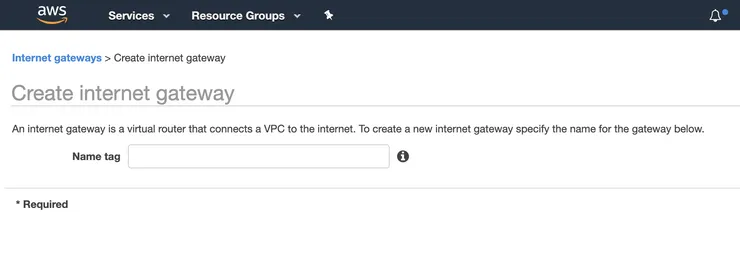
To access Internet, you will need to attach an Internet Gateway to your VPC.
Select Internet Gateways on the left menu and then click on the button Create internet gateway:
- Choose the name of your Internet Gateway, for example my-wonderful-vpc-igw
You will then need to attach your Internet Gateway to your VPC. Come back to the Internet Gateways tab, select your Internet Gateway (my-wonderful-vpc-igw), click on Action, select Attach to VPC and select your VPC (my-wonderful-vpc).
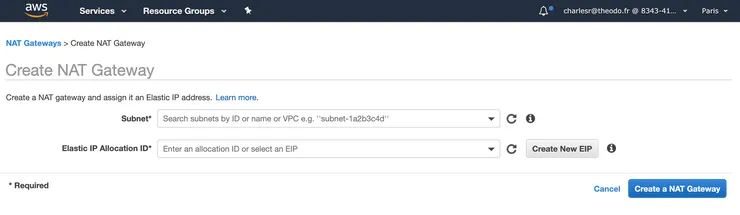
You will also need to create a NAT Gateway. Click on NAT Gateways on the left menu and then on the button Create NAT gateway :
- Choose the subnet you want to be public (my-vonderful-vpc-public-subnet)
- Choose one of your Elastic IPs. If you don’t have one, click on Create New EIP
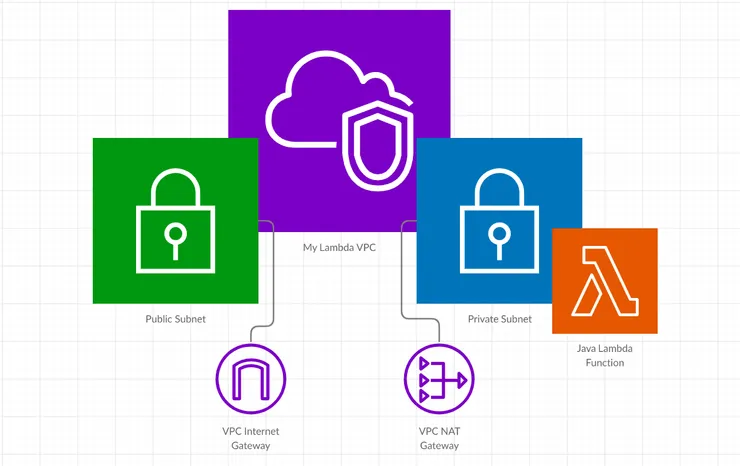
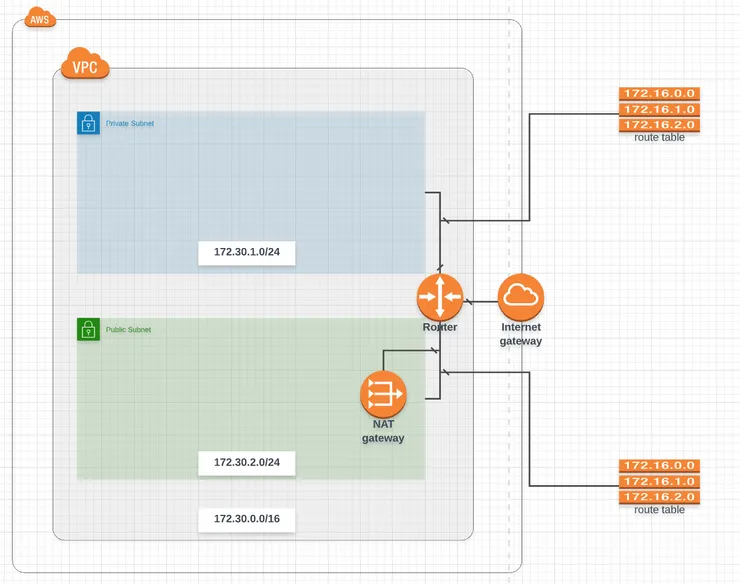
Your infra should look like this now:
4 - Associate the right route tables to the subnets
Remarks:
- Even if you don't create any route table, all VPC come with a default main route table and all the subnets of the VPC are associated to this main route table until you associate them to a custom route table.
- If a subnet is associated to a route table redirecting all traffic to an internet gateway, it is called a public subnet.
We will create two custom route tables, one for each subnet.
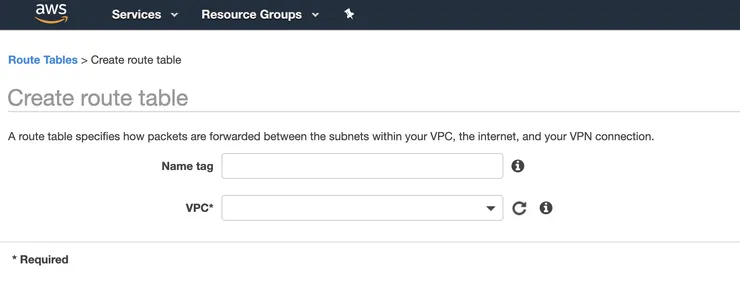
In the VPC service, click on Route Tables in the left menu and then on the button Create route table:
- Choose the name for your route tables, for example my-wonderful-vpc-public-route-table and my-wonderful-vpc-private-route-table
- Choose the VPC created in step 1 (my-wonderful-vpc)
Now that the two routes tables, we are going to configure them. Let’s start with the public one.
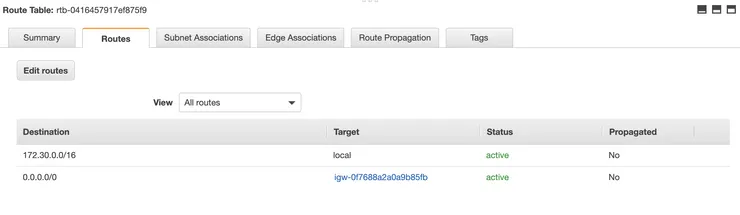
Go back to the Route Tables section and select the created route table my-wonderful-vpc-public-route-table:
- Click on the tab Routes of the selected route table
- Click on the button Edit routes
- Add a new route with for destination 0.0.0.0/0 and for target your internet gateway ID igw-… created in step 3 and click on Save Routes
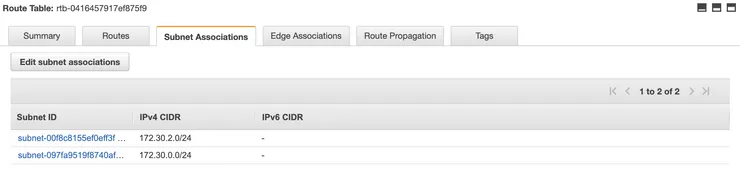
- Then, click on the tab Subnet Associations of the selected route table
- Click on the button Edit subnet associations
- Add your public subnet my-wonderful-vpc-public-subnet created in step 2 and click on Save
By doing that, you have redirected all outgoing traffic of the public subnet to the internet gateway, what makes this subnet a public subnet.
Now, let’s configure the private route table. Go back to the Route Tables tab and select the route table my-wonderful-vpc-private-route-table:
- Click on the tab Routes of the selected route table
- Click on the button Edit routes
- Add a new route with for destination 0.0.0.0/0 and for target your NAT gateway ID nat-… created in step 3 and click on Save Routes
- Click on the tab Subnet Associations of the selected route table
- Click on the button Edit subnet associations
- Add your private subnet my-wonderful-vpc-private-subnet created in step 2 and click on Save
By doing that, you have redirected all traffic of the private subnet to the NAT gateway.
5 - Create the lambda function and configure it
The hardest part is already done!
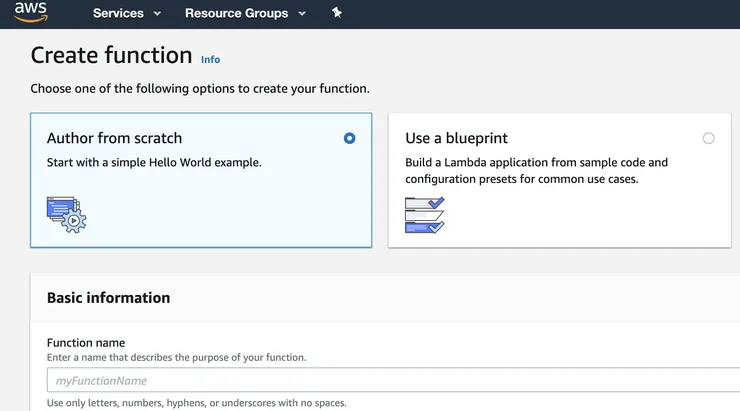
If you don’t already have a lambda, go to the Lambda service, and then click on the button Create function:
- Choose a name for your Lambda, for example my-wonderful-lambda
- Select the Node.js runtime
- In the section Permissions, select the choice create a new role with basic lambda permissions
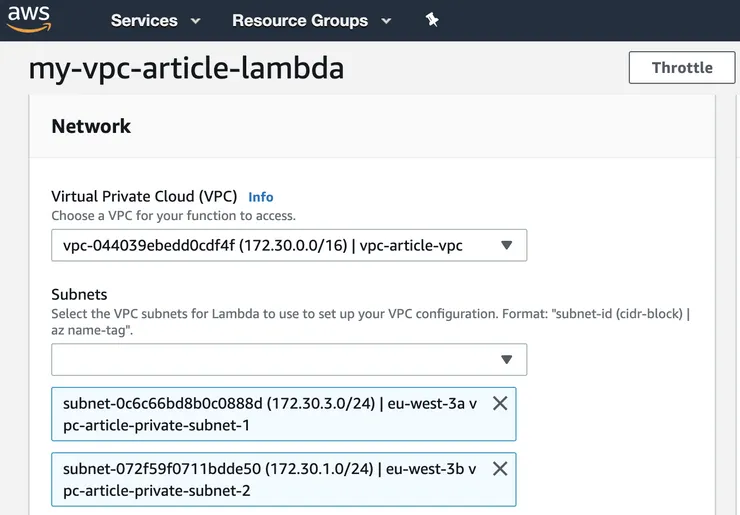
Once your lambda is created, click on it in the Lambda service and it will open the configuration page. Go down to the section Network and there, you must select 3 things:
- your VPC created in step 1 (my-wonderful-vpc)
- your private subnet created in step 2 (my-wonderful-vpc-private-subnet)
- the default security group of your VPC, called by default your-vpc-name-default-security-group
🔥🔥 Congrats, that’s all, your AWS lambda function has access to Internet! 🔥🔥
The end of this post is for people who wonders what is this mysterious default security group that I mentioned in the last step.
Bonus: Add more security with the security groups
Remark:
- even if you don't create security groups, all VPC come with a default security group and all the instances of the VPC are associated to this default security group until you associate them to a custom security group
A good practice is to associate with each of your instance a security group with the strict minimum authorized traffic.
For example, if you have a RDS database (AWS relational database service), you will only need to accept inbound traffic from your lambda (or your other backend instance).
To do that, in the VPC service, click on Security Groups and then on the button Create security group.
Once created, go back to the Security Group tab, select your security group, go the Inbound Rules tab, and select Edit rules to add an inbound rule that allows only incoming traffic from the security group of your lambda instance to reach the RDS instance:

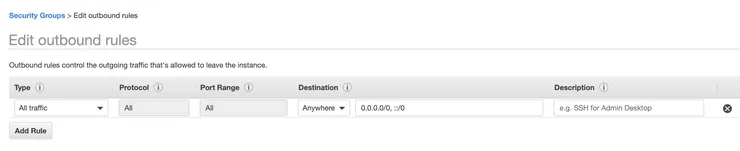
Then, go to the Outbound Rules tab, click on Edit rules to add an outbound rule that allows all traffic to leave the instance:
To finish, you just have to associate this security group to your RDS in its configuration page.
🔥 Congrats, that’s all you have to do to protect your database from the outside.
I hope you have enjoyed and have learned new things in this post. Feel free to leave comments to help me improve it.