Understand the Basics of Git in 8 Minutes
Jérémy Rippert7 min read
Welcome stranger! It is a pleasure meeting you.
When I began using git, I didn’t really understand how it worked: I considered it as a riskier alternative to sharing code by good old reliable USB key. Now that I became more intimate with it, I use it everyday with confidence.
In this article I’ll share what I’ve learned to allow beginners to understand the basics of git within 8 minutes.
I’ll explain how git works and how you can use it daily:
- What is a commit, what is a branch and why it is so important
- A concrete example of software development
What is a commit, what is a branch and why it is important
What is a commit?
A commit is like a picture of your code at a given time.
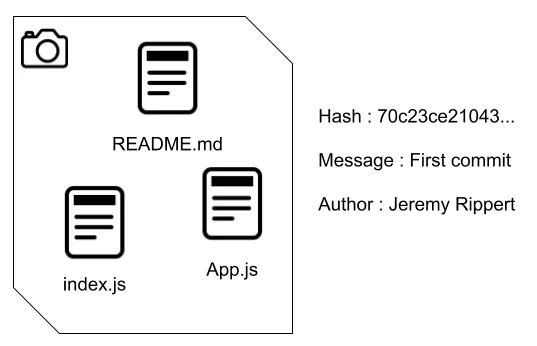
It also contains metadata like the author’s name, a message, and most importantly: a unique hash.
To go back to the state of the code as it was in the commit, you can simply checkout the hash git checkout <commit_hash>.
What is a branch?
A branch is a pointer to a commit.
Branches are a convenient way to checkout different commits without having to remember their hash: if branch my_branch points to commit 4ed89c6f3, then git checkout my_branch will show you the same code as git checkout 4ed89c6f3.
When on a branch, the pointer with automatically be updated when you make a new commit. You can also make the branch manually point to any commit git reset --hard <commit_hash>.
NB: be careful when using git reset --hard as it will delete any uncommitted change.
Why is it important?
Keep in mind those two things:
- You can retrieve any state that was ever committed
- You can make any branch point to any commit
Not that you are familiar with the fundamentals, let’s move on to practice.
A concrete example of software development
Let’s assume that you start working with a friend on a project repository called “Awesome Project”. After cloning the project, your local repository might look something like this:
![]()
Figure 1.1 local repository after cloning
N.B: the notation [HEAD -> master] before the commit message indicates that HEAD (your current position) and master (the pointer for master branch) both point towards “First commit”. Throughout the article, we will keep track of which branch points to which commit using brackets before the commit message.
Create a new branch
Assume you start coding the homepage, you probably want to create a branch feature/homepage git checkout -b “feature/homepage”. You first created a branch called feature/homepage that points to “First commit”, then checked it out. It is equivalent to
git branch feature/homepage && git checkout feature/homepage.
Since you didn’t make any change yet, master and feature/homepage both points towards “First commit”, and your HEAD is attached to feature/homepage.

Figure 1.2 local repository after creating feature/homepage
Commit your changes
After coding your feature, you want to commit your changes with a message “Create homepage”: use git add -A to stage all the files you modified. Files that are staged will be included in your next commit git commit -m “Create homepage”.

Figure 1.3 local repository after committing on feature/homepage
Notice that feature/homepage points towards “Create homepage”, but master is still pointing towards “First commit”.
It is now time to push your changes so the remote repository also includes your branch: use git push or git push --set-upstream origin feature/homepage. You created a branch feature/homepage on the remote repository. Local changes made to feature/homepage will now automatically be pushed on feature/homepage on the distant repository after using git push in the future.
After your friend approves of your changes, you want to include them on master.
Update local repository
First, you want to make sure that local master is up-to-date with remote master so there will be no conflicts when you upload your changes. Use git checkout master to go to master, and git pull to update master.
Assuming a new commit has been added to remote master since you created your branch, this is remote master:

Figure 1.4 remote repository
And this is your local repository after using git pull from local master:

Figure 1.5 local repository after pulling master
Resolve conflicts between your branch and master
When trying to merge feature/homepage into master, you might have merge conflicts. They happen when two developers modified the same line on two different branches.
Before merging two commits (in our case the tip of feature/homepage and master), git will identify which changes it can apply automatically (when only one developer modified a line), and which changes have to be resolved by hand (when there is a merge conflict).
I strongly recommend using an IDE to identify files with conflicts because they are often highlighted in your editor (see example below of command line vs VS Code).
Let me walk you through an example of creating a conflict, identifying it and resolving it:
Create a merge conflict
I’ll walk you through an example of conflict creation and detection using command line and VS Code. First, clone this repository by using git clone https://github.com/JeremyRippert/conflicts.git and go to conflicts folder.
Use git checkout conflicts to add conflicts branch to your local repository, and git checkout master to get back to master.
This is now your local repository:

Figure 1.6 local repository before merging
When merging conflicts into master, git will detect a conflict in “a_file_with_conflicts” because line 3 contains “I added this line on master branch” on master, but contains “I added this line on conflicts branch” on conflicts.
Identify files with conflict (command line vs VS Code)
You can use git merge conflicts from branch master to start the merge operation followed by git status to display the files you are merging:
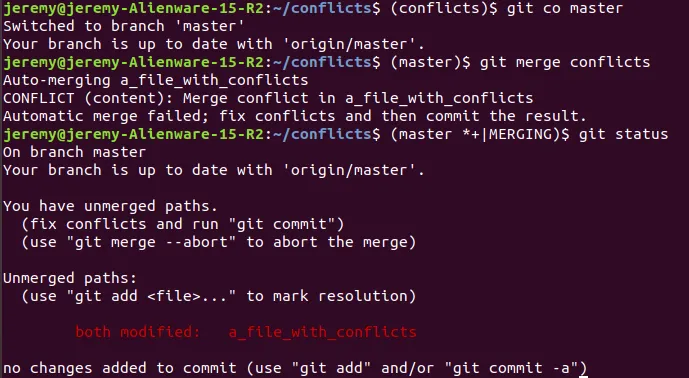
Figure 1.7 detecting conflicts in terminal
Each conflicting file will be displayed after the “both modified” mention.
Here is how it is displayed in VS Code:
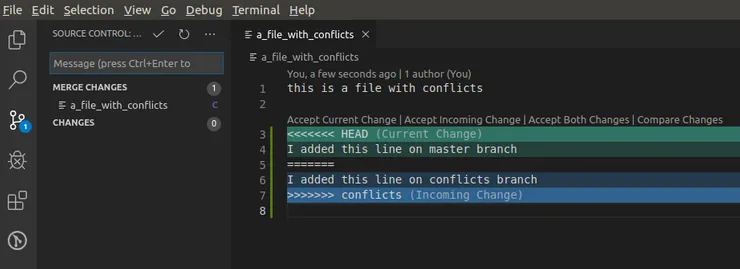
Figure 1.8 detecting conflicts in VS Code
Click on the tree icon on the left to display source control view.
Each conflicting file is displayed under “Merge changes”. You can click on it to open it: the conflict is highlighted in the file. Since you’re merging conflicts into master, “HEAD (Current change)” corresponds to what you did on master, and “conflicts (Incoming Change)” corresponds to what you did on conflicts.
I favor using VS Code to solve conflicts, because it offers a synthetic view of files with conflicts alongside your code.
Resolving conflicts
There are two ways of resolving conflicts: merge and rebase.
Resolving conflicts using merge
In the merge operation, you can resolve conflicts in each of the files, then use git add -A followed by git commit to merge your code. This will create a merge commit that will resolve conflicts. Commits you made on conflicts before will not be modified.

Figure 1.9 local repository after merging conflicts into master
Resolving conflicts using rebase
Instead of merging and solving conflicts, you can rebase your branch on master and then merge it. If you are in the merge operation, use git merge --abort to abort it.
Use git checkout conflicts followed by git rebase master from your branch to start the rebase operation. Git will apply your commits one by one, and will stop to let you resolve conflicts as they appear. After resolving conflicts in your editor, use git add -A and git rebase --continue to continue the rebase.

Figure 1.10 local repository after rebasing conflicts on master
I personally favor rebase over merge to solve conflicts, as conflicts will be solved within the commit that introduces them, instead of being all resolved in the merge commit.
If you want to learn more about rebase, give a look to this article.
Merge your branch on master locally
Now that your branch has no conflicts with master, you can checkout master git checkout master and use git merge feature/create-homepage to merge your branch on master. A commit containing code you added will be created on master.

Figure 1.11 local repository after merging feature/homepage into master
Update remote repository
Once your changes have been added to master, you can use git push to update remote master.

Figure 1.12 remote master after pushing
Congratulations, you just added the homepage to the project!
I hope this article helped you better understand git. It took me some time to wrap my head around it, but it is definitely worth it.
If you know someone who started using git recently, feel free to share this article to help them ramp up faster.