Single Sign-On demystified: set up a custom SSO using JWT
Pierre Milliotte8 min read

On a previous project, I had to set up Single Sign-On (SSO) between two existing and independent applications. This article, which explains how I proceeded, aims at helping understand it and setting it up with Symfony.
What is Single Sign-On (SSO)?
Single Sign-On (SSO) is a process that enables a user to access multiple applications (the service providers) by logging in once on an authentication server (the identity provider).
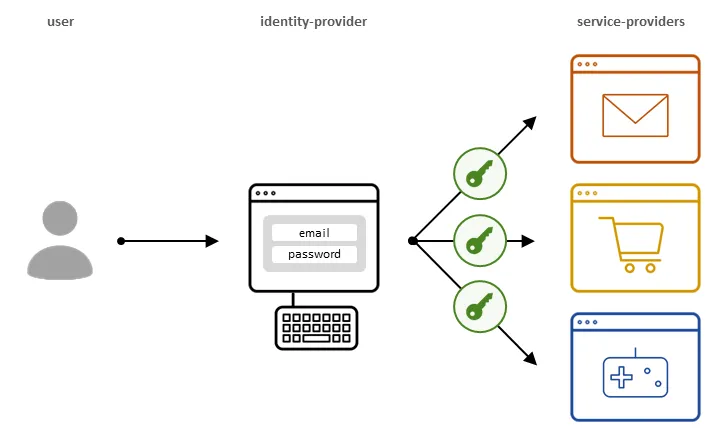 SSO gives access to many applications by entering credentials once
Many applications are using this authentication system to allow users to login through another application’s account, such as Google or Facebook’s - on which they are used to keep a session open. For example, it is possible to login on Wordpress either through Wordpress’ authentication server, or through SSO with a Google account:
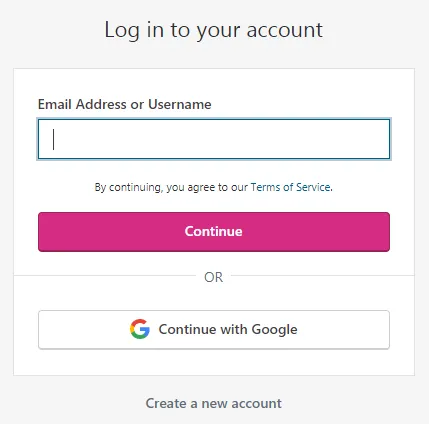 Wordpress provides SSO authentication with Google
Google itself enables its users to login with SSO to the multiple applications it provides - the service providers: Gmail, Youtube… - thanks to a unique central authentication server: Google Account - the identity provider.
SSO Flow
To be authenticated through SSO on a service provider such as Gmail, one need to be logged in on the identity provider (Google Account), which provides a password-based authentication. Having that in mind, here is what the user journey might look like:
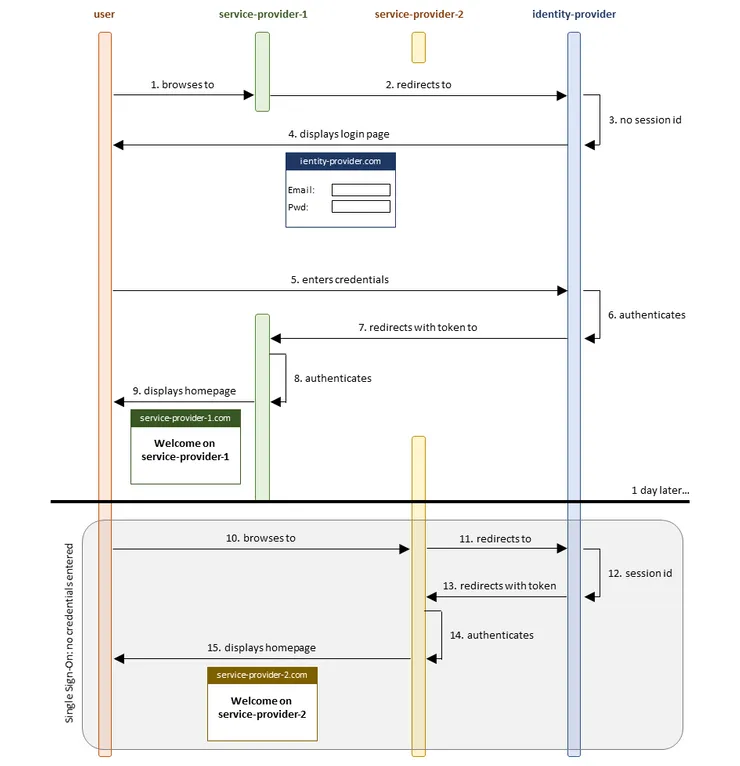 users have to enter their credentials only once to be authenticated on 2 independent applications
- User browses to a service provider which uses SSO: www.service-provider-1.com.
- www.service-provider-1.com redirects to the main authentication server: www.identity-provider.com.
NB: The SSO process can be executed automatically by a redirection when browsing to www.service-provider-1.com, or manually by clicking on a button like “Continue with Google”.
- www.identity-provider.com has no session open: User has not entered any credentials yet.
- User is thus prompted with www.identity-provider.com ‘s login page.
- User enters his credentials on www.identity-provider.com’s login page.
- www.identity-provider.com authenticates User,
- And redirects to www.service-provider-1.com with a signed token.
- www.service-provider-1.com decodes the token and authenticates User.
- www.service-provider-1.com displays its homepage to User.
NB: User did not have to enter his service-provider-1 credentials. He did enter his identity-provider credentials, that will allow him to access other service providers also using SSO: service-provider-2.
- User browses to another service provider which uses SSO: www.service-provider-2.com.
- www.service-provider-2.com redirects to the main authentication server: www.identity-provider.com.
- www.identity-provider.com has authenticated User earlier and still has his session open.
- www.identity-provider.com redirects to www.service-provider-2.com with a signed token.
- www.service-provider-2.com decodes the token and authenticates User.
- www.service-provider-2.com displays its homepage to User.
Single sign-on needs the service providers to communicate with the identity provider. One way of exchanging user information is through Json Web Tokens (JWT).
NB: In this case, information must not be confidential, a token can be easily accessed and decoded with an XSS attack: do not communicate passwords through JWT!
What is JSON Web Token (JWT)?
As accurately stated in this article, A JSON Web Token (JWT) is:
a JSON object that is defined in RFC 7519 as a safe way to represent a set of information between two parties. The token is composed of a header, a payload, and a signature.
In our SSO context, it means that a service provider can receive trustworthy information from the authentication server. Indeed, by sharing a secret key with the identity provider, the service provider can hash a part of a token it receives and compare it to the signature of the token. If the result matches the signature, the service provider knows that the information does come from the other entity possessing the key: the identity provider.
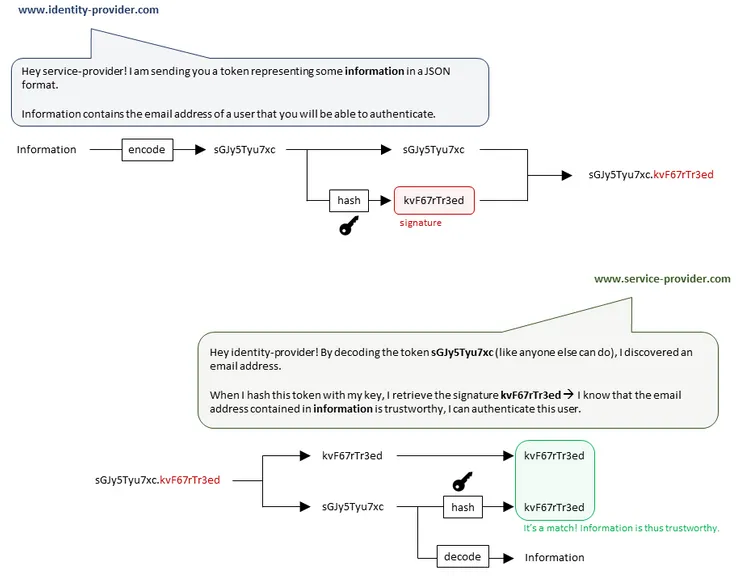 the service provider verifies the token’s authenticity
NB: what we call “information” consists in fact of 2 parts: a header and a payload which are encoded separately at first.
NB: Find more information on how to generate a RSA key pair with openssl key generator here.
My use-case: create a custom SSO between 2 existing and independent websites with their own user database
This part focuses on the method I chose to set up a custom SSO authentication on a project. Why custom? Because I had to deal with the code legacy and follow the specifications of the client. For example, if a user tries to login through SSO on a service provider, while being not authenticated on the identity provider, he should be redirected to the login page of the service provider.
Context
My client is an international company selling specific products all over the world, and whose website is available in many countries / languages.
The Russian subsidiary started to develop an independent platform for Russian drivers only, with a different domain name. For legal reasons, the drivers’ database had to be managed in Russia: merging both applications was thus not an option.
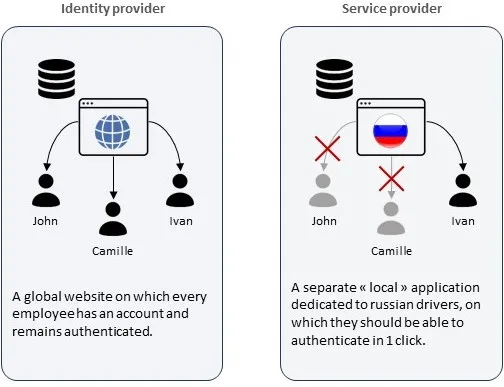 the service and identity providers have users in common, but they do not share the same user base
Specifications
The main specifications I had to take into account resulted from the independence between the applications: the service provider already had its password-based authentication system for its own users database.
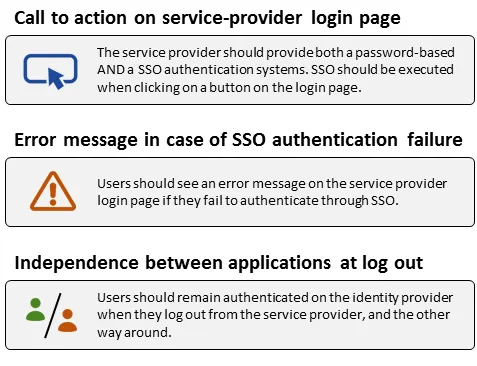 Except when clicking on a SSO button, the existing applications should remain independent
NB: This last specification is not common: usually, a user logging out from the identity provider will be logged out from the related service providers. This stresses the fact that in our context, the service provider already has its own authentication system where a user’s password might be different than the one on identity-provider.com (although the email address has to be the same on both applications).
Solution
For time-consumption and customizability reasons, I decided to set up a SSO authentication on Symfony using Guard - a Symfony component that helps implementing custom authentication systems. In a nutshell, Guard runs some code depending on the outcome of its ‘supports’ method which is called on every request. For example: does the current request has a token? No —> continue with the initial request. Yes —> decode the token.
In our context, the user chooses to login through SSO or by entering his credentials on the service provider. The user journey thus slightly differs from the one in the introduction - which is more relevant to a company offering different services such as Google - where the user was automatically redirected to the identity provider.
Given a user who has an account on both applications, he must first login on the identity provider, for the single sign-on to succeed on the service provider. Otherwise he would be prompted with an error message:
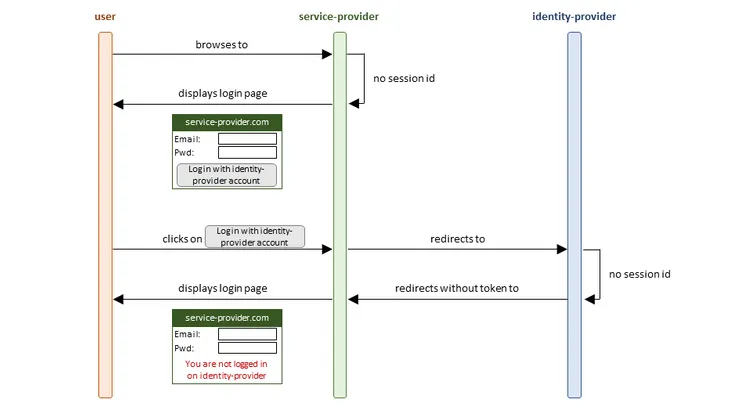 users must be authenticated on the identity provider for SSO to succeed
NB: Implementing the error message in case of SSO authentication failure will not be further addressed below.
The user then decides to login on the identity provider…:
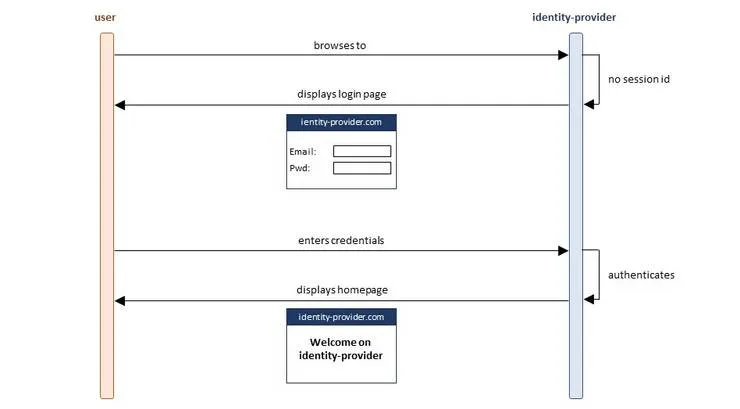 the user browses and login to the identity provider
…And click on the SSO button to login to the service provider:
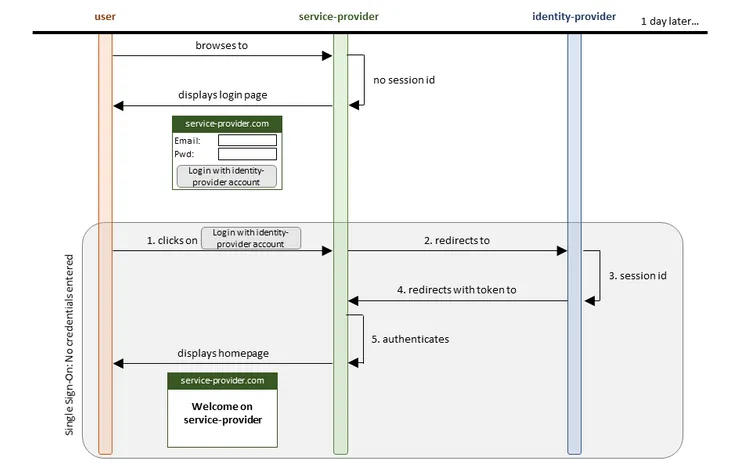 clicking on the SSO button authenticates the user on the service provider without entering credentials
- User clicks on SSO button.
- www.service-provider.com redirects to www.identity-provider.com.
// service-provider/src/Controller/SsoController.php

/**
 * @Route("/sso/login", name="sso_login")
 */
public function ssoAction(): RedirectResponse
{
    return new RedirectResponse('https://identity-provider/sso/token');
}
NB: Here we could pass other information to the identity-provider such as the original URL requested by the user, to redirect accordingly after authentication.
- www.identity-provider.com has authenticated User earlier and still has his session open.
- www.identity-provider.com redirects to www.service-provider.com with a token containing User’s encoded email address
// identity-provider/src/Controller/SsoController.php

/**
 * @Route("/sso/token", name="sso_token")
 */
public function communicatesTokenToServiceProviderAction(Request $request)
{
    // Get the private key to sign the token
    $privateKey = openssl_pkey_get_private(
        file_get_contents(self::PRIVATE_KEY_PATH)
    );

    // Generate the token if a user is authenticated
    $bearerValue = $this->getBearerValue($privateKey);

    // Set the token as a query param
    $url = sprintf(
        '%s?bearer=%s',
        'https://service-provider/home',
        $bearerValue
    );

    return new RedirectResponse($url);
}

private function getBearerValue($privateKey): ?string
{
    if (!$this->securityContext->isGranted('IS_AUTHENTICATED_REMEMBERED')) {
        return null;
    }

    $issuedAt = time();
    $expirationTime = $issuedAt + self::SECONDS_VALID;
    $token = [
       'email'=> $this->getUser()->getEmailAddress(),
       'iat' => $issuedAt,
       'exp' => $expirationTime
    ];

    return JWT::encode($token, $privateKey, 'RS256');
}
NB: The URL of the service provider differs from the ientity provider’s. Thus the token can not be sent to the service provider in a cookie. Here, it is sent as a query param: for security reasons, make the token expire soon after use (through const SECONDS_VALID).
- www.service-provider.com decodes the token and recognizes the email address of a user who it authenticates.
NB: This is where I use Symfony’s Guard component. At every request made on the service provider, the Guard component checks if it contains the expected token which it decodes with the shared private key.
// service-provider/src/Security/TokenAuthenticator.php

class TokenAuthenticator extends AbstractGuardAuthenticator
{
   ...

    /**
     * Called on every request:
     * Checks the existence of the param 'bearer', skips this
     * authenticator if false.
     */
    public function supports(Request $request)
    {
        $bearer = $request->get('bearer');

        return isset($bearer);
    }

    /**
     * Returns the credentials to be passed to 'getUser': the email
     * address in our case.
     */
    public function getCredentials(Request $request)
    {
        return [ 'token' => $request->get('bearer') ];
    }

    /**
     * Retrieves the user's email address by decoding the token.
     */
    public function getUser($credentials, UserProviderInterface $userProvider)
    {
        $jwt = $credentials['token'];

        $publicKey = openssl_pkey_get_public(
            file_get_contents(self::PUBLIC_KEY_PATH)
        );

        $decodedJwt = (array) JWT::decode($jwt, $publicKey, ['RS256']);

        return $this->userRepository
            ->findOneBy(['email' => $decodedJwt]);
    }

    ...
}
- www.service-provider.com displays its homepage to User.
Alternative
Symfony’s Guard component is far from being the only option: SSO can be done for example with SAML (Security Assertion Markup Language) - a security format based on XML - with libraries such as Simplesamlphp.
Conclusion
The specifications I had to take into account, and the communication between two independent applications that SSO requires made me look at it sceptically first. However, I quickly found out that SSO could work with simple redirections, and would be easily customizable with Symfony’s Guard component.