How to Test Your NestJS Application with Jest in 4 Steps
Débora Barreto Ornellas13 min read

NestJS is a server-side backend framework that is becoming increasingly popular within the Node community. In this article, we’ll suggest how to make the most out of Nest testing tools from our experience at Theodo.
What you’ll learn in this article
- An intro to NestJS
- A quick overview of good testing practices
- How to write unit and E2E tests for your backend with Jest
- How to mock services and HTTP calls
About NestJS
Inspired from Angular, Nest uses Typescript and Javascript and compared to other Node.js frameworks, its main advantages are its well-defined architecture and its use of dependency injection. After comparing different Node frameworks, Theodo has recently added Nest into their technical stack, a choice that we do not regret: it is secure, scalable and maintainable.
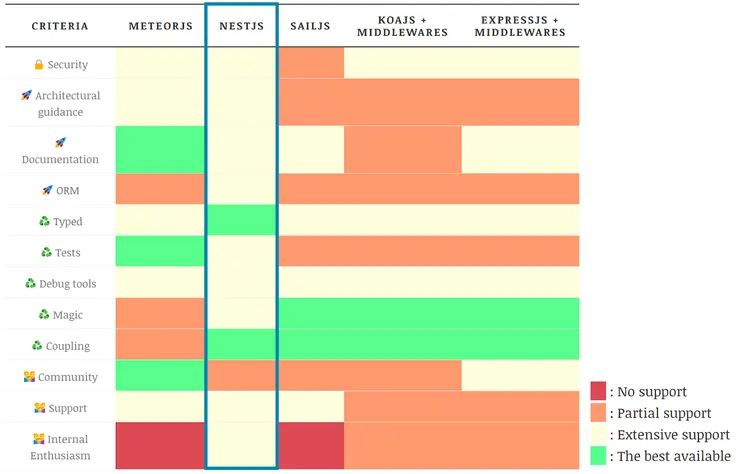
An overview of Node.js frameworks. Read more about how we chose ours.
Besides all this, NestJS has one notable aspect: it offers its developers advantages to write automated tests. Why? First, because of the use of dependency injection, a design pattern that allows dependencies to be managed at runtime instead of compile time. This makes mocking and unit testing much easier! Second, because it’s written in Typescript, which makes up for robust code. Third, it already comes with Jest, a Javascript testing framework. That’s great!
NestJS Architecture
Basic NestJS architecture is composed of Modules, Controllers and Services.
When you start a basic Nest application, in the /src folder you’ll see five files: the main file, one app module, one controller, one service and a test file for the controller.
src
├── app.controller.ts
├── app.module.ts
├── app.controller.spec.ts
├── app.service.ts
└── main.ts
Ideally, as your project becomes bigger you’ll want to create separate modules for your features (and corresponding controllers and services). Modules are the main pieces of your app: inside them, you’ll find the declaration of all its components (controllers, services) and its dependencies (imports). Controllers are where you’ll define your routes and call their corresponding services. The idea is to keep controllers as clean and as independent from your external services as possible. Finally, services contain the core of your business logic and the focus of your tests. A module usually contains more than one service and controller.
Our example application
To illustrate how to test your NestJS application, we’ve built a simple example. We have a backend with one route and two services that finds a student in a simulated database by his or her name and calculate the GPA (grade average) if he or she exists.
This route will be used to exemplify two kinds of tests: unit and end-to-end.
We started our application by following the steps defined here. Everything we’ll need is included in this default installation! For the tests, we’ll create a new subfolder named “Test”. Inside, we’ll put our new testing files: student.service.spec.ts and app.e2e-spec.ts.
src
├── api.service.ts
├── app.controller.ts
├── app.module.ts
├── main.ts
├── student.service.ts
└── test
    ├── app.e2e-spec.ts
    └── student.service.spec.ts
Our app.module looks like this:
import { Module, HttpModule } from '@nestjs/common';
import { AppController } from './app.controller';
import { StudentService } from './student.service';
import { ApiService } from './api.service';

@Module({
 imports: [HttpModule],
 controllers: [AppController],
 providers: [ApiService, StudentService],
})
export class AppModule {}
The app.controller file looks like this:
import { Controller, Get, Query, HttpException } from '@nestjs/common';
import { StudentService } from './student.service';

@Controller('student')
export class AppController {
 constructor(private readonly studentService: StudentService) {}

 @Get('/gpa')
 async getStudentGpa(
   @Query('firstName') firstName: string,
   @Query('lastName') lastName: string,
 ): Promise<number> {
   if (!firstName || !lastName) {
      throw new HttpException('Incomplete student information', 400);
   }
   return await this.studentService.getGpa(firstName, lastName);
 }
}
Here’s the studentService :
import { Injectable, HttpException } from '@nestjs/common';
import { ApiService } from './api.service';

interface Student {
  name: string;
  grades: number[];
}

@Injectable()
export class StudentService {
  constructor(private apiService: ApiService) {}

  public async getGpa(firstName: string, lastName: string): Promise<number> {
    const student: Student = await this.apiService.getStudent(
      firstName,
      lastName,
    );

    if (!student || !student.grades) {
      throw new HttpException('Cannot find student or student grades', 404);
    }

    let gpa: number = 0;

    for (const grade of student.grades) {
      gpa += grade / student.grades.length;
    }

    return gpa;
  }
}
And, finally, our api.service looks like this:
import { Injectable, HttpService } from '@nestjs/common';

interface Student {
  name: string;
  grades: number[];
}

@Injectable()
export class ApiService {
  constructor(private http: HttpService) {}
  async getStudent(firstName: string, lastName: string): Promise<Student> {
    const url = `....../get-student?firstName=${firstName}&lastName=${lastName}`;
    const response = await this.http.get(url).toPromise();
    return response.data;
  }
}
The API URL is fake but here it will not be a problem, as we’ll be most interested in mocking this call.
Ok, we’re all set! So, how can we test our code?
4 steps to a happy NestJS testing:
1) Know and apply good testing practices
Having a well tested backend is an important step for having a successful product. Most of the business logic is there, and you’ll want to make sure that neither a “future you” or someone else will break the beautiful code you’ve written today.
Therefore, it is never too late to stop and revise some of the best practices when it comes to software testing:
a) Be familiar with the testing pyramid
We usually divide automated tests into three categories: unit, integration and end-to-end tests. Unit tests are smaller and simpler: they are meant to test one internal method at a time, without contacting the external world. Integration tests encompass bigger methods and calls to external services (which, however, should be mocked). Finally, end-to-end tests serve as an extensive check into your routes, to see if everything’s ok in real conditions.
The testing pyramid has been described with some different shapes, but the main idea remains universal: we should write more of the simpler tests and less of the more complicated ones, without leaving any of them behind.
b) KISS
The KISS (Keep It Simple, Stupid) principle applies to tests as well. Testing can be very time-consuming, so we should avoid at all costs over-engineering and losing time, right?
Not all logic needs to be tested! Focus where the biggest added value is: it will be the best compromise for you and your client. As always, quality matters more than quantity.
c) Write code that it’s easy to maintain
The best practice is to test the result of your method, not the implementation details. When finishing writing a test, ask yourself: if I ever refactor the tested method (without changing the result), will I have to modify this test? If the answer is yes, you can simplify your tests.
d) Give a chance to Test Driven Development (TDD)
TDD is a development technique that lots of people have heard of (and even tried once), but don’t use that often. When you start each chunk of logic of your code with a test that fails and then you write the minimal amount of code that makes it pass, you’re ensuring that you’re not over-engineering your app and that your tests are useful and reliable.
2) Make the most out of Typescript
Typescript is a programming language that allows static typing and compiles to pure Javascript. Nest does not oblige developers to use Typescript, however, it fully supports it and we encourage you to use it!
While using Typescript is not exactly testing, it is included on this list because it makes your code more robust and actively avoids many bugs. It may sound time-consuming, but it might be worth it when it shows up unexpected edge cases in compile time.
Good practices:
- Type not only your method parameters, but also your method returns. This will help you ensure that what you’re sending at your service is what your controller is expecting.
- Avoid using “any”: even if you don’t know all the data you’re dealing with, you can partially type what you know.
3) Write your isolated unit tests with Jest and Nest testing tools
About Jest
As we mentioned before, Jest is a Javascript testing framework whose mission is to simplify the developer experience writing tests in frontend and backend projects. It is integrated with the default Nest installation, which is very cool!
Of course, you’re not obliged to keep it and use it if you have another preferred testing framework, such as Mocha or Chai. At Theodo, we stick to Jest, because it is a framework that fulfill our needs. Hint: if you’d like to give it a try, it is possible to convert code from other frameworks to Jest. Another hint: this Jest cheatsheet may help you if you’re a beginner!
Mocking a service
In our example backend, the external service is the student database API. In a real, more complicated project, external services can be everywhere: REST APIs, authentication, content management, databases, payment services, among other possibilities. If we were to call all those services after every code modification, the test suite would be painstakingly long. Luckily, Nest and Jest make mocking a lot easier.
Ok, let’s write tests!
That’s how our unit test file will look like:
student.service.spec.ts
import { Test, TestingModule } from '@nestjs/testing';
import { ApiService } from '../api.service';
import { StudentService } from '../student.service';

class ApiServiceMock {
 getStudent(firstName: string, lastName: string) {
   return {
     name: 'Jane Doe',
     grades: [3.7, 3.8, 3.9, 4.0, 3.6],
   };
 }
}
To write isolated unit tests, it’s common to mock all dependencies of a method or a service. In our StudentService unit test, we’ll mock AppService by creating an ApiServiceMock class.
This is the ideal procedure if you want to mock everything from this service. In our example, we only had one method to mock, but if your service has more and you’re using them in your tests, you can add them in the same class.
Next, we’re setting up our test configurations inside beforeAll:
describe('StudentService', () => {
 let app: TestingModule;
 let studentService: StudentService;

 beforeAll(async () => {
   const ApiServiceProvider = {
     provide: ApiService,
     useClass: ApiServiceMock,
   };
   app = await Test.createTestingModule({
     providers: [StudentService, ApiServiceProvider],
   }).compile();
   studentService = app.get<StudentService>(StudentService);
 });
We’ll use the TestingModule from the Nest testing package, which takes every provider and module you need for testing. Inside it, we define a mock provider that recognizes when ApiService is called and use the ApiServiceMock class instead. That’s all we need for mocking!
The BeforeAll method sets a one-time setup for the test suite. If you need the setup to run before each test, use BeforeEach.
describe('getGpa', () => {
   it('should get student GPA', async () => {
     const expectedGpa = 3.8;
     const gpa = await studentService.getGpa('Jane', 'Doe');

     expect(gpa).toEqual(expectedGpa);
   });
 });
});
Use “toBe” if you want the response to be the instance of the expected response. Prefer “toEqual” if it’s not the case, but you want the values to match.
4) Put it all together: write an end-to-end test (also with Jest!)
Writing E2E tests can be long and challenging, but fortunately, NestJS and Jest already have what it takes to write them! We want to test our entire route, calling the two services.
Our goal is to check if our whole route corresponds to our requirements:
- Calculate the GPA if the student exists and has grades,
- Throw an error if the query is incomplete, if the student hasn’t been found or if he/she doesn’t have any grades.
Mocking an HTTP call
In an E2E test, the idea is to also call your external services, but here we’re mocking the HttpService for simplicity reasons. This means we’ll call the APIService and we’ll use the Jest function spyOn to simulate our HTTP response.
Writing our test:
import { Test, TestingModule } from '@nestjs/testing';
import * as request from 'supertest';
import { AppModule } from '../app.module';
import { INestApplication, HttpService, HttpModule } from '@nestjs/common';
import { ApiService } from '../api.service';
import { StudentService } from '../student.service';
import { AxiosResponse } from 'axios';
import { of } from 'rxjs';

describe('AppController (e2e)', () => {
 let app: INestApplication;
 let httpService: HttpService;
First, we need to set up the dependencies of the test:
beforeAll(async () => {
   const testAppModule: TestingModule = await Test.createTestingModule({
     imports: [AppModule, HttpModule],
     providers: [ApiService, StudentService],
   }).compile();

   app = testAppModule.createNestApplication();
   httpService = testAppModule.get<HttpService>(HttpService);
   await app.init();
 });
We called beforeAll as we did for the unit test, but this time we’re importing two modules and calling the createNestApplication method, that simulates our real app.
Notice that one of the imported modules is the real HttpModule. That’s because the mock action will happen inside of each test! It’s the simplest solution in our situation, because the mocked response will change for each test case.
We have four tests:
First, if we insert the name of a valid student and there are grades associated with this student, we expect to receive the correct GPA.
 it('GET student GPA if API finds the student', async () => {
   const result: AxiosResponse = {
     data: {
       name: 'Jane Doe',
       grades: [3.7, 3.8, 3.9, 4.0, 3.6],
     },
     status: 200,
     statusText: 'OK',
     headers: {},
     config: {},
   };
   jest.spyOn(httpService, 'get').mockImplementationOnce(() => of(result));
   const expectedGpaString = '3.8';
   const response = await request(app.getHttpServer())
     .get('/student/gpa?firstName=Jane&lastName=Doe')
     .expect(200);
   expect(response.text).toEqual(expectedGpaString);
 });
In the line await request(app.getHttpServer()).get(‘/student/gpa?firstName=Jane&lastName=Doe’).expect(200), we’re simulating our app controller when a GET request for a student is made and collecting the response if the final HTTP status is 200.
Notice that we defined an AxiosResponse object with the student response we want (all properties are obligatory). Then, with jest.spyOn, we can mock the implementation of the get method of httpService. The of() method transforms the result object into an observable.
In the next test, we should expect an HTTP 400 code if the query isn’t complete.
 it('throws error if GET request does not include student name', async () => {
   return await request(app.getHttpServer())
     .get('/student/gpa?firstName=&lastName=')
     .expect(400);
 });
Now, we should expect an HTTP 404 code if the query is complete, but the student hasn’t been found.
it('throws error if API cannot find the student', async () => {
    const result: AxiosResponse = {
      data: {},
      status: 404,
      statusText: '',
      headers: {},
      config: {},
    };

    jest.spyOn(httpService, 'get').mockImplementationOnce(() => of(result));

    return await request(app.getHttpServer())
      .get('/student/gpa?firstName=Anna&lastName=Julia')
      .expect(404);
  });
Finally, we should also expect an HTTP 404 code if the student exists, but has no grades array associated.
 it('throws error if student does not have grades assigned', async () => {
   const result: AxiosResponse = {
     data: { name: 'Davy Jones' },
     status: 200,
     statusText: '',
     headers: {},
     config: {},
   };

   jest.spyOn(httpService, 'get').mockImplementationOnce(() => of(result));

   return await request(app.getHttpServer())
     .get('/student/gpa?firstName=Davy&lastName=Jones')
     .expect(404);
 });
});
Now that we wrote all our tests, we might want to check our test coverage. With Jest, it’s pretty simple: go to your package.json file, find the Jest configuration and add ‘“collectCoverage”: true’ to it. You can also add ‘“verbose”: true’ if you want more details into your test report.
Let’s run our test suite (with npm test or yarn test):
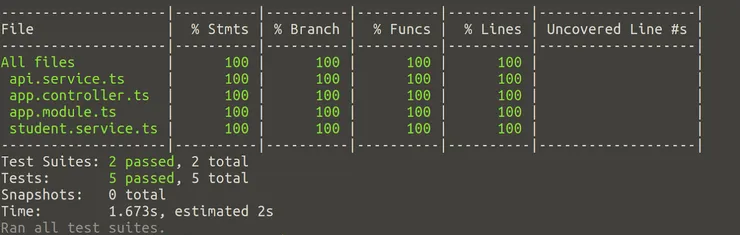
Everything passed ! And, as expected, we’re fully covered.

We’ve arrived at the end of this list. If you followed through, you’ll have the main tools for a nice test suite in your NestJS application!
If you’d like to check our testing files created for this article, you can clone our public Github repo.
Do you use other techniques for testing a NestJS app? Would you recommend other steps to be a better tester? Share in the comments!
