Deploy a NestJS App with Serverless Framework
Jean Delevoye9 min read
Here in Theodo we are very enthusiastic about NestJS framework. It is quite young but we consider it currently one of the best NodeJS frameworks. Recently, we asked ourselves if it was possible to deploy serverless NestJS applications.
Serverless is a new paradigm that will help you to quickly deploy your back-end application with cutting costs. If you want to learn more about serverless, check this article.
Serverless Framework is currently the most known solution to deploy a serverless application. It has the same assets as many other serverless frameworks:
- It’s easy, you can deploy your app with one command
- It’s fast, you deploy your application in one minute or less
- Last but not least, it allows you to deploy your app without using AWS dashboard
Many other serverless frameworks could help you: Claudia.js, Up, Architect, etc. However the popularity of Serverless Framework positions it a step ahead:
- It has good documentation and a lot of plugins
- It is Cloud agnostic: you can deploy on different clouds with the same command
That’s the solution we want to use for our app!
This tutorial will give you the keys to deploy an already existing NestJS API with the Serverless Framework. It will not give you any detail on how to create your own NestJS application or how to test it. We will go through all the steps from configuring your nestJS application and testing it offline to deploying it. Before getting started, let’s introduce Serverless Framework!
If you want to see directly the code of a serverless deployable nestJS application, here is the Github of my project.
Prerequisites
- AWS account
- Node.js
- Npm (or yarn)
- A NestJS application
Serverless Framework
Cloud Functions and Serverless
In order to better understand the role of Serverless framework let’s remind what the serverless paradigm is:
Serverless is a method of deploying and running applications on cloud infrastructure, on a pay-per-use basis and without renting or buying servers. Instead of you, the serverless platform provider is responsible for capacity planning, scaling, balancing, and monitoring; the provider is also able to treat your applications as functions.
Serverless Applications with Node.js by Slobodan Stojanović and Aleksandar Simović
These functions mentioned in the quote above are Cloud Functions. Cloud functions like AWS Lambda, Google Cloud Functions, Azure Function are independent units of development, like a microservice. They are merely code designed to be deployed in the Cloud and to perform small tasks.
Serverless Framework presentation
The Serverless framework can build such cloud functions from your application code. Once built, it deploys these functions in your Cloud Provider. This operation takes less than a minute.
The framework supports multiple languages like Node.js, Python, Java. Its biggest asset apart for its swiftness is its ease of use and its agnosticism in regards to Cloud Platforms. It is compatible with AWS, Microsoft Azure and Google Cloud Provider. Besides, Serverless Framework allows deploying fully configured cloud functions. You can have an AWS Lambda running without using AWS dashboard.
Serverless Framework setup
Install Serverless-cli with this simple command.
# Installing the serverless cli
npm install -g serverless
Once installed you have to set up your Cloud provider credential. If you don’t have an AWS account already, create one. Create a user with the AWS IAM service and get its access key and secret access key.
Now create the file .aws/credentials in your user root directory with the following content:
[default]
aws_access_key_id = YOUR_ACCESS_KEY
aws_secret_access_key = YOUR_SECRET_ACCESS_KEY
That’s all with Serverless configuration! Now let’s focus on your NestJS app deployment.
Deploy your NestJS app
From here the tutorial will only focus on the deployment of AWS Lambda functions. Here is a diagram of a typical serverless application with AWS.
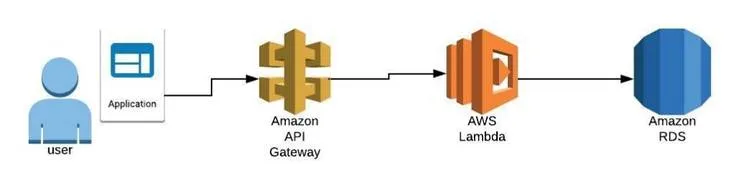
API Gateway creates a REST API in front of your lambdas. By default, each Serverless project generates a new API Gateway. You can configure Serverless Framework to share API Gateway and API ressources.
Create your handler
For Serverless to build your lambda you have to wrap your application. You need to provide an entry point for Serverless to compile your code in a lambda function. This entry point will be a handler object exported in the file lambda.ts. This entry point is not the same for each Cloud Provider.
Create the lambda.ts file in the src folder of your application.
The main.ts file could also serve as an entry point for Serverless but it is a better practice to let the code of your app unchanged.
.
├── package.json
├── serverless.yml
├── tsconfig.json
└── src
    ├── app.controller.ts
    ├── app.module.ts
    ├── app.service.ts
    ├── lambda.ts
    ├── main.ts
    └── photo
        ├── photo.controller.ts
        ├── photo.entity.ts
        ├── photo.module.ts
        ├── photo.service.ts
        └── interfaces
            └── photo.dto.ts
If you were developing an Express API, for example, you could use the package serverless-http to create your entry point. With a NestJS app, it is a bit harder though, the package is not working currently with NestJS framework. As you may know, under the hood, Nest makes use of Express by default. To create a Serverless entry point with Nest you will need full control of the express lifecycle. You need to use the function NestFactory to do so.
const expressApp = express();
const nestApp = await NestFactory.create(AppModule, new ExpressAdapter(expressApp)
You will also need to import functions from the plugin aws-serverless-express and aws-lambda. They will help convert your app into a server able to handle AWS events.
Install the plugin aws-lambda and aws-serverless-express in your project.
npm install --save aws-serverless-express
npm install --save aws-lambda
In the lambda.ts file place the following code:
// lambda.ts
import { Handler, Context } from 'aws-lambda';
import { Server } from 'http';
import { createServer, proxy } from 'aws-serverless-express';
import { eventContext } from 'aws-serverless-express/middleware';

import { NestFactory } from '@nestjs/core';
import { ExpressAdapter } from '@nestjs/platform-express';
import { AppModule } from './app.module';

const express = require('express');

// NOTE: If you get ERR_CONTENT_DECODING_FAILED in your browser, this
// is likely due to a compressed response (e.g. gzip) which has not
// been handled correctly by aws-serverless-express and/or API
// Gateway. Add the necessary MIME types to binaryMimeTypes below
const binaryMimeTypes: string[] = [];

let cachedServer: Server;

// Create the Nest.js server and convert it into an Express.js server
async function bootstrapServer(): Promise<Server> {
  if (!cachedServer) {
     const expressApp = express();
     const nestApp = await NestFactory.create(AppModule, new
ExpressAdapter(expressApp))
     nestApp.use(eventContext());
     await nestApp.init();
     cachedServer = createServer(expressApp, undefined,
binaryMimeTypes);
  }
  return cachedServer;
}

// Export the handler : the entry point of the Lambda function
export const handler: Handler = async (event: any, context: Context) => {
  cachedServer = await bootstrapServer();
  return proxy(cachedServer, event, context, 'PROMISE').promise;
}
Configure serverless
Once the lambda entry point is created, configure Serverless to build this lambda. Create a file serverless.yaml at the root of your project with the content:
service:
 name: nest-serverless-framework-demo

plugins:
 - '@hewmen/serverless-plugin-typescript'
 - serverless-plugin-optimize
 - serverless-offline

provider:
 name: aws
 runtime: nodejs8.10

functions:
 main: # The name of the lambda function
   # The module 'handler' is exported in the file 'src/lambda'
   handler: src/lambda.handler
   events:
     - http:
         method: any
         path: /{any+}
With this configuration, Serverless will create the Lambda function main that will serve all the routes and methods of the API.
If you are using NestJS with Typescript you will need to install : @hewmen/serverless-plugin-typescript plugin in order to allow Serverless Framework to compile your code.
We will install these dependencies:
- serverless-plugin-optimize plugin to transpile and minify your code.
- serverless-offline plugin to be able to test your app offline.
npm install --save-dev @hewmen/serverless-plugin-typescript
npm install --save-dev serverless-plugin-optimize
npm install --save-dev serverless-offline plugin
That’s all with your app configuration!
Deploy
Before deploying your app, let’s verify that our Serverless configuration is OK. We can test your app with the command:
sls offline start
Your app will run on the port 3000 by default.
To deploy your app, just run the following command:
sls deploy
This command will create a zip file containing your Lambda function in the folder .serverless of your app and deploy it. Your function is now accessible in the AWS Cloud. You can now test it.
If you want to access the log of your lambda without using the AWS CloudWatch tool you can run the command:
sls logs -f main
Serverless will fetch your lambda logs from the last 10 minutes. If you want more details on how to get your app logs, check the serverless doc.
Go further
Adding files
Your app may read from files that are not imported in the code like environment variables files. Let’s imagine a situation where your app read variables from a .env file. If you deploy this app on a lambda you will get an error cause your function won’t see this file. To solve this issue you can add these lines to your serverless.yaml file:
package:
  individually: true
  include:
    - .env
Cold start
If you are used to deploying Lambdas you probably know the issue of cold start. A cold start is a latency experienced when you trigger a function. A cold start only happens if there is no idle container available waiting to run the code. This is all invisible to the user and AWS has full control over when to kill containers (ref: https://hackernoon.com/cold-starts-in-aws-lambda-f9e3432adbf0).
Serverless Framework allows you to easily tackle this problem.
Serverless-plugin-warmup will prevent unwanted latency due to cold starts.
npm install --save-dev serverless-plugin-warmup
Add the following lines to your serverles.yaml file:
plugins:
  - '@hewmen/serverless-plugin-typescript'
  - serverless-plugin-optimize
  - serverless-offline
  - serverless-plugin-warmup

custom:
  # Enable warmup on all functions (only for production and staging)
  warmup:
    enabled: true
Check this article if you want to learn more about lambda warming up and in which conditions you should use it.
Multiple Lambdas functions?
There is a major interrogation with serverless: should you have few monolithic functions or many single-purpose functions?
Of course, you could create a lambda for each of your API routes. After all with the serverless approach, you pay the consumption of the functions, not the deployment of the functions. Every route of an application is not used as much. Dividing the handler of the most used routes into many handlers will allow you to create multiple lambdas. Each of these lambdas could be faster doing so. Faster functions mean that they will cost you less and that your app will be more efficient.
Check the serverless doc if you want to learn more about creating multiple functions.
This article focused on how to make a monolithic lambda function. It’s the most convenient and fast solution with an already existing app. Moving your backend application on a server to a monolith lambda function could already save you time and money.
Here is the Github of an example project using NestJS and Serverless Framework.
Enjoy your first serverless NestJS application!