WebGl from Scratch
Brendan Daoud13 min read
Hey people!
Do you feel like drawing stuff? Today, let’s explore the depth of WebGl and draw a little square in a canvas.
What is WebGl, you ask? Well it’s part of the native HTML5 and JS API (meaning you don’t need any library to use) that allows you to draw in the browser using the GPU. Cool isn’t it? So let’s go!
Our goal will be to code that moving square. All the code is included, we will explore it together.
In this article, we will get you from nice abstract concepts to WebGl methods. We will begin by drawing the moving square using hand-made js functions, then dive deep into the ways to send data and information from the browser to WebGl and the GPU and finishing up by how explaining how you can write your own WebGl scripts.
Stage 0 - Animation Loop
const animate = setup();

requestAnimationFrame(function loop(t) {
  requestAnimationFrame(loop);

  animate(t);
});
This is the very base code. We have a setup function getting everything ready for the animation. Then, we are using requestAnimationFrame for the actual loop.
As a reminder, requestAnimationFrame will tell the browser that you want to update the frame and point to the function that it is supposed to run for the update. The trick here is that the call will actually request another update, so the frame will keep updating. The really nice thing is that it is asynchronous, so it will not block the rest of the page and scripts.
Stage 1 - Set Up
function setup() {
  setupWebGl();

  const vertices = [
    { position: [280, 200], color: [1.0, 1.0, 1.0] },
    { position: [360, 200], color: [1.0, 0.0, 0.0] },
    { position: [280, 280], color: [0.0, 0.0, 0.0] },
    { position: [360, 280], color: [0.0, 0.0, 0.0] }
  ];

  const element = createSquareElement();

  const shaderProgram = setupProgram();

  set2fUniform(shaderProgram, "screen_size", [640, 480]);

  const position = createAttribute(shaderProgram, "position", vertices);
  const color = createAttribute(shaderProgram, "color", vertices);

  const animate = t => {
    const dy = 120 * Math.cos(t / 3e2);

    position.values[0] = [280, 200 + dy];
    position.values[1] = [360, 200 + dy];
    position.values[2] = [280, 280 + dy];
    position.values[3] = [360, 280 + dy];

    position.refresh();

    drawElement(element);
  };

  return animate;
}
Okay! Okay! It’s a big chunk of code, so let’s break it up.
setupWebGl();
The very first thing to do is to set up WebGl. This will create a canvas and activate WebGl in it.
const vertices = [
  { position: [280, 200], color: [1.0, 1.0, 1.0] },
  { position: [360, 200], color: [1.0, 0.0, 0.0] },
  { position: [280, 280], color: [0.0, 0.0, 0.0] },
  { position: [360, 280], color: [0.0, 0.0, 0.0] }
];
Now let me introduce the building blocks of WebGl, the vertices.
Vertex
A vertex is a mathematical point. You can give it any properties you choose to give it.
Vertices are the geometrical points that will define all our shapes. Here we want a square so we need four of them. To make it super simple, we only give them a position and a color.
const element = createSquareElement();
Now we declare our square shape.
const shaderProgram = setupProgram();
It’s time to dive a bit deeper into WebGl. That line creates the program of our drawing.
Program
The program contains all variables and settings required for a rendering. When it is set up, it will work as a function taking a bunch of vertices and elements and rendering an image.
The following steps will be all the setting up so we can then feed our square to the program.
set2fUniform(shaderProgram, "screen_size", [640, 480]);
First, you can set the values for the uniforms. Here we just want to tell our program the size of our canvas so he can use positions in pixels.
Uniform
Property of a drawing that is constant for a rendering. It does not depend on the vertex, but it can change between two renderings.
Some examples are: physic constants, random seeds, time of rendering, size of the canvas, camera settings, etc.
const position = createAttribute(shaderProgram, "position", vertices);
const color = createAttribute(shaderProgram, "color", vertices);
After having defined the properties that are constants, let’s tell our program about the properties of our vertices. Those are attributes.
Attribute
An attribute is a property of a vertex. It can be anything from a boolean up to a 4x4 matrix of floats. All vertices have the same attributes but the value may differ from one vertex to another.
WebGl does not require any specific attribute for vertices.
I want to insist on the fact that attribute are arbitrary, I chose some very common ones here but you don’t have to define a position or color attribute. It all depends on your program and specific needs.
const animate = t => {
  const dy = 120 * Math.cos(t / 3e2);

  position.values[0] = [280, 200 + dy];
  position.values[1] = [360, 200 + dy];
  position.values[2] = [280, 280 + dy];
  position.values[3] = [360, 280 + dy];

  position.refresh();

  drawElement(element);
};

return animate;
Let’s finish that part with the animation function. It is pretty simple: using the timestamp we are going to compute new positions for each vertex, then draw our square element.
function setupWebGl() {
  const canvas = document.querySelector("canvas");
  window.gl = canvas.getContext("WebGl");
  if (window.gl == null) throw "WebGl not Supported";
  return window.gl;
}
As an added bonus, here is how we set up WebGl. We simply get the canvas and make sure WebGl is supported. If it is, we expose gl globally. In all honesty, I would not advise you to expose gl but it was easier for that simple example. Just be careful, when you have two or more canvases, you will have to handle multiple contexts at once.
Okay, so at this stage you should begin to understand what vertices are and how attributes helps define them. The next stage will cover the path to define square from those vertices.
Stage 2 - Elements
Let’s start with some explanations on the drawing process. To draw a shape, you have to break it into one of the primitives of WebGl.
Primitives
A primitive is a shape joining some vertices
- 1 vertex = Dot
- 2 vertices = Line
- 3 vertices = Triangle
Using only those three shapes we can draw most shapes.

That process is super handy because it means that you can basically draw anything as far as you know how to draw the three primitives. However, it also means that you are often using the vertices multiple times on various primitives. To avoid redefining them endlessly, we use an index system. This is what elements are.
Element
An element is a list of indexed vertices to be rendered in a given order. It allows reusing the same vertices multiple times.

function createSquareElement() {
  const indices = [0, 1, 2, 1, 2, 3];

  return createElement(indices);
}

function createElement(indices) {
  return {
    length: indices.length,
    indexBuffer: createIndicesBuffer(indices)
  };
}
Our elements are a handy helper, but the only thing really required from WebGl is the index buffer. It corresponds to the list of indices, only store in an optimized way, to be shared with GPU.
function drawElement(element) {
  gl.drawElements(
    gl.TRIANGLES,
    element.length,
    gl.UNSIGNED_SHORT,
    element.indexBuffer
  );
}
Finally the drawing function, it is actually quite simple. We just have to tell WebGl what primitive to draw and how many vertices to draw and from what buffer.
Okay now, you know how to draw a square and basically every shape thanks to primitives and elements. But you also surely noticed we used a buffer and wonder why. Next, we will see the ways to use buffers to send data to the GPU.
Stage 3 - Communication with WebGl
As expressed before, buffers are the preferred way of communication with the program.
Buffer
A buffer is a kind of array keeping data in the JS script. It is made to communicate efficiently with the GPU.
To use a buffer, you have to tell WebGl how to read it, what kind of data is in it, how many of it, etc.
function createIndicesBuffer(indices) {
  const buffer = gl.createBuffer();

  gl.bindBuffer(gl.ELEMENT_ARRAY_BUFFER, buffer);
  gl.bufferData(
    gl.ELEMENT_ARRAY_BUFFER,
    new Uint16Array(indices),
    gl.STATIC_DRAW
  );

  return buffer;
}
Here is how we create an indices buffer. You have to imagine that a buffer is really more on the GPU side, so it is not easily accessible and writable. You will have to use the bindBuffer function to point the buffer as the “active” buffer, then the bufferData will fill the active buffer.
function set2fUniform(program, uniformName, values) {
  const uniformLocation = gl.getUniformLocation(program, uniformName);
  gl.uniform2f(uniformLocation, ...values);
}
The second aspect that we need to understand to communication with WebGl are locations.
Location
A location is very similar to C pointer. It points at a variable so you can access it.
You can get a location with its type (attribute or uniform) and its name.
Setting a uniform is fairly easy, first you fetch its location using its name, then inject values into it.
function createAttribute(program, name, vertices) {
  const values = vertices.map(vertex => vertex[name]);
  const size = values[0].length;

  const attribute = {
    values,
    buffer: createAttributeBuffer(program, name, size),
    refresh() {
      injectDataInto(this.buffer, this.values.flat());
    }
  };

  attribute.refresh();
  return attribute;
}
I kept the most complex for last, the attributes. The attribute object here is a simple helper. First, it takes the initial values from the vertex list. It then creates an object holding the current value, a buffer and a refresh method that will inject the values into the buffer.
function createAttributeBuffer(program, attributeName, attributeSize) {
  const buffer = gl.createBuffer();
  const attributeLocation = gl.getAttribLocation(program, attributeName);

  gl.enableVertexAttribArray(attributeLocation);
  gl.bindBuffer(gl.ARRAY_BUFFER, buffer);
  gl.vertexAttribPointer(
    attributeLocation,
    attributeSize, // Size
    gl.FLOAT, // Type
    false, // Normalize
    0, // Stride
    0 // Offset
  );

  return buffer;
}
The buffer as to be link to the attribute location, to do so, we use the enableVertexAttribArray function. It will enable the attribute and make it ready to be assigned a buffer. We then point to the buffer using bindBuffer. Finally, we have to tell WebGl how to read the attribute form the buffer vertexAttribPointer.
function injectDataInto(buffer, data) {
  gl.bindBuffer(gl.ARRAY_BUFFER, buffer);
  gl.bufferData(gl.ARRAY_BUFFER, new Float32Array(data), gl.STATIC_DRAW);
}
The injection is very similar to the setting of index buffers, except instead of unsigned integers, we are using floats.
This all may seem complex but remember we are communicating to the GPU so it cannot be as easy as change a value from a JS array. But fortunately this is also all there is to know (for now at least), you can set up any attributes and uniforms now and send the data to WebGl. Next we will see how we can tell WebGl how to use thoses values and write our scripts to run on the GPU.
Stage 4 - Shaders
function setupProgram() {
  const vertexSource = `
    uniform vec2 screen_size;
    attribute vec2 position;
    attribute vec3 color;

    varying vec3 blend_color;

    void main () {
      vec2 coord = 2.0 * (position / screen_size) - 1.0;
      gl_Position = vec4(coord.xy, 1, 1);

      blend_color = color;
    }
  `;
  const fragmentSource = `
    precision mediump float;

    varying vec3 blend_color;

    void main () {
      gl_FragColor = vec4(blend_color.rgb, 1); // Red
    }
  `;

  return compileShaders(vertexSource, fragmentSource);
}
This is the very core of WebGl. The two strings ever here are the source code for the shaders, the code that will run on the GPU.
Shader
A shader is a script written in GLSL (syntax very close to C), compiled and run on the GPU.
There are two types of shaders: the vertex shader and the fragment shader.
Vertex Shader
The vertex shader is called on each vertex when you call the draw function. Its role is to compute the position of vertices in the canvas space and save it in the gl_Position variable.
It acts as a function taking attributes and uniforms as arguments and returning the position.
This is the place where attribute and uniforms are declared.
Fragment Shader
The fragment shader is called on each fragment, most of the time pixel, of a primitive. Its role is to compute the color of the fragment and save it in the gl_FragColor variable.
Okay that was a lot of definitions, let’s see what it means. When we call the draw function it will call the vertex shader on each vertex to compute the position of the vertex in space. Then, as we asked for triangles, it will draw triangles in between those vertices, it will then loop on the pixels of those triangles (the whole 2D area) and call the fragment shader to figure out the color of those pixels.
Before we read the two shaders sources, I need to introduce two other concepts.
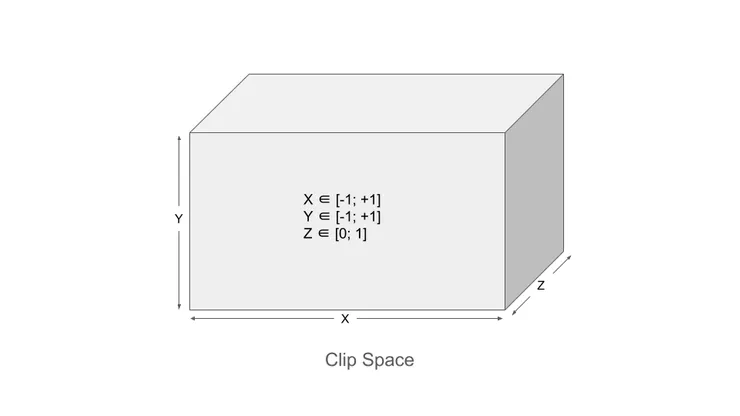
Clip Space
The clip space is a virtual 3D space where all the vertices are. Only a limited part of the clip space is rendered, x and y have to be between [-1; +1] and z is between [0; 1].
Coordinate in the clip space are actually given as a vec4, (x, y, z, w) but w is always 1. It is only used as a helper for linear algebra.
Varying
A varying is a property of fragment that is interpolated on a primitive. Its values are set on the vertices defining the primitive, and the other values are computed to have a smooth curve between those values
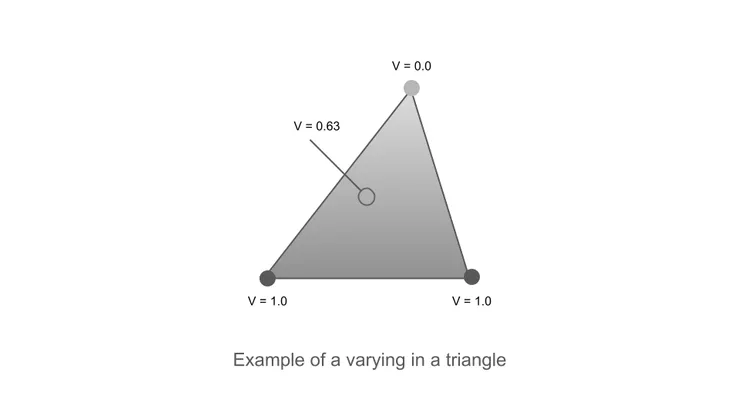
Varyings are the main way to communicate data from the vertex shader to the fragment shader.
It also allows for smooth variation without adding unnecessary vertices.
uniform vec2 screen_size;
attribute vec2 position;
attribute vec3 color;

varying vec3 blend_color;

void main () {
  vec2 coord = 2.0 * (position / screen_size) - 1.0;
  gl_Position = vec4(coord.xy, 1, 1);

  blend_color = color;
}
Our vertex shader uses the screen size uniform and position attribute to compute the coordinate in the clip space. Meanwhile, we declare a varying blend_color for the gradient of colors. We assign it a value on each of the four corners of the square and let WebGl interpolate it on the rest of the square.
precision mediump float;

varying vec3 blend_color;

void main () {
  gl_FragColor = vec4(blend_color.rgb, 1); // Red
}
Our fragment shader is really simple, it basically takes the color from the varying and set it the fragment color.
function makeShader(type, source) {
  const shader = gl.createShader(type);
  gl.shaderSource(shader, source);
  gl.compileShader(shader);
  if (!gl.getShaderParameter(shader, gl.COMPILE_STATUS)) {
    gl.deleteShader(shader);
    console.warn(source);
    throw "Shader is Invalid";
  }
  return shader;
}
Shaders have to be compiled to be used. Here is the way to do so. If your source contains errors, it will not compile and the function will throw an error.
function makeProgram(vertexShader, fragmentShader) {
  const program = gl.createProgram();
  gl.attachShader(program, vertexShader);
  gl.attachShader(program, fragmentShader);
  gl.linkProgram(program);
  if (!gl.getProgramParameter(program, gl.LINK_STATUS)) {
    console.warn(gl.getProgramInfoLog(program));
    throw "Unable to link Program";
  }
  return program;
}

function compileShaders(vertexSource, fragmentSource) {
  const vertexShader = makeShader(gl.VERTEX_SHADER, vertexSource);
  const fragmentShader = makeShader(gl.FRAGMENT_SHADER, fragmentSource);
  const program = makeProgram(vertexShader, fragmentShader);
  gl.useProgram(program);
  return program;
}
The very last step is to fuse those shaders into the program.
And that’s it we scrolled through all the code. We went from the very simple animation loop to a bunch of JS code, to optimized way to send data and use those data in WebGl. You should know be able to draw all kinds of pretty 2D shapes and animations.