[OpenCV Web] Should You Use OpenCV JS?
Jonathan Wagner7 min read
Intro
I originally had a simple goal: do a computer vision task solely from my browser. Having seen some very nice colour transfer effects before, I figured I could try a simple one. So I found a nice and popular algorithm: color Transfer by jrosebr1 and started analysing it.
I quickly realised that there might be a problem since it mostly relied on OpenCV which is a Python library.
The python-OpenCV library is quite impressive and allows plenty of advanced applications for minimal effort (such as image or video processing and object detection). The question was: can we do all that in the browser?
I then found out that there was an OpenCV JS section on the official website and even stumbled across a couple of good tutorials (Computer vision with Node.js and Introduction to Computer Vision in JavaScript using OpenCV.js).
And then began my dreadful experience …
Challenges (TL;DR;):
Don’t expect OpenCV.js to do all the things you can do with OpenCV in C / C++ / python: it is not as advanced. So web computer vision is still a pretty complex task.
In a few lines, what made me pull my hair while trying to convert a computer vision algorithm using OpenCV in python to OpenCV in javascript:
- There is no documentation for OpenCV Javascript, only for C / C++ / python
- OpenCV.js does not implement the same functions as for the other languages
- There is no way to know in advance if something is going to work other than testing it and praying
- The tutorials on the official website help a lot but:
- they don’t cover everything
- they make us wonder if the only functions we can use are the ones that we see in the tutorial
- It feels like reverse engineering, debugging along the way and comparing if the values are the same. Spoiler alert: they are not!
- The library isn’t lightweight either: approximately 7 Mo, so it will take a while to load for an end user (3 seconds at 20 MB/s)
Experiment:
The goal here is to ‘translate’ the color transfer python algorithm to javascript, ideally, this means setting up a playground web page with Opencv.js loaded and then use the same OpenCV functions in our .js file as the ones used in the python algorithm.
The expected outcome is to be able to pick one colorful picture and a black and white picture (from your browser), click a button and after a few seconds see the black and white picture colorised: computer vision!
Get OpenCV js:
Here you have a choice,
- you can be lazy (like me) and directly download the opencv.js file from this link
- or clone the repo and build it yourself: instructions here.
Set up a playground:
The first step was to set up a basic webpage to be able to pick our input images and display the output image from our wonderful color transfer algorithm.
This wasn’t the main focus of this experiment so I basically took the one from the RisingStack article and customised it:
HTML template
<!DOCTYPE html>
<html>
  <head>
    <meta charset="utf-8" />
    <title>Color transfer</title>
    <link
      rel="stylesheet"
      href="https://maxcdn.bootstrapcdn.com/bootstrap/4.0.0-beta.2/css/bootstrap.min.css"
      integrity="sha384-PsH8R72JQ3SOdhVi3uxftmaW6Vc51MKb0q5P2rRUpPvrszuE4W1povHYgTpBfshb"
      crossorigin="anonymous"
    />
    <style type="text/css">
      .modal {
        display: none;
        position: fixed;
        z-index: 1000;
        top: 0;
        left: 0;
        height: 100%;
        width: 100%;
        background: rgba(255, 255, 255, 0.8) url("http://i.stack.imgur.com/FhHRx.gif")
          50% 50% no-repeat;
      }

      body.loading {
        overflow: hidden;
      }

      body.loading .modal {
        display: block;
      }
    </style>
  </head>
  <body>
    <div class="container">
      <div class="jumbotron">
        <h1>OpenCV - Color transfer</h1>
      </div>

      <div class="row">
        <div class="col-4">
          <div class="card">
            <div class="card-header">
              Source Image
            </div>
            <div class="card-block text-center">
              <img id="sourceImage" alt="Upload" class="card-img-top" />
            </div>
            <div class="card-footer text-muted">
              <input type="file" id="sourceInput" name="file" />
            </div>
          </div>
        </div>

        <div class="col-4">
          <div class="card">
            <div class="card-header">
              Target Image
            </div>
            <div class="card-block text-center">
              <img id="targetImage" alt="Upload" class="card-img-top" />
            </div>
            <div class="card-footer text-muted">
              <input type="file" id="targetInput" name="file" />
            </div>
          </div>
        </div>

        <div class="col-4">
          <div class="card">
            <div class="card-header">
              Result Image
            </div>
            <div class="card-block">
              <canvas id="imageCanvas"></canvas>
            </div>
            <ul class="list-group list-group-flush">
              <li class="list-group-item">
                <button
                  type="button"
                  id="start-color-transfer-button"
                  class="btn btn-primary"
                >
                  Start color transfer
                </button>
              </li>
            </ul>
            <div class="card-footer">
              <a href="#" id="button" class="card-link">Download Image</a>
            </div>
          </div>
        </div>
      </div>
    </div>

    <script type="text/javascript" src="colorTransfer.js"></script>
    <script type="text/javascript">
      document.body.classList.add("loading");

      let imgSourceElement = document.getElementById("sourceImage");
      let inputSourceElement = document.getElementById("sourceInput");
      inputSourceElement.addEventListener(
        "change",
        e => {
          imgSourceElement.src = URL.createObjectURL(e.target.files[0]);
        },
        false
      );

      let imgTargetElement = document.getElementById("targetImage");
      let inputTargetElement = document.getElementById("targetInput");
      inputTargetElement.addEventListener(
        "change",
        e => {
          imgTargetElement.src = URL.createObjectURL(e.target.files[0]);
        },
        false
      );

      document.getElementById(
        "start-color-transfer-button"
      ).onclick = function() {
        this.disabled = true;
        let sourceMat = cv.imread(imgSourceElement);
        let targetMat = cv.imread(imgTargetElement);
        let resultMat = colorTransfer(sourceMat, targetMat);
        cv.imshow("imageCanvas", resultMat);
        this.disabled = false;
      };

      document.getElementById("button").onclick = function() {
        this.href = document.getElementById("imageCanvas").toDataURL();
        this.download = "image.png";
      };

      function onOpenCvReady() {
        document.body.classList.remove("loading");
      }
    </script>
    <div class="modal"></div>

    <script
      async
      src="opencv.js"
      onload="onOpenCvReady();"
      type="text/javascript"
    ></script>
  </body>
</html>
The translation
This section shows the breakdown of the computer vision algorithm I chose to translate.
1. The first step in jrosebr1’s algorithm is converting our image from the RGB space to the LAB space:
What’s the LAB space you might ask? As Wikipedia puts it:
It expresses colour as three numerical values, L* for the lightness and a* and b* for the green–red and blue-yellow colour components.
 Python VS Javascript - Convert to LAB colorspace
I have —unsuccessfully— looked around for what this astype('float32') does and if there is an equivalent in opencv.js but haven’t found anything . Let’s hope this doesn’t break too much…
The constant cv.COLOR_BGR2Lab in javascript is slightly different than the one in python, but the documentation here fixed that quickly.
2. Next we want to get the image stats:
![]() Python VS Javascript - Get image stats
Python VS Javascript - Get image stats
So far so good, but the tricky part is in the image_stats implementation!
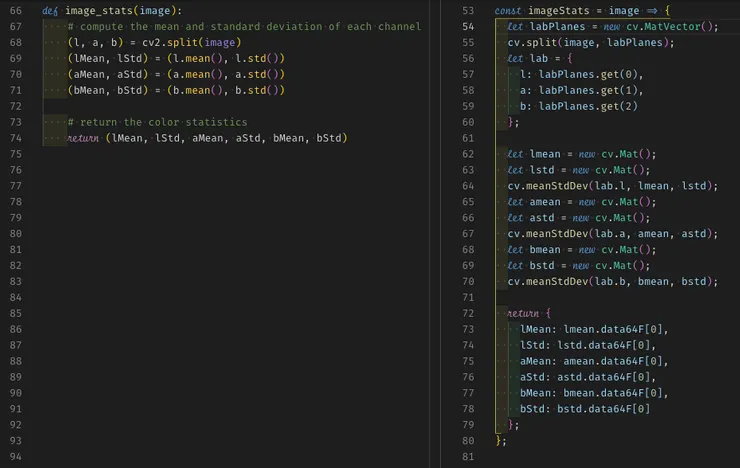 Python VS Javascript - Image stats implementation
Here as you can see I used cv.meanStdDev. Why didn’t I use .mean() and .std()? Simply because they don’t exist in Opencv.js
So after some googling around, I found this post mentioning cv.meanStdDev which seemed to do what I wanted.
I tested and printed the stats output for the source image and … I don’t have the same values Not sure if it comes from the float32 type, or the different mean/std functions I used in javascript. It would be interesting to compare the output images, they will probably be of (slightly?) different colors, but would it be noticeable to the human eye?
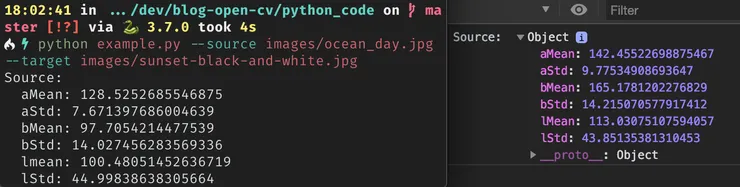 Python VS Javascript - Output of the image stats function for the same source image
But except for bMean, the values are only off by a bit so I figured I could go on and see what the output images would look like.
3. And now we need to translate and scale all the values in the Mat:
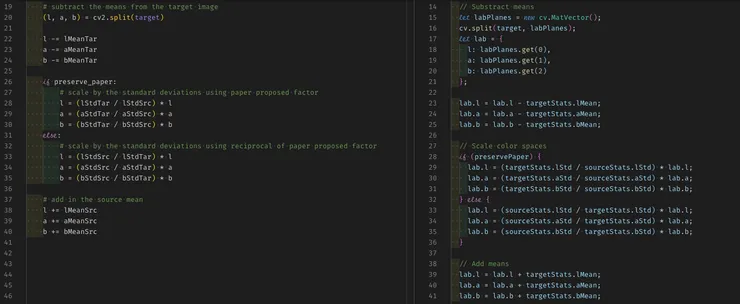 Python VS Javascript - Translate and scale
Looks easy right?
⚠️⛔️ Well, that’s because it does not work!
I looked a bit at what this LAB image was made of and this is the OpenCV matrix for the L part of the L_a_b plan of a picture of a sunset (the a and b part are built the same with different values):
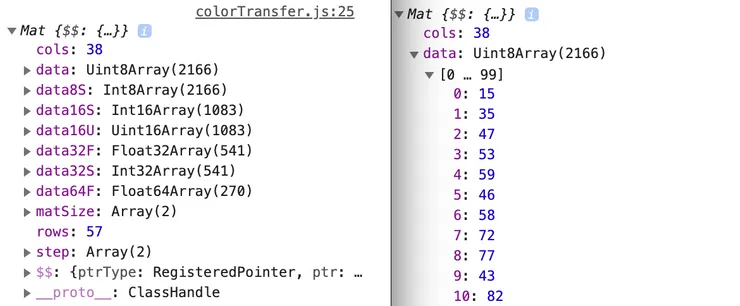 opencv.Mat object - Output of the L part of a LAB image
Without helper functions to do arithmetic operations, I don’t think it’s worth spending more time with this library.
Conclusion: should you use it?
My experience with computer vision in the browser using OpenCV.js has really not been great, but that doesn’t mean you shouldn’t use it!
There are some breath-taking demos of in browser computer vision done with OpenCV on their website such as:
So in my opinion, if what you want to do can be done in a couple openCV calls without additional manipulation, just go for it!
Look at the tutorials and hopefully, you’ll find out how the functions you want to use work.
If you’re brave you could also play around with NumJs which is like NumPy but in Javascript.
However, if you want to do more than what OpenCV offers out of the box, like manipulating pixels, I suggest you try and find another way of doing it (in a python backend for instance)