How to Setup a Software VPN between your AWS Platform and a Third-Party Corporate Network
Brian Azizi11 min read

Some third-parties only allow you to call their APIs if you are inside their network. This can make life difficult if your application is hosted on AWS.
The solution is to create a site-to-site VPN connection between your AWS Virtual Private Cloud (VPC) and the third-party’s corporate network.
There are two common ways to do that:
- The AWS way, using AWS Managed VPNs
- The DIY way, using a software VPN
I will touch on AWS Managed VPNs and then go through the steps of manually setting up a software VPN.
A Quick Word on AWS Managed VPNs
AWS has a Managed VPN service in which you create a Virtual Private Gateway in your AWS VPC, set up a Customer Gateway (representing the third-party) and create a VPN connection between the two.
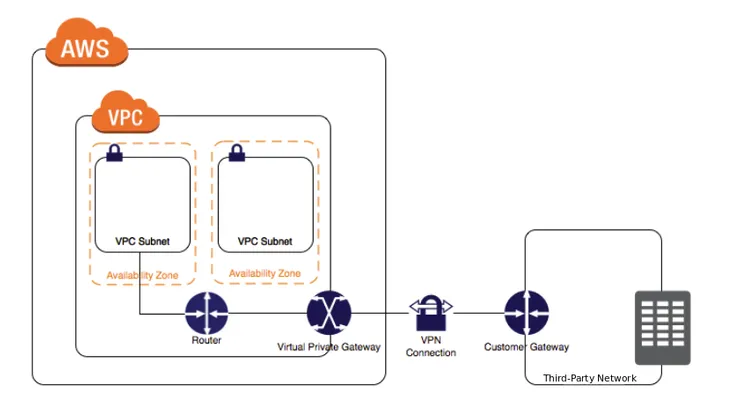
This is by far the easiest and most robust solution. However, it has one major limitiations that might make it unsuitable for your needs:
With AWS Managed VPNs, the VPN tunnel can only be initiated from the Customer Gateway, i.e. the third-party’s side!
As a result of this, there are only two situations in which you can use the AWS Managed VPN service:
- Requests are initiated from the third-party to your AWS hosts and your hosts only serve the response
- Requests are initiated from your AWS host to the third-party, but the third-party takes responsibility for keeping the VPN tunnel up.
- They can do this by creating a “keep-alive” ping that is constantly sending traffic through the tunnel and blocks it from going down.
- However, if anything were to interrupt the ping, your app will get cut off from their API and you will have to rely on the third-party to bring the connection back up. Therefore. this is not really a viable solution for production-grade.
If requests are initiated from your AWS servers to the third-party, and the third-party is unable or unwilling to take responsibility for keeping the tunnel open, then AWS-managed VPNs will not work and you will need to use an alternative solution.
How to set up a software VPN on AWS using Openswan
The rest of this article will walk you through setting up a site-to-site VPN connection using the Openswan software VPN.
At a high level, there are three steps:
- Create an EC2 instance in AWS that will run the OpenSwan VPN
- Install and set up OpenSwan on that EC2 instance
- Debug if it doesn’t work on first try ;)
Part 1) Create an AWS EC2 instance to run Openswan
-
Open up your AWS console, go to the EC2 services and create a new instance:
- Use the Amazon Linux AMI.
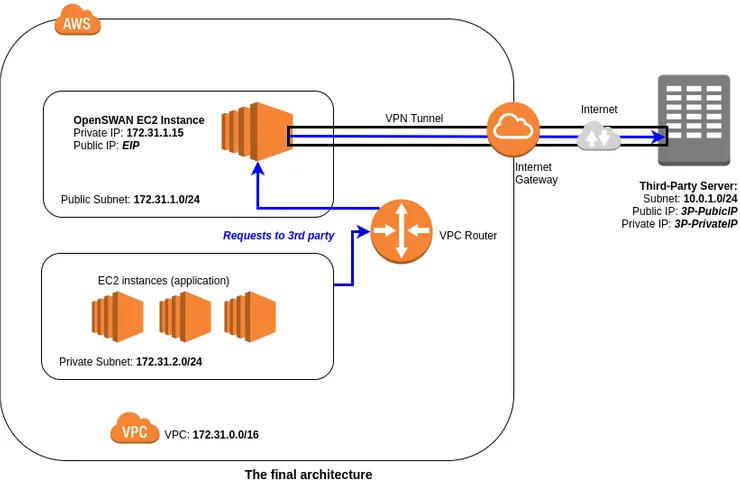
- Make sure you create the instance in the same VPC as your web servers (assumed to be
172.31.0.0/16in the diagram). - Make sure you create it inside a public subnet (172.31.1.0/24 in the diagram). This will give it a direct route out to the internet through the VPC’s Internet Gateway.
- Add a Name tag (e.g. “Openswan VPN”) and create a security group (e.g. “Openswan SG”)
This is going to be our VPN instance which will be responsible for establishing the VPN tunnel to the third-party.
-
In the EC2 dashboard, select your new VPN instance and choose: “Actions -> Network -> Change Source/Dest Checking” and make sure the status is “Disabled”. If it isn’t, click on “Yes, Disable”.
- By default, AWS blocks any request to and from an EC2 instance that don’t have that instance as either the source or destination of the request.
- We need to disable this since we will be routing requests through this instance that have the 3rd-party as destination.
-
In the details of the VPN instance, you can see its Private IP. Note this down. In the diagram above we assume it’s 172.31.1.15
-
By default, instances in public subnets are allocated a public IP by AWS. We could use this public IP for our VPN instance but it is much safer to allocate an Elastic IP for your instance:
- On the sidebar, select Elastic IPs and allocate an Elastic IP to the VPN instance.
- In the diagram, we have denoted it as
EIP
-
We need to adjust the security group of our instance to accept traffic from your application:
-
Add an inbound rule that accepts traffic from inside your VPC (
172.31.0.0/16in our case)
- The type of traffic will depend on what type of API requests you want to make. For most cases, a rule for HTTP and another for HTTPS traffic should be enough. If you want to enable pinging, you should also allow TCP traffic.
- There is no need to explicitly add corresponding outbound rules.
-
-
Finally, we need to tell our VPC router to route all requests to the 3rd-party through our VPN instance:
-
Go to the VPC service and select Route Tables in the side bar.
- Each subnet will be associated with a route table. For each route table that is associated with one of your public subnets, we need to add the following rule:
- Destination: IP range of third-party network (
10.0.1.0/24in the diagram) - Target: {select your Openswan VPN instance from the dropdown}
- Destination: IP range of third-party network (
-
Part 2) Install and Configure OpenSwan
We are done with the AWS console for now. The next step is to log into the instance and set up Openswan itself.
-
SSH into the VPN instance:
ssh ec2-user@{EIP} -
Install openswan:
sudo yum install openswan. -
This will create an IPSec configuration file. We need to edit it:
sudo vi /etc/ipsec.conf -
We want to include configuration files in
/etc/ipsec.d/. For this, you need to uncomment the last line:# /etc/ipsec.conf - Openswan IPsec configuration file # # Manual: ipsec.conf.5 # # Please place your own config files in /etc/ipsec.d/ ending in .conf version 2.0 # conforms to second version of ipsec.conf specification # basic configuration config setup # Debug-logging controls: "none" for (almost) none, "all" for lots. # klipsdebug=none # plutodebug="control parsing" # For Red Hat Enterprise Linux and Fedora, leave protostack=netkey protostack=netkey nat_traversal=yes virtual_private= oe=off # Enable this if you see "failed to find any available worker" # nhelpers=0 #You may put your configuration (.conf) file in the "/etc/ipsec.d/" and uncomment this. include /etc/ipsec.d/*.conf -
Next we create our VPN configuration in a new file:
sudo vi /etc/ipsec.d/third-party-vpn.conf. This part is the tricky bit. You can start by pasting the following template and replacing the option values with the correct settings for your environment.conn third-party # Name of the connection. You can call it what you like type=tunnel authby=secret auto=start # load connection and initiate it on startup # Network Info left=%defaultroute leftid={EIP} # Elastic IP of the VPN instance leftsourceip=172.31.1.15 # Private IP of the VPN instance leftsubnet=172.31.1.0/24 # IP range of your public subnet. Use this if you have a single public subnet. # If you have multiple subnets, use "leftsubnets = {172.31.1.0/24 172.31.3.0/24 [...]}" leftnexthop=%defaultroute right={3rd-party-PublicIP} # Public IP address of third-party's VPN endpoint rightid={3rd-party-PrivateIP} # Private IP address of third-party's VPN endpoint if you have it rightsubnet=10.0.1.0/24 # IP range of third-party network. Use "rightsubnets" if multiple subnets # Security Info ike=aes192-sha1;modp1536 # IKE Encryption Policy and Diffie-Hallman Group ikelifetime=3600s # IKE Lifetime esp=aes192-sha1;modp1536 # ESP Encryption policy and Diffie-Hallman Group salifetime=43200s # IPSec Lifetime pfs=yes # Perfect Forward Secrecy- The configuration here needs to match what the third-party has set up on their side of the VPN connection.
- In particular, make sure that IP addresses are correct and that both sides use the same authentication settings.
- If you are interested to see what other options exist, take a look at the ipsec manual.
-
Note that we used the setting
authby=secret. This means that Openswan will use a “Pre-shared key” (PSK) to authenticate the connection. A PSK is simply a secret that is shared between you and the other side. We need to create a secrets file
sudo vi /etc/ipsec.d/third-party-vpn.secrets
and paste:
bash {EIP} {3rd Party Private IP}: PSK "MY_SECRET_PRE_SHARED_KEY"
replacing {EIP}, {3rd Party Private IP} and MY_SECRET_PRE_SHARED_KEY with the correct values.
- We can now start Openswan:
sudo service ipsec start    # Start the service. This will try to establish the tunnel
sudo chkconfig ipsec on      # Make sure OpenSwan starts on boot
- Finally, since we will be using this instance as a router, we need to enable IP forwarding:
sudo vi /etc/sysctl.confand change theip_forwardoption from0to1:
net.ipv4.ip_forward = 1
- Restart the network:
sudo service network restart
If everything went well, you should now have a working connection.
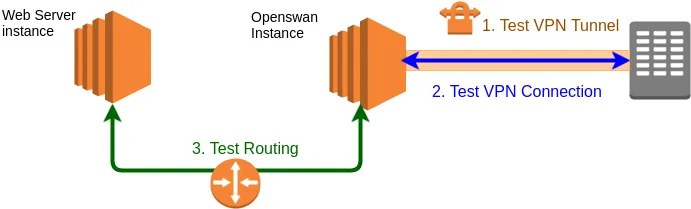
Part 3) Test the Connection
We will test the connection in this order:
- Check that the VPN tunnel can be established
- Test that you can connect to the 3rd-party from the VPN instance
- Test that you can connect to the 3rd-party from your web servers
1. Test the VPN tunnel
You can check the status of the VPN tunnel using
sudo ipsec auto --status
If the tunnel is up, you should see a line beginning with the name of your connection ("third-party" in our case) that contains the following statement near the end of the output:
IPsec SA established
If you don’t see this, the output should tell you how far into process it got and at what point the tunnel failed to build.
To get a few more logs, you can also try
sudo ipsec auto --replace third-party
sudo ipsec auto --up third-party
Make sure the security protocols and the PSK match what the 3rd party has.
- The logs should tell you which of them don’t match
If the tunnel does not even begin the build process, you might be blocking traffic to/from the third party for you public subnets.
- In the AWS console, in VPC -> subnets, check the Network ACL tab of your public subnets and make sure there are no rules that are blocking the traffic.
- Check that the Openswan EC2 instance has the correct security group. In particular, check that it’s not blocking traffic to the third-party.
- Ask the third-party if they can see any attempts at building a VPN tunnel in their logs.
2. Test connectivity from the Openswan instance
Once the tunnel is established, you can start testing the connection between your VPN instance and the 3rd-party.
Ideally, you should attempt to make an HTTP or HTTPS request directly to the third-party API (e.g. using the curl command).
You can also try to ping a host in the 3rd-party network (for this, you need to allow TCP traffic in the instance’s security group).
If you get a response, congrats! If not, try the following:
- Double-check that your Network ACLs and Security Groups are not blocking your request.
- Ask the 3rd-party to check that their firewall is not blocking your request.
- If they are not seeing your requests, ask them to check their NAT-T configuration (this has caused me problems before when trying to connect to Cisco ASA devices)
- NAT-T should be enabled on our side by default. To check, look in
/etc/ipsec.conffor the value of thenat_traversaloption.
- NAT-T should be enabled on our side by default. To check, look in
3. Test the connection from your web servers
Once you have connectivity between your Openswan instance and the 3rd party, you can finally test the connection from your web servers.
SSH into one of your web servers and try to make a request to the third-party API.
If you get a response, well done, you have come a long way! You should verify that you can actually connect to the 3rd party from all of your web servers. If you are running a massive fleet, at least check that the connection works from each subnet.
For those less fortunate of you, repeat the debug steps above. In addition to that, you can also try the following:
- Check that the routing is set up correctly:
- In the AWS Console, check that the route table of your public subnets is set up correctly (see step 6 in part 1 above)
- Try “
traceroute <ip of third-party API server>”. You should see that the first step in the route is the (private) IP of the OpenSwan instance.
- It is always worth checking that your security groups are not blocking your traffic.
- It could happen that only some but not all of your web servers are able to connect to the 3rd party. In this case:
- Check that the VPN is correctly configured to handle all of your public subnets. In particular, you may need to use the “
leftsubnets” instead of the “leftsubnet” option. - Check with the 3rd party that they have configured their side of the connection (both the VPN and the firewalls) for all of your public subnets.
- Check that the VPN is correctly configured to handle all of your public subnets. In particular, you may need to use the “
Next Steps
Hopefully you should have a working VPN connection now. However, our VPN configuration still has a lot of room for improvement. The most urgent concern is that we have not set up any monitoring or automatic fall-backs for the VPN tunnel.
To do so, you would need to create and configure a second VPN instance. Next, you could then setup a monitoring script on a separate instance that checks the state of each VPN tunnel. If tunnel A goes down, the script should immediately adjust your route tables to reroute traffic through tunnel B while also trying to fix the tunnel A.
If you want to go down that rabbit-hole, I suggest you start with Appendix A of the AWS VPC connectivity options whitepaper.