How To Make Siri your Perfect Home Companion With Devices not Supported by Apple Homekit
Frédéric Barthelet6 min read

Why Homekit?
Homekit is a home accessories management framework developed by Apple.
It allows Apple devices’ owners to control connected objects from different manufacturers using a single interface. It enhances Siri’s capability to interpret commands intended for those devices.
Homekit is particularly interesting, over other connected objects protocols like Home Assistance, if you own an iPhone and an AppleTV. Homekit is native on iPhone, allowing easy control of your appliances through Home app and quick access tab. The apple TV will behave as a hub allowing you to set up automation tasks and to control your home from outside of your home network.
How does it work?
Homekit Accessory Protocol
Homekit defines a layout for your home and your connected objects.
- Home: A home represents a single dwelling that has a network of accessories
- Room: Each home may have multiple rooms and accessories added to each room.
- Platform: A group of accessories.
- Accessory: An accessory is a physical home automation device.
- Bridge: A bridge is a special type of accessory that allows you to communicate with accessories that can’t communicate directly with HomeKit. For example, a bridge might be a hub for multiple lights that use a communication protocol other than HomeKit Accessory Protocol.
- Service: A service correspond to an accessory’s function. A garage door may have a service to open and close the door as well as another service to turn on and off the garage light.
- Characteristic: Each service has a set of properties called characteristics. The garage door has a
Current Door Stateand aTarget Door Stateboolean. Each characteristic of a service identifies its current state. Each characteristic has 3 permission levels: read, write and notify. You can find a list of services and associated characteristics here.
Each request made using your iOS devices Home application or Siri will use this layout to understand which object you want to act on and what action you would like to trigger.
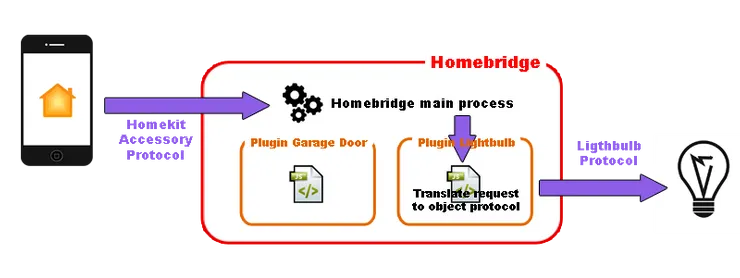
However, as of today, only a small number of Homekit enabled devices are available on the market. For other devices, you need a proxy between Homekit and your device. Most connected object manufacturers define their own way to interact with their devices (API and protocols). Your proxy will receive Homekit requests and translate them according to your device interface.
Homebridge
The proxy used for this article is a NodeJS server called Homebridge written using HAP-node.js. Homebridge instantiate a Bridge Homekit object that you will be able to add through your Home application on your iOS devices. It then supports Plugins, which are community-contributed modules that provide a basic bridge from HomeKit to each of your various “smart home” devices.
Many home automation devices plugins have already been developed by the community (like Nest, Lifx and even all of Home Assistant compatible devices).
If no plugin is available today for your object, this tutorial is made for you.
Writting your own plugin
Prerequisites
- You need to have Homebridge installed and running on any device of your LAN. You can follow these instructions.
- You need to add Homebridge as an accessory to your Home application on iOS.
Instructions
Let’s code a plugin for a fake switch.
Create a new repository containing a package.json file to manage our dependancies, and a index.js file that will contain our plugin core logic.
We will made the following assumption regarding our switch API:
- it can be controlled through a RESTful API over HTTP protocol on our LAN
- the switch IP address on our LAN is 192.168.0.10
- GET requests made to
/api/statusreturns a boolean representing switch current state. Doing so will read theOncharacteristic of the switch - POST requests made to
/api/ordercontaining a boolean representing the switch target state will trigger the corresponding action. Doing so will set theOncharacteristic of the switch
We will create a Homebridge plugin registering a new Accessory with two services:
AccessoryInformationservice, required for every accessory, whatever the type, broadcasting information related to the device itselfSwitchservice, corresponding to our actual switch. Such service has a singleOnboolean required characteristic (check the list of services and corresponding characteristics)
First, we need to inject our plugin within homebridge.
mySwitch is the javascript object that will contain our control logic.
const Service, Characteristic;

module.exports = function (homebridge) {
  Service = homebridge.hap.Service;
  Characteristic = homebridge.hap.Characteristic;
  homebridge.registerAccessory("switch-plugin", "MyAwesomeSwitch", mySwitch);
};
The core logic built within HAP-node.js and Homebridge is located wihtin the getServices prototype function of mySwitch object.
We will instanciate our services in this function. We will also define which getter and setter of each characteristic of each service it shall call on every requests received from Homekit.
We need to instanciate :
- an
AccessoryInformationservice containing:- a
Manufacturercharacteristic - a
Modelcharacteristic - a
SerialNumbercharacteristic
- a
- a
Switchservice containing:- an
Oncharacteristic - the only required characteristic of this service
- an
Unlike AccessoryInformation service’s characteristics, which are readable and can be set at plugin initialization, the On characteristic is writable and require a getter and setter.
mySwitch.prototype = {
  getServices: function () {
    let informationService = new Service.AccessoryInformation();
    informationService
      .setCharacteristic(Characteristic.Manufacturer, "My switch manufacturer")
      .setCharacteristic(Characteristic.Model, "My switch model")
      .setCharacteristic(Characteristic.SerialNumber, "123-456-789");

    let switchService = new Service.Switch("My switch");
    switchService
      .getCharacteristic(Characteristic.On)
      .on('get', this.getSwitchOnCharacteristic.bind(this))
      .on('set', this.setSwitchOnCharacteristic.bind(this));

    this.informationService = informationService;
    this.switchService = switchService;
    return [informationService, switchService];
  }
};
We will now write the logic of On characteristic getter and setter within dedicated prototype function of mySwitch object.
We will make the following assumption regarding the RESTful API offered by the switch :
- GET requests on http://192.168.0.10/api/status returns a
{ currentState: }reflecting the switch current state - POST requests on http://192.168.0.10/api/order sending a
{ targetState: }reflecting desired target state set the switch state
We will use request and url modules to perform our HTTP requests.
Our configuration object, defined within Homebridge global configuration JSON, will contain both URLs described above.
const request = require('request');
const url = require('url');

function mySwitch(log, config) {
  this.log = log;
  this.getUrl = url.parse(config['getUrl']);
  this.postUrl = url.parse(config['postUrl']);
}

mySwitch.prototype = {

  getSwitchOnCharacteristic: function (next) {
    const me = this;
    request({
      url: me.getUrl,
      method: 'GET',
    },
    function (error, response, body) {
      if (error) {
        me.log('STATUS: ' + response.statusCode);
        me.log(error.message);
        return next(error);
      }
      return next(null, body.currentState);
    });
  },

  setSwitchOnCharacteristic: function (on, next) {
    const me = this;
    request({
      url: me.postUrl,
      body: {'targetState': on},
      method: 'POST',
      headers: {'Content-type': 'application/json'}
    },
    function (error, response) {
      if (error) {
        me.log('STATUS: ' + response.statusCode);
        me.log(error.message);
        return next(error);
      }
      return next();
    });
  }
};
We can now add our newly created plugin to Homebridge by installing it globally:
npm install -g switch-plugin
Open the config.json file located in your Homebridge directory in your favorite text editor. In the accessory section, add info to the array:
{
  "accessory": "MyAwesomeSwitch",
  "getUrl": "http://192.168.0.10/api/status",
  "postUrl": "http://192.168.0.10/api/order"
}
Restart Homebridge and you shall now be able to switch on and off this fake switch through Home app on your iOS device.