Autoscaling with AWS
Nathan Gaberel12 min read
What is autoscaling? Do I need it?
A good application should always be able to send responses to users’ requests within reasonable delay. That’s the whole point of application scaling.
Most of the time the scaling process is predictable and happens over a long period of time (weeks, months or even years). In this kind of situation, those in charge of the infrastructure will have an idea of how many servers their app needs in advance. This gives them sufficient time to acquire, provision and deploy the extra instances ahead of time.
However consider the following scenario: we’re about to publish on our website a critical piece of news that’s going to attract a lot of attention. We expect a huge peak of users over a relatively short period of time (a couple of days maybe) and then, in all likelihood, the metrics will slowly go back to their usual level over a longer period (days, weeks or maybe even months). We wouldn’t want to #BreakTheInternet so we need to prepare.
In this scenario the scaling process is hectic and unpredictable. We obviously need more servers to handle the extra load, but how many exactly? Eyeballing the resources needed to handle the peak might be difficult, especially if it’s the first time we’re getting out of our load “comfort zone”.
Even then, assuming we decide to trust our totally-made-up-formula-which-is-definitely-not-just-a-cross-multiplication on the number of instances we’ll need, should we provision and deploy them ourselves? If so, when is the right time to do so? Twenty-four hours in advance to give us time to test our new servers or 20 minutes before prime time to reduce the costs? The same kind of question applies for instances termination.
Autoscaling is the solution to this problem. Quoting Wikipedia:
Autoscaling […] is a method used in cloud computing, whereby the amount of computational resources in a server farm, typically measured in terms of the number of active servers, scales automatically based on the load on the farm.
With autoscaling, no need to try and compute the number of instances required, or devise a plan to be able to deploy new instances manually in case we reach maximum capacity. The autoscaling system automatically starts and stops instances depending on the load it’s facing.
If you want your application to be able to handle a rapidly-changing load then you might want to look into autoscaling. It’s also a good way to minimise your bills if you’re already using a hosting provider that supports it (only using the resources you need and no more).
Amazon Web Services (AWS) offers such an autoscaling system to be used with it’s Elastic Compute Cloud (EC2) instances.
What we need
An AWS account
If you already have an Amazon account you can just login to AWS, if not you can create an account from the same page.
During your first login, AWS will ask for your credit card details, however you’ll be eligible to AWS Free Tier which includes most of AWS services for free during one year (with limitations of course).
Remember to activate Multi-Factor Authentication for more security.
A certificate
Once your AWS account is created, go to Security Credentials > X.509 Certificates and click Create new certificate. This certificate will be used to log in to the instances.
A stateless application
Whether it’s a website or the backend of some software, an application needs to be stateless in order to be able to increase the number of application servers effortlessly.
Setting it up
Amazon’s implementation of autoscaling is based on their infamous EC2 instances. Auto scaling groups are collections of an indefinite number of such instances, but managed as one single entity.
The goal of this section is to create a simple auto scaling group (aka ASG in the rest of this article). To do so we will also need a template to create the instances from.
It all starts with one button: go to Services > EC2 then Autoscaling > Launch Configurations and …

It will take us to the Launch Configuration creation page.
Launch configuration
The launch configuration (LC) is the template mentioned above. It creates the machines running in our auto scaling group. For example when our instances reach a predefined threshold AWS will spin up a new EC2 instance based on this launch configuration.
Creating a launch configuration is exactly like configuring a new EC2 instance, except it won’t actually launch any! We’re asked to choose an AMI and an instance type (nano, micro, medium, etc) and optionally configure storage and security groups. If you already have some experience with EC2 you shouldn’t have any trouble doing this.
Finally after we’ve picked a name for our launch configuration and reviewed it, it’s time to save it.
Auto scaling group
Now that our launch configuration is ready we can move on to creating an auto scaling group.
An auto scaling group is a set of identical EC2 instances: they’re all based on the same launch configuration so they have the same (virtual) hardware specs and the same provisioning. An ASG lives in a VPC (Virtual Private Cloud, a private network basically) and we can assign it several subnets. If you don’t already have one, now is the time to create one for your ASG.
We can optionally create scaling policies to dictate how and when EC2 instances should be created or destroyed. One option is to “Keep this group at its initial size” and not configure any scaling policies. This is self explanatory: nothing will happen to our instances until we update the configuration.
However it starts becoming interesting when we do configure scaling policies. After we’ve chosen the default size of the ASG and reviewed its configuration, let’s save it and create scaling policies!
Scaling policies
Scaling policies give fine control over when and how to create and destroy instances in an ASG.
A policy is usually set off by an alarm (although it’s not always necessary to configure one: we could also trigger policies manually) and takes an action. After its creation a new instance has a warm-up period during which it doesn’t contribute to the ASG metrics.
You could imagine a scaling policy as a sentence:
When the average CPU utilization is greater than 80%, then launch 2 more instances.
- The “when” part of this sentence is the alarm ;
- the “then” part is the action.
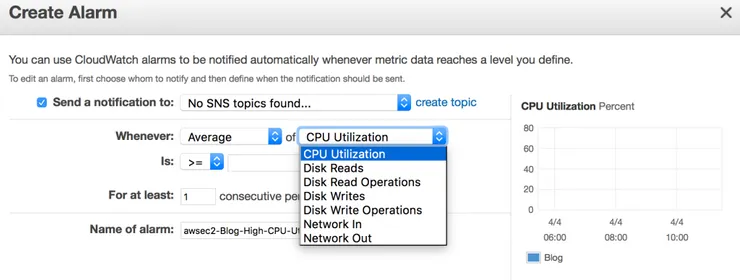
Alarms
Alarm are triggered when certain instance metrics reach a predefined threshold. The figure below shows the metrics available to the alarm.
Actions
There are three types of action:
- add instance(s)
- remove instance(s)
- set the number of instances

Application lifespan
Now that our application has a variable number of instances to live on comes the time to deploy it. We’ll discuss the two critical moments in an application lifespan: provisioning and deployment.
Provisioning an ASG
We’ve mentioned it quickly earlier but the crucial point here is that launch configurations are linked to an AMI (Amazon Machine Image). An AMI describes the filesystem content of a server and thus makes for a very good provisioning system.
Creating a provisioning image
We’ll want to create a provisioning AMI that contains our dependencies (eg. nginx, php, mysql, etc). We’ll then use it with our launch configuration.
Let’s assume for now we have a provisioned instance we wish to use as our base for our future instances. We’ll create a new AMI from this instance:
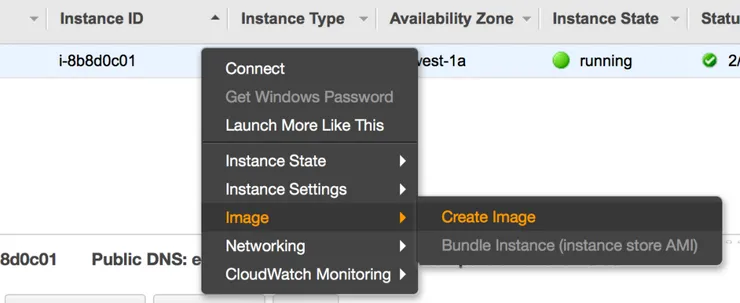
We’ll be asked to name this image, I suggest using some sort of versioning scheme (eg. MyAwesomeBlog-v1) to avoid accidentally reprovisioning our fleet with the same AMI (or even worse: reprovisioning it with an older image)!
There are a couple of ways to provision an instance to build an AMI from. In both cases we’ll need to create a new EC2 instance (one that’s not part of the ASG) to build it from, using the AMI we want to use as a base (latest Ubuntu LTS for example). From there we could either configure the system and install dependencies manually or use a provisioning tool such as Ansible.
(Re)provisioning
Once we have a new AMI we wish to deploy to our instances we’ll need to tie it to a launch configuration.
However, here comes the tricky part: AWS doesn’t allow us to change the AMI of a launch configuration. The only option left is to copy our existing LC and use the new AMI with the copied LC.
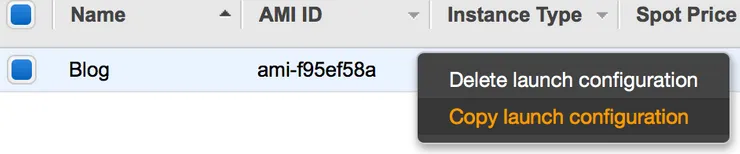
When creating the LC copy, remember to edit the AMI to use the new one!
Once that is done we can edit the ASG to use the new LC. From now on the newly launched instances will have the new provisioning.
What’s left for us to do is to progressively replace the old instances of our ASG with newer ones (based on the new AMI). To do that the easiest is to manually executes scaling policies. There are several strategies here: if there are n instances in the ASG we could either launch n new instances, wait for them to spin up (warm-up time) and then destroy all n old ones or create and delete instances one at a time (doing so n times). This depends mostly on how much time and budget we have (having more instances costs more, obviously).
Deploying to an ASG
Having a variable-sized fleet of servers for our application gives rise to two problems:
- A new version of our app has been released, we want to deploy it. How do we know which (and how many) servers we should deploy it to?
- A scaling policy has been executed and a new instance has been launched inside our ASG. Should we deploy the app to this new instance ourselves?
CodeDeploy config
Fortunately AWS provides an ASG-compatible deployment tool: CodeDeploy. It takes care of all deployment-related tasks and solves the two aforementioned problems.
When creating an “Application” within CodeDeploy, we’ll need to enter a name for it and choose the ASG we’re using.
CodeDeploy implements different deployment configurations. Quoting AWS website:
OneAtATime(most secure): deploys to one instance at a time. Succeeds if all instances succeed. Fails after the very first failure. Allows the deployment to succeed for some instances, even if the overall deployment fails.AllAtOnce(least secure): deploys to up to all instances at once. Succeeds if at least one instance succeeds. Fails after all instances fail.HalfAtATime: deploys to up to half of the instances at a time. Succeeds if at least half of the instances succeed; fails otherwise. Allows the deployment to succeed for some instances, even if the overall deployment fails.
Depending on the expected resilience of our application we can opt for the quickest, least secure option (AllAtOnce) up to the most secure option (OneAtATime) which will probably take a while if we have a large amount of instances.
The final step is to configure a Service Role to grant access to the instances to CodeDeploy. Such a Role can be created in the IAM interface and should be attached to the policy “AmazonEC2FullAccess”.
The deployment configuration is specified by an appspec.yml file that should be placed in the root of our code directory.
GitHub config
In order to deploy we now need to send our code/binaries to CodeDeploy. For this we have two options: upload them to S3 or use GitHub. For the purpose of this article we’ll assume the code is hosted on GitHub (which is a much better option anyway).
Create a new deployment within CodeDeploy and choose “My application is stored in GitHub” as a Revision Type. If that’s not the case already you’ll be asked to connect your GitHub account (oAuth) to AWS. From there we’ll be able to choose which repository and which commit we want to deploy. Click “deploy now” and that’s it!
This is all very manual, so the next step is to have a nice auto-deploy feature. Wouldn’t it be nice if our application was automatically deployed when a new commit on “master” has passed the CI tests? This great post from AWS blog explains it in detail.
Going further
There are a couple points we haven’t mentioned yet:
- Step adjustments: scaling policies can either provide simple scaling (this is what we’e been using until now) or step scaling. Step scaling enables us to change the magnitude of the action based on the size of the alarm threshold breach:
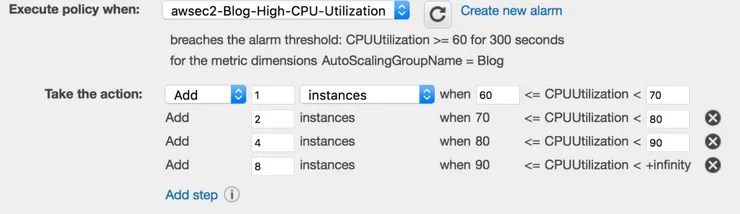
In this example we’re creating a variable amount of new instances based on the CPU level (above the alarm level). - Scheduled actions: actions don’t have to be triggered by an alarm (and thus be part of a scaling policy) to be executed, they can also be scheduled. That’s very useful if we want to, say, lower our application resources every week-end.
- ASGs also support spot instances (cheaper, otherwise unused EC2 instances, availability depends on your bid).
- Our application will need a load balancer to distribute requests. AWS’s Elastic Load Balancers work out of the box with ASG.
Now that our ASG is setup, everything should be running smoothly. The reliability of our application depends, of course, a lot on our scaling policies. Depending on the requirements we have to meet it might be more interesting to scale out quickly and then scale in slowly (à la Netflix), or the other way round, or another entirely different strategy.
However I cannot stress enough how important having the right scaling policies is. From Netflix’s article:
Auto scaling is a very powerful tool, but it can also be a double-edged sword. Without the proper configuration and testing it can do more harm than good. A number of edge cases may occur when attempting to optimize or make the configuration more complex.
Happy scaling!