Demystifying Building Native Modules for React Native
Kamile Matulenaite6 min read

You’ve just released a new native SDK. Could you bring more business to your company by releasing on a cross-platform development framework?
Maybe you’re a developer, longing for a native module of an open-source platform API (or even the third-party SDK above 🙄) to be released. Could you fast-track the development yourself?
You could build your own module. With React Native, this becomes a straightforward process.
Let’s talk about React Native for a second.
Why React Native
For those unfamiliar with React Native: it is a cross-platform development framework allowing you to create native apps for iOS and Android. Using React, you can maintain two platforms using the same codebase, allowing faster development, iteration and knowledge-sharing.
With this framework, we have two sides; JavaScript and Native. Between the two is a bridge, allowing bidirectional and asynchronous communication. This is the power of React Native, on top of a multitude of other benefits.
In 2020, we see the likes of Facebook, Bloomberg and Shopify [1] using React Native to develop their mobile applications, amongst others in the Fortune 500. With over 11 million Javascript developers [2] and more companies switching to React Native, releasing your technology for React Native could bring more growth.
We’ve seen other cross-platform development frameworks like Flutter and Xamarin climb the ranks over the last few years, but React Native is still gaining popularity and ever-increasing its performance as it gets more mature.
So hopefully that’s convinced you to consider releasing a Native Modules for React Native if you’re releasing Native SDKs. Let’s break down how you’d do that.
Native to React Native
As previously mentioned, communication from the native world to React Native is asynchronous. What this means is that any values must be sent through asynchronous callbacks, promises and events, each sent on a batched message queue. This is the architecture as of April 2020; there is currently a re-architecture of the React Native internals and due to be released mid-2020 [3].
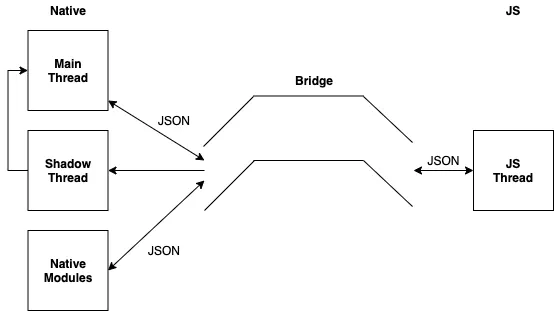
On the native side:
- The main thread is responsible for the UI.
- The shadow queue is responsible for layout calculations.
- Each native module has its own thread (Android shares a thread pool)
On the JavaScript side:
- JavaScript VM thread which runs the bundled JS code and sends instructions to the native threads via the bridge.
The two sides communicate over the bridge using the message queue.
JavaScript knows about your native modules at runtime - there’s a JSON representation of each Native Module (consisting of module id, method id and arguments) and we can call methods on the Native Module this way.
For the other direction, Native to JavaScript, we can use promises, callbacks and event to transfer data.
To read more about the React Native internals and the upcoming re-architecture, read this article [4].
Module structure
To get started building your native module, there are a number of tools to help set up the skeleton of your project. For example:
- https://github.com/react-native-community/bob
- https://github.com/brodybits/create-react-native-module
- https://github.com/peggyrayzis/react-native-create-bridge
We like Bob, as your library will then come pre-configured with TypeScript and support for Kotlin and Swift. If you’ve got any other favourites, let us know!
For project structure, if you’ve chosen Bob, the library should now have the following project structure:
- /ios
- /android
- /src
    - index.tsx
- /yourExampleApp
    - package.json
    - ...
- ...
In the iOS and Android folders, you’ll want to have your native SDK code - either available in your project or using git submodules to keep the version control.
Exposing iOS Modules
On the iOS Side, there are two languages at play: Objective-C and Swift. You can write the native module entirely in Objective-C, or write methods in Swift and expose them to Objective-C by using the @objc attribute.
The steps are then as follows:
-
Create a Bridging Header file (Objective-C,
.hfile) - Here you’ll import:#import "React/RCTBridgeModule.h" #import <React/RCTLog.h> #import <React/RCTEventEmitter.h> #import <React/RCTConvert.h> -
Create a Bridging Command file (Objective-C,
.mfile), expose modules withRCT_EXPORT_MODULEand Expose methods withRCT_EXPORT_METHOD#import <React/RCTBridgeModule.h> #import <React/RCTEventEmitter.h> #import "MyModule.h" @interface RCT_EXTERN_MODULE(MyModule, NSObject) RCT_EXTERN_METHOD(myMethodWithNoParams) RCT_EXTERN_METHOD(myMethodWithAPromise:(NSString)input resolver:(RCTPromiseResolveBlock)resolve rejecter:(RCTPromiseRejectBlock)reject) + (BOOL)requiresMainQueueSetup { return YES; } @end -
Define event emitters, implementing the Delegate pattern.
#import <React/RCTBridgeModule.h>
#import <React/RCTEventEmitter.h>
#import <React/RCTConvert.h>

@interface RCT_EXTERN_MODULE(MyModuleEmitter, RCTEventEmitter)

// Create a singleton for the EventEmitter class

- (id)allocWithZone:(NSZone *)zone {
  static MyModuleEventEmitter *shared = nil;
  static dispatch_once_t onceToken;
  dispatch_once(&onceToken, ^{
  shared = [super allocWithZone:zone];
  });
  return shared;
  }

- (BOOL)requiresMainQueueSetup
  {
  return YES;
  }

@end
For Swift, a good pattern to use is the Observer-Command-Emitter pattern:
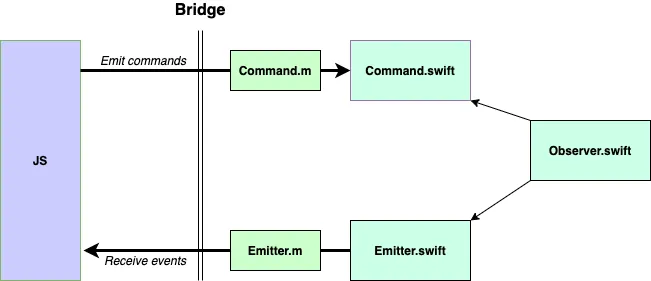
This ties together your observer which implements the delegate, the event emitter which triggers events and the commands which will be the methods to expose to JavaScript. In the above code snippets, you’ve seen the Objective-C .m files for the above.
Exposing Android Modules
The steps for Android are similar:
-
Create a
ReactPackageto declare the modules to expose:package com.mymodule import java.util.Arrays import com.facebook.react.ReactPackage import com.facebook.react.bridge.NativeModule import com.facebook.react.bridge.ReactApplicationContext import com.facebook.react.uimanager.ViewManager class MyPackage : ReactPackage { override fun createNativeModules(reactContext: ReactApplicationContext): List<NativeModule> { return Arrays.asList<NativeModule>(MyModule(reactContext)) } override fun createViewManagers(reactContext: ReactApplicationContext): List<ViewManager<*, *>> { return emptyList<ViewManager<*, *>>() } } -
Create your module extending
ReactContextBaseJavaModuleto declare the methods to expose using@ReactMethod. Implement listeners to emit events.package com.mypackage import com.facebook.react.bridge._ import com.facebook.react.modules.core.DeviceEventManagerModule.RCTDeviceEventEmitter import java.util.\* enum class MyModuleError(val errorCode: String, val message: String) { INPUT_NOT_RECOGNISED( "INPUT_NOT_RECOGNISED", "Input was not of the correct format."), } class MyModule(reactContext: ReactApplicationContext) : ReactContextBaseJavaModule(reactContext), MyListener { companion object { const val MODULE_NAME = "MyModule" } override fun getName(): String { return MODULE_NAME } private fun createErrorHandler(promise: Promise): (TokenError) -> Unit { return fun(error: TokenError) { promise.reject(error.errorCode, error.message) } } @ReactMethod fun myMethodWithNoParams() { doSomething(); } @ReactMethod fun myMethodWithAPromise(input: String, promise: Promise) { val handleError = createErrorHandler(promise) doSomethingWithInputSucceeds(input)?. let { promise.resolve("MY_METHOD_SUCCESS") } ?: kotlin.run { handleError(ModuleError.INPUT_NOT_RECOGNISED) } } override fun onEventSuccess(result: String, message: String) { val body: WritableMap = Arguments.makeNativeMap(mapOf( "result" to result, "message" to message )) this.reactApplicationContext.getJSModule(RCTDeviceEventEmitter::class.java) .emit("MyModule/eventSucceeded", body) } override fun onEventFailure(error: String, message: String) { val body: WritableMap = Arguments.makeNativeMap(mapOf( "error" to error, "message" to message )) this.reactApplicationContext.getJSModule(RCTDeviceEventEmitter::class.java) .emit("MyModule/eventFailed", body) } }
Your new module
Now you’ve exposed your native modules and methods to React Native and can continue to build on top of them. What’s left is to import them from NativeModules from react-native and you’re ready to create your app:
In /src of your Native Module:
import {
  NativeModules,
  DeviceEventEmitter,
  NativeEventEmitter,
} from "react-native";

export const { MyModule, MyModuleEventEmitter } = NativeModules;
Now you’re ready to go. Just yarn add react-native-myModule and import the above MyModule and emitters to get going.
To launch your development experience and quality to the next level:
- Add a React Native deployment pipeline - https://blog.theodo.com/2019/04/react-native-deployment-pipeline/
- Add end-to-end tests with Detox - https://github.com/wix/Detox
- Add support for offline - https://dev.to/reactnativeradio/rnr-157-building-great-offline-ready-apps-in-react-native-with-josh-warwick
What a great development set up!
Summary
Once that’s all ready, your module is tested, you’re ready to publish. Very straightforward with npm publish[5].
There you have it. A native module which can now be released to the JavaScript tech community - perhaps bringing in more customers for your business or fast-tracking your next development track.
Hopefully this article gave you an overall idea of where to start building your bridge module. If you have any questions, let us know, we’d be happy to help!
For more resources, the following are some good resources:
- https://reactnative.dev/docs/native-modules-ios
- https://reactnative.dev/docs/native-modules-android
- https://hackernoon.com/react-native-bridge-for-ios-and-android-43feb9712fcb
- http://nightlyclosures.com/2018/02/09/writing-a-react-native-ios-module-in-swift/
Sources + links:
- https://reactnative.dev/showcase
- https://www.slashdata.co/free-resources/state-of-the-developer-nation-17th-edition?utm_source=BlogPost&utm_medium=Text
- https://github.com/react-native-community/discussions-and-proposals/issues/40
- https://www.reactnative.guide/3-react-native-internals/3.1-react-native-internals.html
- https://docs.npmjs.com/cli/publish