Getting started with NestJS & TypeORM (+bonus NestJS Admin)
Quentin Somerville10 min read

NestJS is one of the most complete NodeJS Framework in the NodeJs ecosystem.
It is based on Express and written in TypeScript.
This article will show you how to start an application in less than 30 minutes.
Throughout this article, we will create an application to store and retrieve dogs.
How did we end up choosing NestJS? The answer in this article!
Prerequisites
- The nestJS CLI
npm i -g @nestjs/clito generate the template of our code - A database, for example you can use postgresql
Start an empty application
nest new project && cd project
Let’s start the project by running yarn start:dev.
If you chose npm as package manager, in the installation run npm run start:dev, then go to http://localhost:3000 to see the first page.
It should print ‘Hello World’
The project is now initialized!
Create dogs controllers and module
Before creating your first route, you need to create a module called dogs.
The modules are used by nestJS to organize the architecture of the application.
To create a new module run nest generate module dogs (or the shorthand: nest g mo dogs).
This command will create a new folder called dogs with a dogs.module.ts file inside.
It will also update the main module with a reference to the newly created dogs module.
You also need a controller: nest generate controller dogs (or the shorthand: nest g co dogs).
This command creates the dogs controller in the dogs folder.
It will also update the dogs module to import and use the newly created controller.
A test file dogs.controller.spec.ts has also been created.
At this point, you have one new folder with 3 files: the module, the controller and the test file.
├── node_modules
├── src
│   ├── dogs
│       ├── dogs.controller.spec.ts
│       ├── dogs.controller.ts
│       ├── dogs.module.ts
│   ├── app.controller.spec.ts
│   ├── app.controller.ts
│   ├── app.module.ts
│   ├── app.service.ts
│   ├── main.ts
├── package.json
├── yarn.lock
Create first GET and POST route.
Let’s create your first route in the controller.
To create it, use the @Get decorator.
import { Controller, Get } from '@nestjs/common';

@Controller('dogs')
export class DogsController {
    @Get()
    getDogs() {
        return 'we get all dogs';
    }
}
If you go to http://localhost:3000/dogs you will see the sentence you wrote before.
Now let’s create the other routes you need for your controller:
import { Controller, Get, Post, Body, Param, Delete, Put } from '@nestjs/common';
import { DogDto } from './interfaces/dog.dto';
@Controller('dogs')
export class DogsController {
@Get()
getDogs() {
return 'we get all dogs';
}
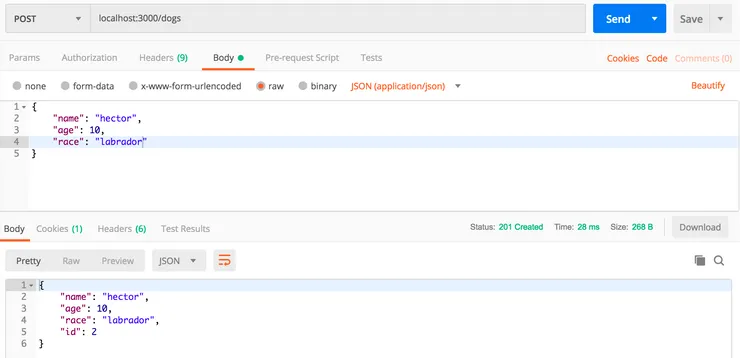
@Post()
create(@Body() dogDto: DogDto) {
return dogDto;
}
@Get(':id')
findOne(@Param('id') id: string) {
return `we get the dog with the id ${id}`;
}
@Put(':id')
update(@Param('id') id: string) {
return `we update the dog with the id ${id}`;
}
@Delete(':id')
remove(@Param('id') id: string) {
return `we delete the dog with the id ${id}`;
}
}
In the Post route the DogDto object has been introduced.
This DTO (Data Transfer Object) is a representation of the dog object: it will list all the fields present.
Example of a Dog DTO class:
export class DogDto {
    readonly name: string;
    readonly age: number;
    readonly breed?: string;
}
Let’s save this DTO in a dogs/interfaces/dog.dto.ts file.
Our dog will have a name, an age, and an optional breed.
This DTO will define the format of the POST request you need to create the object.
It is possible to test all these routes with Postman and see that it returns what is set in the controller.
As you can see when testing your routes, nestJS uses the standard HTTP response codes for REST APIs (201 for POST, 200 for GET etc…)
Use the newly created route to save objects and return them
To be able to create dogs with this route, you will need a database set up to store the dogs into it.
For this example, using postgresql, I’d only have to run createdb dogs.
Then, to be able to manipulate this database, I will use an ORM. I chose typeorm, which is also written in Typescript and recommended by the nestJS developers.
Add typeorm and pg to the dependencies of the project: yarn add @nestjs/typeorm typeorm pg
Create Dogs entity
Now let’s create the dogs table in your database.
Let’s create a dogs/dogs.entity.ts to represent your dog object.
import { Entity, PrimaryGeneratedColumn, Column } from 'typeorm';

@Entity()
export class Dog {
   @PrimaryGeneratedColumn()
   id: number;

   @Column({length: 50})
   name: string;

   @Column()
   age: number;

   @Column({length: 100, nullable: true})
   breed: string;
}
In this example you are going to create 4 fields in your dogs table.
The id field will be the primary key and auto incremented each time you create a dog.
Then you have the name, the age and the breed of your dog.
You can notice that a nullable attribute has been added to the breed field.
Create dogs repository
Now, to manipulate the Dogs objects, you need to create a repository dogs/dogs.repository.ts.
A repository is a class with the @EntityRepository decorator.
For now, let’s create the function that saves a dog.
import { Dog } from './dogs.entity';
import { EntityRepository, Repository } from 'typeorm';
import { DogDto } from './interfaces/dog.dto';

@EntityRepository(Dog)
export class DogRepository extends Repository<Dog> {
  createDog = async (dogDto: DogDto) => {
    return await this.save(dogDto);
  };
}
At this point the project architecture looks like the following.
├── node_modules
├── src
│   ├── dogs
│       ├── interfaces
│           ├── dogs.dto.ts
│       ├── dogs.controller.spec.ts
│       ├── dogs.controller.ts
│       ├── dogs.entity.ts
│       ├── dogs.module.ts
│       ├── dogs.repository.ts
│   ├── app.controller.spec.ts
│   ├── app.controller.ts
│   ├── app.module.ts
│   ├── app.service.ts
│   ├── main.ts
├── package.json
├── yarn.lock
Set up database configuration
You’re almost there!
Now you have to configure your database configuration to use the repository.
- Create a .env file which should be like this.
Be careful, you need to replace the username.
APP_SECRET=!NotSoSecretChangeMe!
TYPEORM_CONNECTION=postgres
TYPEORM_USERNAME=yourusername
TYPEORM_PASSWORD=!ChangeMe!
TYPEORM_HOST=localhost
TYPEORM_PORT=5432
TYPEORM_DATABASE=dogs
TYPEORM_ENTITIES=**/*.entity.ts,src/**/*.entity.ts
TYPEORM_MIGRATIONS=migration/*.ts
TYPEORM_MIGRATIONS_DIR=migration
TYPEORM_SYNCHRONIZE=false
- Add these lines in the main module to say to nestJS that you will use the database configuration written in the .env file with the ORM Typeorm
import { Module } from '@nestjs/common';
import { TypeOrmModule } from '@nestjs/typeorm';
import { AppController } from './app.controller';
import { AppService } from './app.service';
import { DogsModule } from './dogs/dogs.module';

@Module({
  imports: [
    TypeOrmModule.forRoot(),
    DogsModule,
  ],
  controllers: [AppController],
  providers: [AppService],
})
export class AppModule {}
- Add theses lines in the dogs module file to indicate that you will use the dog entity and the dog repository in the controller.
import { Module } from '@nestjs/common';
import { DogsController } from './dogs.controller';
import { TypeOrmModule } from '@nestjs/typeorm';
import { Dog } from './dogs.entity';
import { DogRepository } from './dogs.repository';

@Module({
  imports: [TypeOrmModule.forFeature([Dog, DogRepository])],
  controllers: [DogsController],
})
export class DogsModule {}
Create and run migrations
Now let’s update your database with the changes you made.
To do so you will have typeorm generate the migration.
Adding these 3 lines in the scriptsof the package.json will allow us to generate and run migrations.
"scripts": {
   "migration:generate": "ts-node node_modules/.bin/typeorm migration:generate",
   "migration:run": "ts-node node_modules/.bin/typeorm migration:run",
   "migration:revert": "ts-node node_modules/.bin/typeorm migration:revert"
}
Then run yarn migration:generate -n CreateDogs.
It will generate a migration file with 2 functions: up and down.
The up function will create the table with the fields listed in the entity file.
The down function will drop the table in case you need to rollback the migration.
import { MigrationInterface, QueryRunner } from "typeorm";

export class CreateDog1553858330734 implements MigrationInterface {

    public async up(queryRunner: QueryRunner): Promise<any> {
        await queryRunner.query(`CREATE TABLE "dog" ("id" SERIAL NOT NULL, "name" character varying(50) NOT NULL, "age" integer NOT NULL, "breed" character varying(100), CONSTRAINT "PK_c0911b1d44db6cdd303c6d6afc9" PRIMARY KEY ("id"))`);
    }

    public async down(queryRunner: QueryRunner): Promise<any> {
        await queryRunner.query(`DROP TABLE "dog"`);
    }
}
This file has been generated by TypeORM by parsing all the files matching **/*.entity.ts,src/**/*.entity.ts (as set up in the .env file).
Then it compares these files and the database to generate the migrations.
As with any code generated automatically, you should review it before running it.
In this example you can see that the column breed will not be created with the NOT NULL constraint because you set it as nullable in the entity file.
The migration has been added to migration folder and the architecture of the project is now as follows:
├── node_modules
├── migration
│   ├── 1553858330734-CreateDog.ts
├── src
│   ├── dogs
│       ├── interfaces
│           ├── dogs.dto.ts
│       ├── dogs.controller.spec.ts
│       ├── dogs.controller.ts
│       ├── dogs.entity.ts
│       ├── dogs.module.ts
│       ├── dogs.repository.ts
│   ├── app.controller.spec.ts
│   ├── app.controller.ts
│   ├── app.module.ts
│   ├── app.service.ts
│   ├── main.ts
├── package.json
├── yarn.lock
Execute the migrations by running the script yarn migration:run you set up in the package.json.
Let’s have a look at your database to see the new dog table.
dogs=# \d
                     List of relations
 Schema |       Name        |   Type   |       Owner
--------+-------------------+----------+-------------------
 public | dog               | table    | quentinsomerville
 public | dog_id_seq        | sequence | quentinsomerville
 public | migrations        | table    | quentinsomerville
 public | migrations_id_seq | sequence | quentinsomerville
(4 rows)
You can rollback the migration by running yarn migration:revert which will run the down function of the migration file.
Use the repository functions in the controller to store and return the dogs objects
At this point the database is set up.
Now, to be able to read and write your dogs objects to the database, you can use the repository in the controller.
First, to use the repository, you need to inject the dependencies in the controller.
To do so, add these lines at the beginning of the class with the related imports.
import { InjectRepository } from '@nestjs/typeorm';
import { DogRepository } from './dogs.repository';

constructor(
    @InjectRepository(DogRepository) private readonly dogRepository: DogRepository,
  ) {}
After that you can use the createDog function you wrote before in the Post method.
@Post()
create(@Body() dogDto: DogDto) {
    return this.dogRepository.createDog(dogDto)
}
If you call the route with the Post method like before, you will create a dog in the database and the response will include an auto-generated id.
Create Get, Put, Delete routes
To finish this endpoint you should create GET, PUT and DELETE methods.
Let’s start by filling the Repository:
import { Dog } from './dog.entity';
import { EntityRepository, Repository } from 'typeorm';
import { DogDto } from './interfaces/dog.dto';

@EntityRepository(Dog)
export class DogRepository extends Repository<Dog> {
  createDog = async (dogDto: DogDto) => {
    return await this.save(dogDto);
  };

  findOneDog = async (id: string) => {
    return this.findOneOrFail(id);
  };

  updateDog = async (id: string, dogDto: DogDto) => {
    return this.save({ ...dogDto, id: Number(id) });
  };

  removeDog = async (id: string) => {
    await this.findOneOrFail(id);
    return this.delete(id);
  };
}
And you can finish by using these new functions in your controller.
import { Controller, Get, Param, Post, Body, Put, Delete } from '@nestjs/common';
import { InjectRepository } from '@nestjs/typeorm';
import { DogDto } from './interfaces/dog.dto';
import { DogRepository } from './dog.repository';
@Controller('dogs')
@UseGuards(AuthGuard('jwt'))
export class DogController {
constructor(
@InjectRepository(DogRepository) private readonly dogRepository: DogRepository,
private readonly dogService: DogService,
) {}
@Post()
create(@Body() dogDto: DogDto) {
return this.dogService.createDog(dogDto);
}
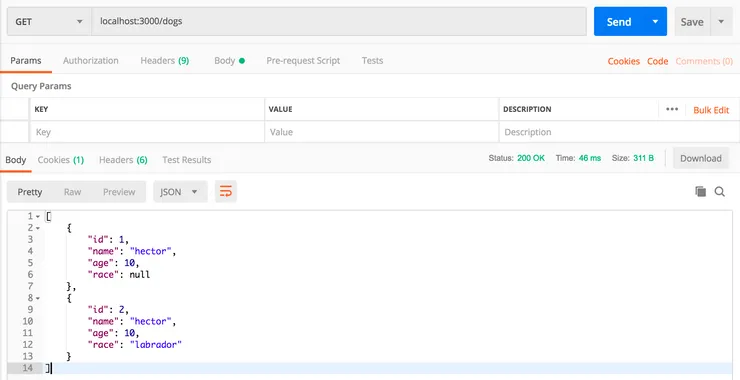
@Get()
findAll() {
return this.dogRepository.find();
}
@Get(':id')
findOne(@Param('id') id: string) {
return this.dogRepository.findOneDog(id);
}
@Put(':id')
update(@Param('id') id: string, @Body() dogDto: DogDto) {
return this.dogRepository.updateDog(id, dogDto);
}
@Delete(':id')
remove(@Param('id') id: string) {
return this.dogRepository.removeDog(id);
}
}
At this point you have a functional endpoint and the Get method will return all the objects created with the Post requests.
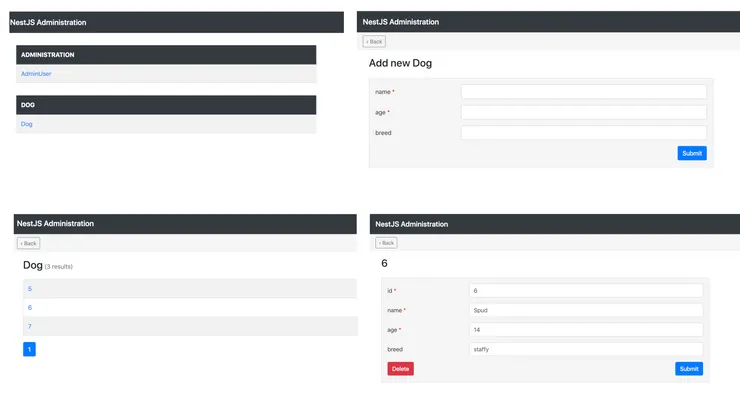
Admin panel
Now if you want to be able to create/update/delete/view all your dogs quickly and easily without hitting the endpoint manually each time, you can install the nestjs-admin using yarn add nestjs-admin and follow the docs in the library to get it set up. You will end up with an easy-to-use interface at localhost:3000/admin.
Next steps could include:
- Refactoring the dog creation logic into a service
- Setting up tests
- Setting up authentication